A spark of holiday creativity can turn an ordinary afternoon into something kids talk about long after the season ends.
The charm of making simple, hands-on projects together brings warmth, laughter, and a sense of excitement as little artists shape their own festive world.
With easy christmas arts and crafts for kids diy, even basic supplies can lead to unexpected results that feel meaningful and fun.
Each project opens a new way for kids to create, imagine, and add their own style to the season.
What follows offers plenty of ideas that keep small hands busy and spirits bright.
Also Read: 163 Christmas Puns Perfect for Social Media
Christmas Arts and Crafts for Kids
A collection of simple paper and coloring projects that kids can enjoy with basic supplies, easy steps, and plenty of room for creativity.
1. Paper Santa Masks
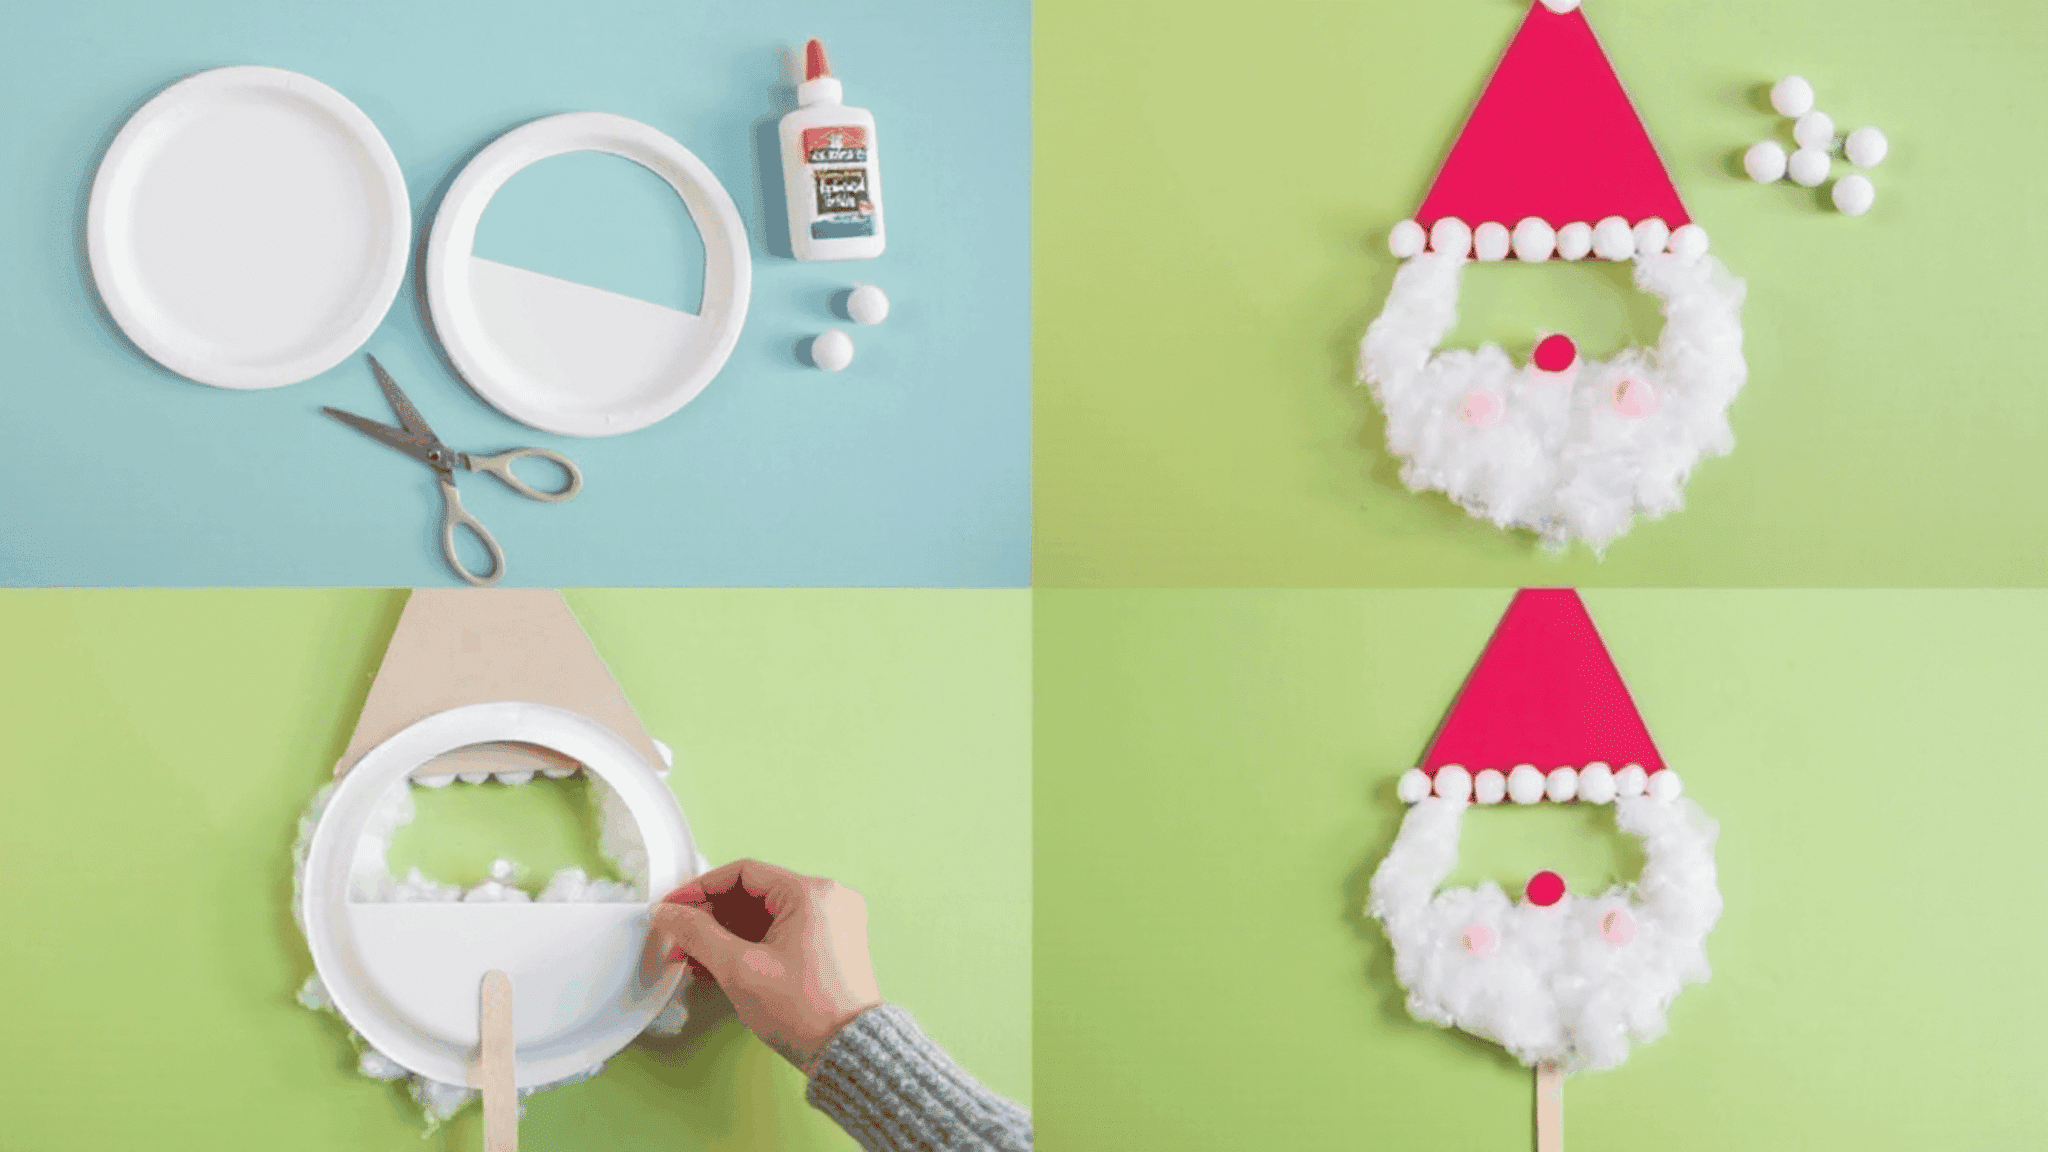
Materials: Cardstock, scissors, glue, cotton balls, crayons or markers, and a craft stick (optional).
Steps:
- Cut a large face-shaped piece from cardstock to form the base of the mask.
- Cut out two round eye holes so kids can see through the mask easily.
- Draw and color Santa’s hat, then glue a cotton ball trim along the bottom of the hat.
- Add cotton balls around the mouth area to create a fluffy beard.
- Attach a craft stick at the bottom if you want the mask to be handheld.
2. Folded Paper Christmas Trees
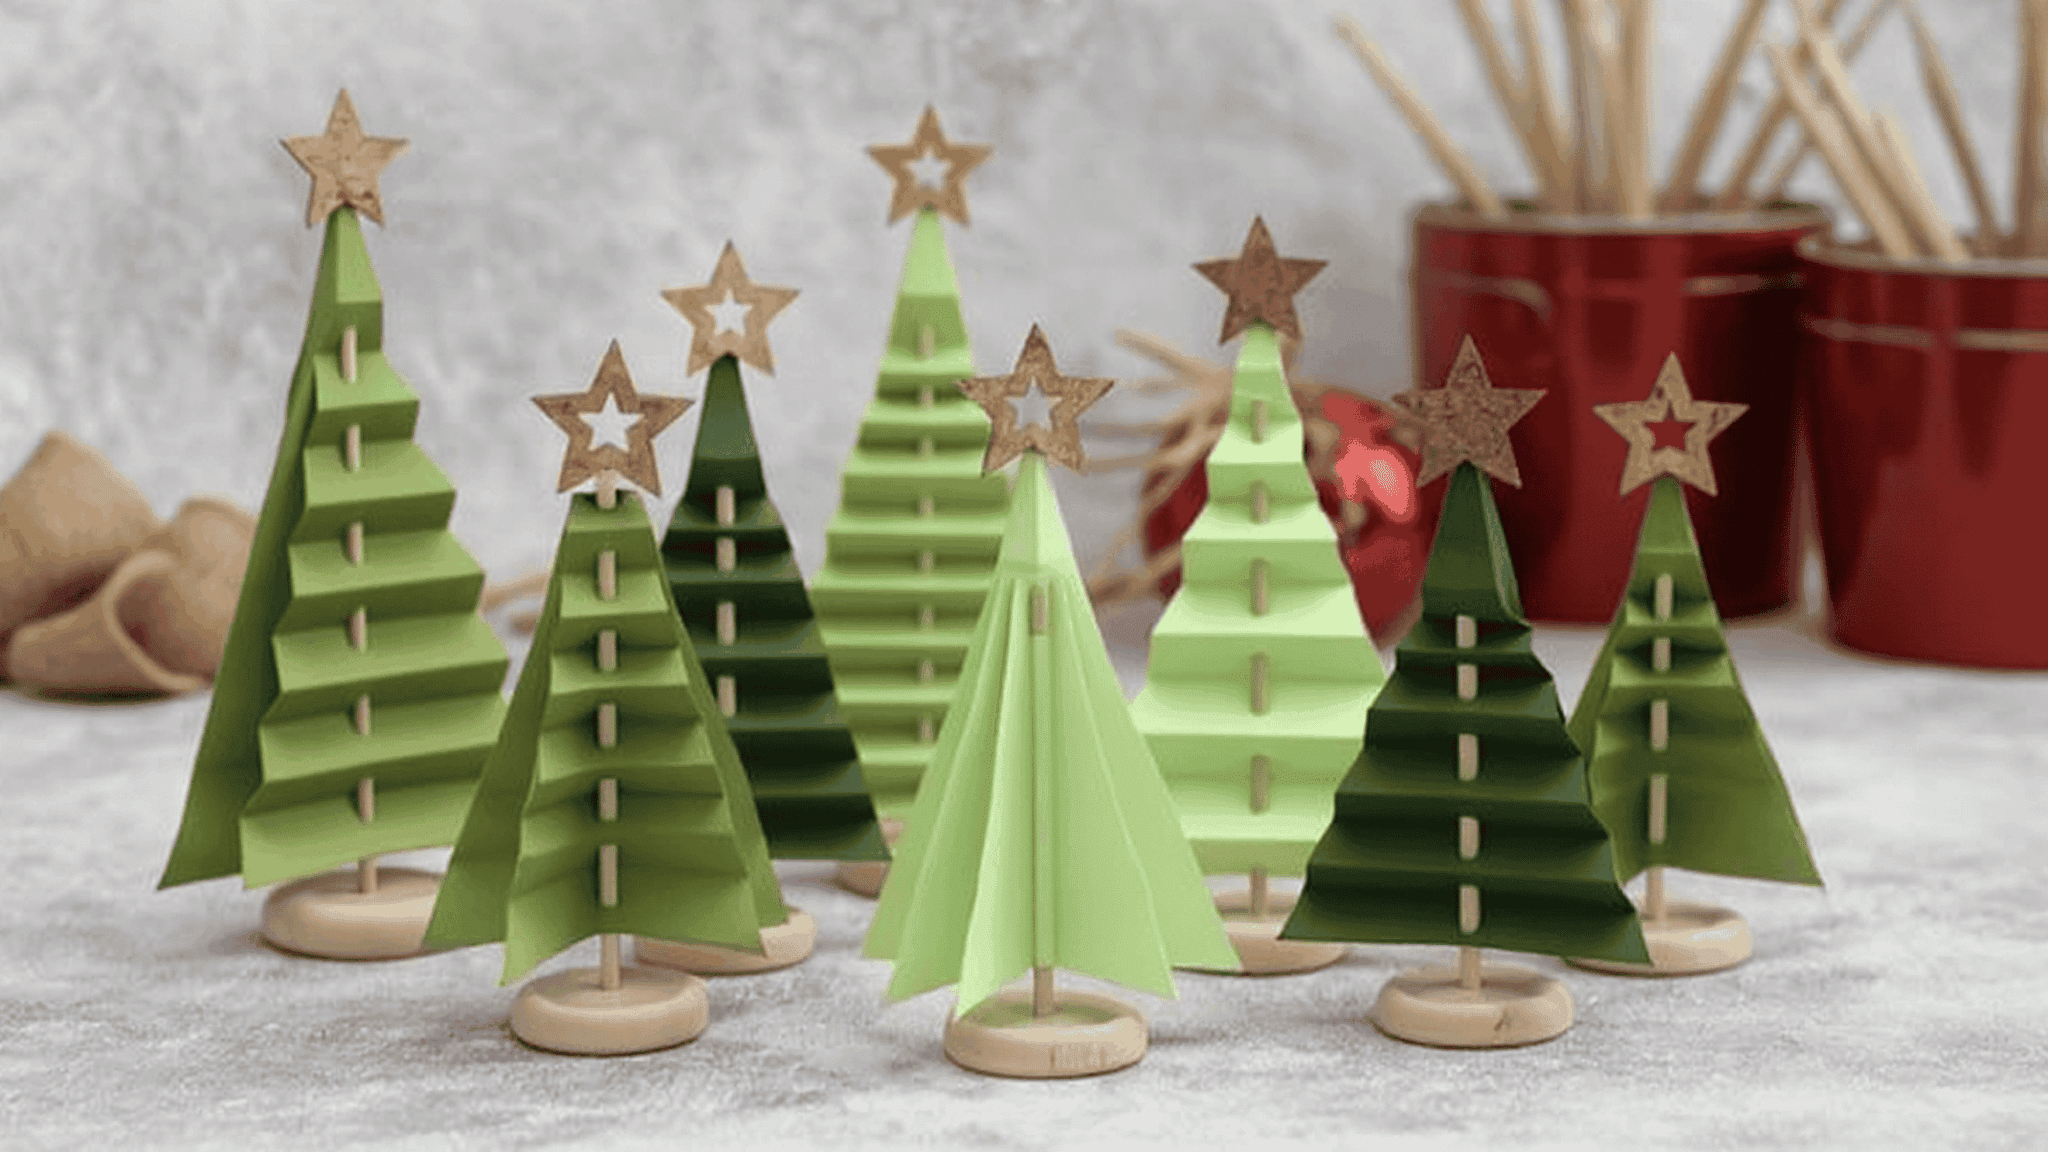
Materials: Green construction paper, scissors, glue, and small stickers or sequins.
Steps:
- Fold the green paper back and forth like an accordion to create even pleats.
- Cut the folded paper into a triangle shape, keeping the folds intact.
- Gently fan out the folds to shape the tree. Glue the base to hold it together.
- Add small stickers or sequins to decorate the tree.
3. Fingerprint Holiday Lights Art
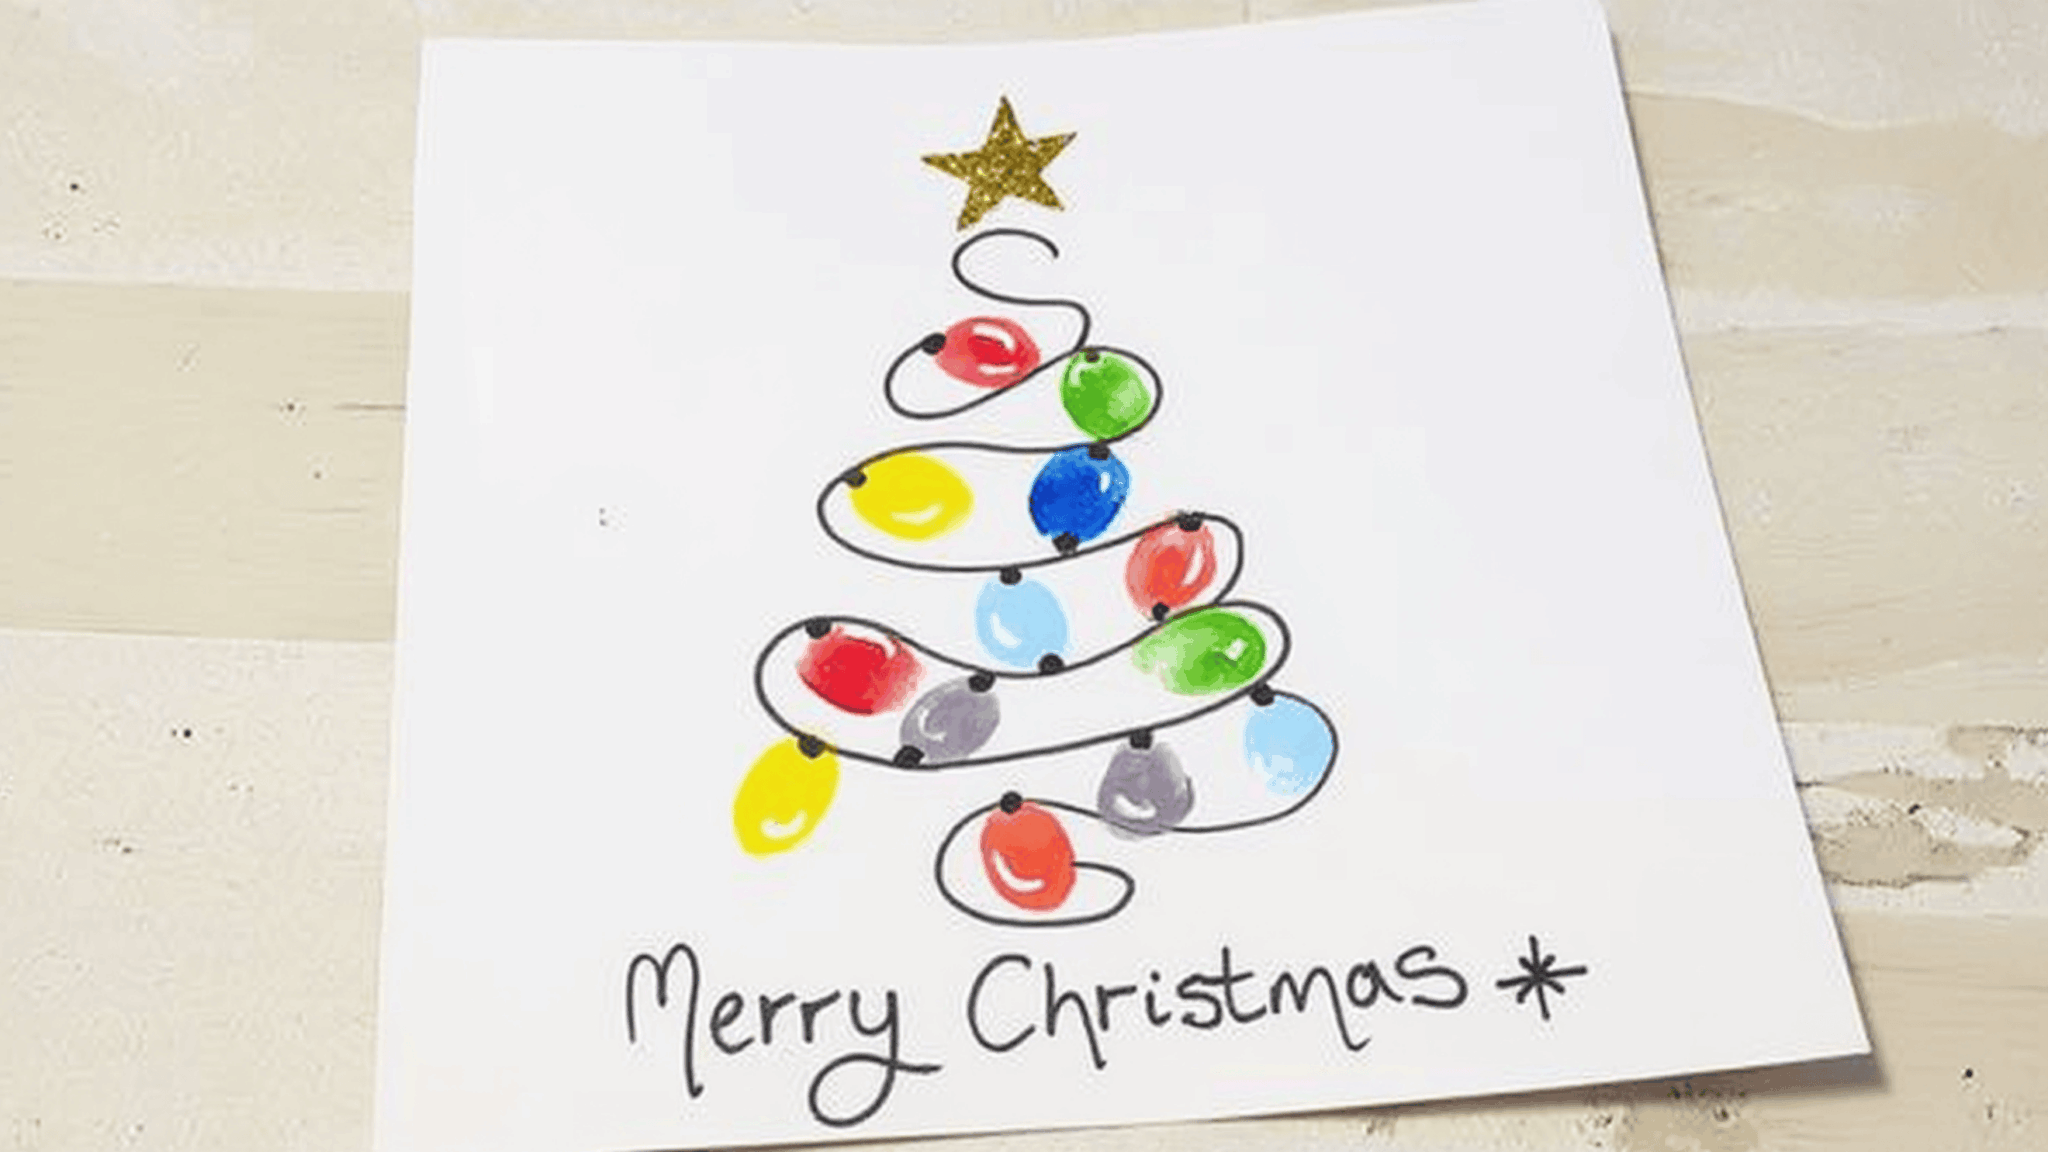
Materials: White paper, black marker, washable paint, and a small paintbrush.
Steps:
- Draw a curved line across the page with a marker to form the light string.
- Add small rectangles along the line to act as bulb sockets. Brush a thin layer of paint onto a child’s fingertip.
- Press fingerprints along the sockets to create the light bulbs. Let the paint dry before handling the artwork.
4. Watercolor Christmas Ornaments on Paper
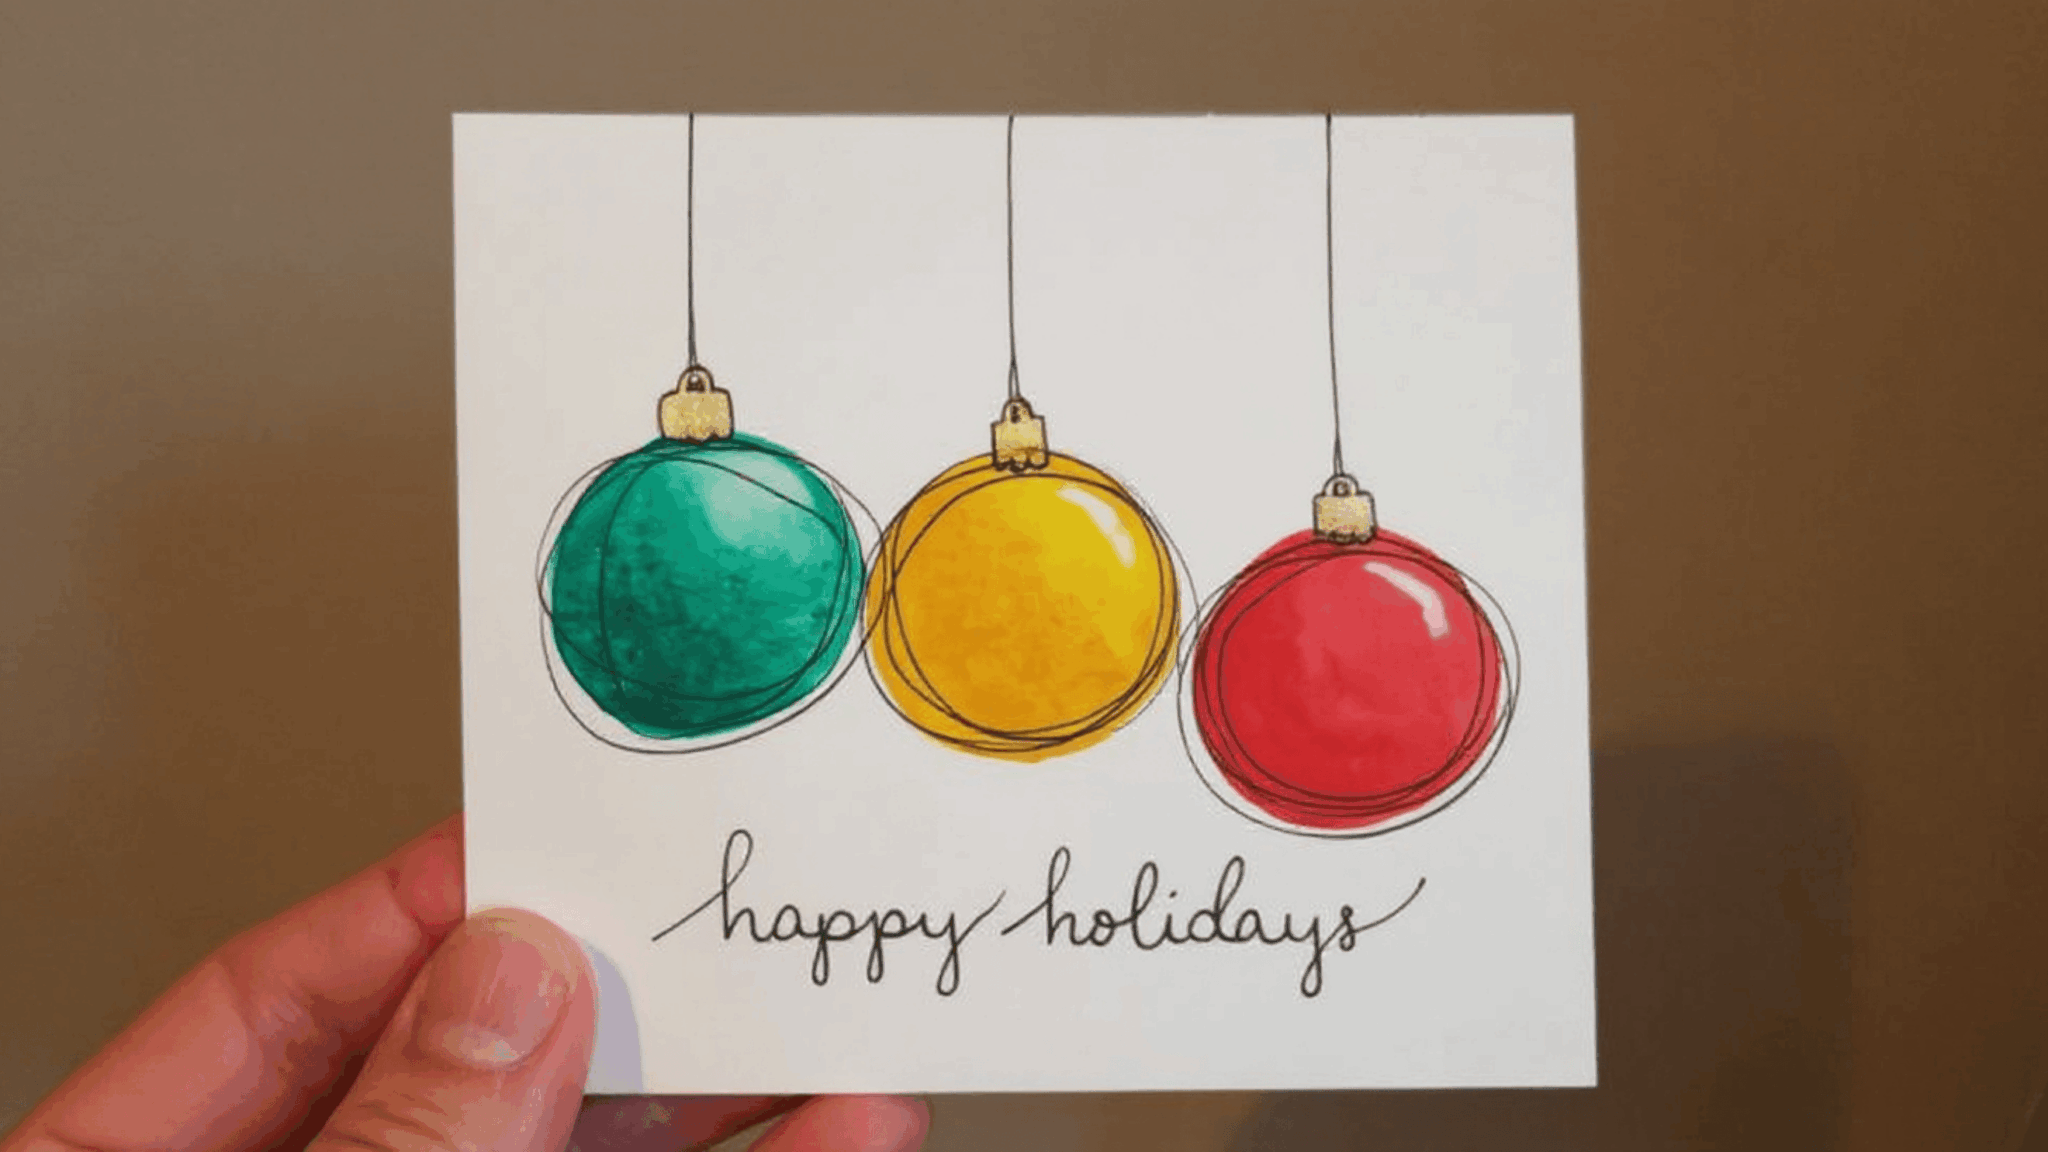
Materials: Watercolor paper, watercolor paints, paintbrushes, a marker, and a cup of water.
Steps:
- Draw several ornament shapes such as circles or teardrops across the page.
- Fill each ornament with watercolor paint, letting the colors blend softly.
- Once dry, outline the shapes with a marker to give them a neat finish.
- Draw small loops and thin lines at the top to make them look like they are hanging.
- Add small details or patterns with a fine marker if desired.
5. Reindeer Handprint Art
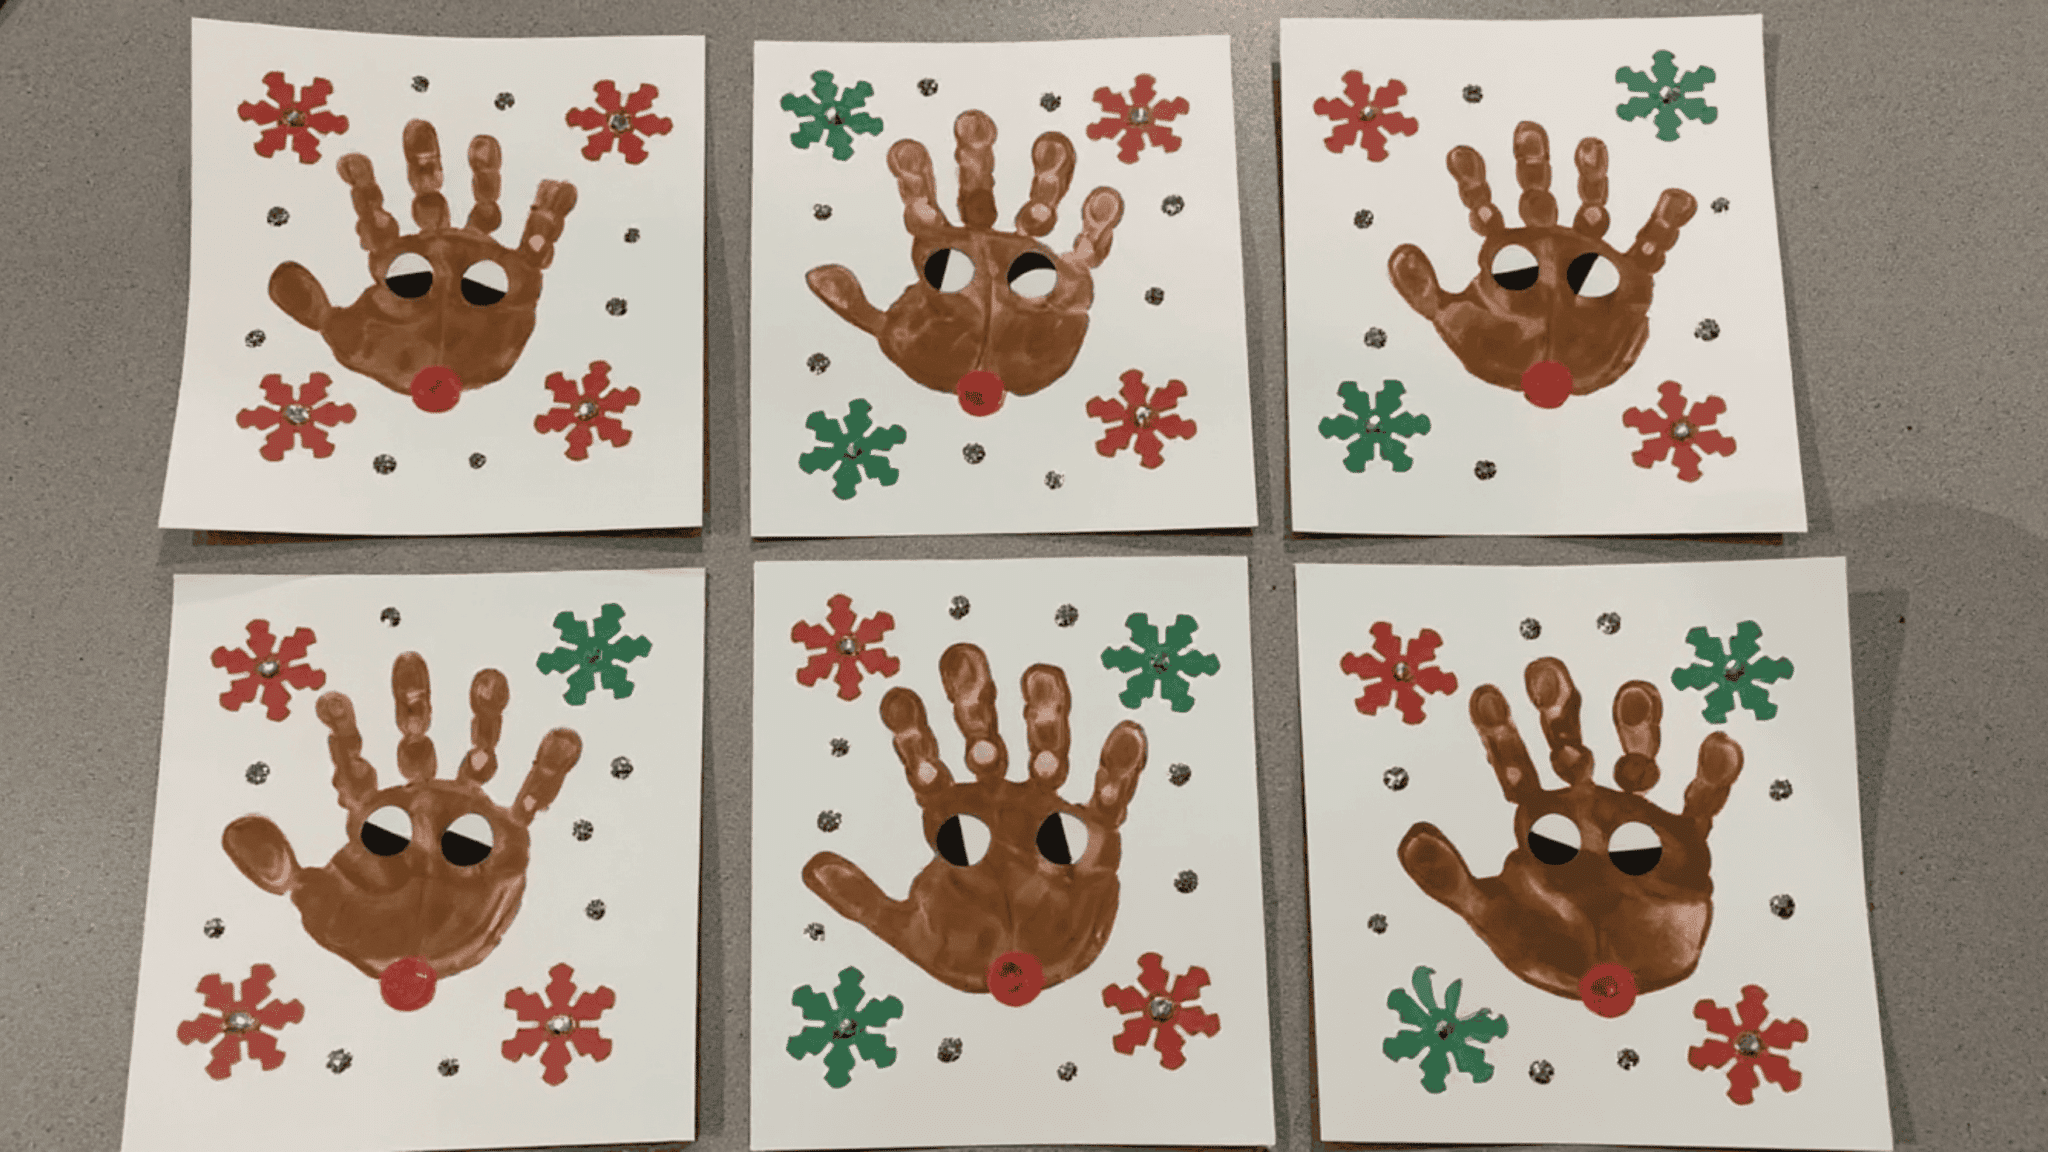
Materials: Brown construction paper, pencil, scissors, glue, googly eyes (optional), and a red sticker or small red circle.
Steps:
- Trace both hands on the brown paper to create antlers and cut them out.
- Cut a large circle from the same paper to form the reindeer’s head. Glue the handprint antlers behind the top of the circle.
- Add eyes and a red circle for the nose. Let it dry flat so all pieces stay secure.
6. Paper Chain Countdown Garland
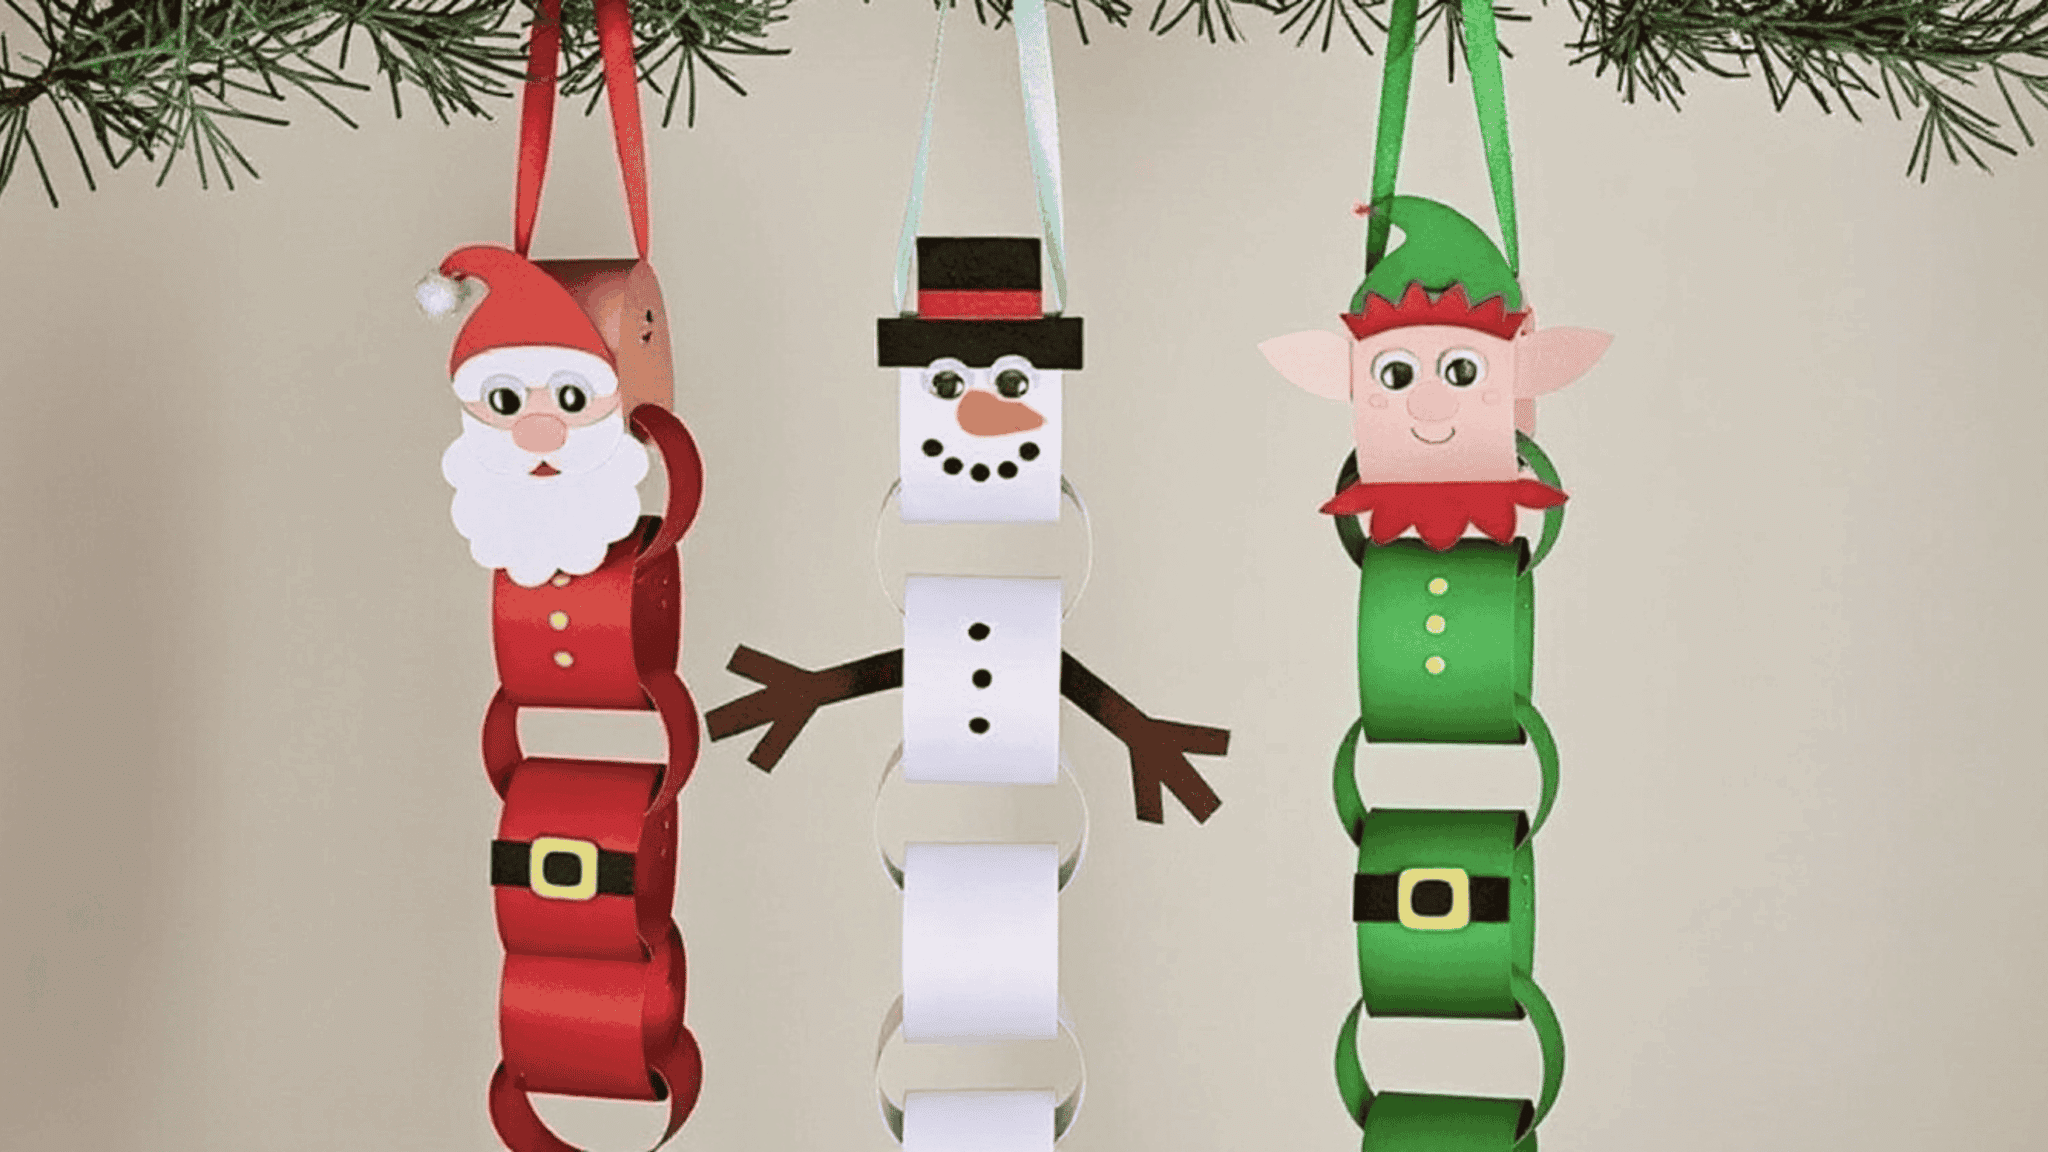
Materials: Construction paper strips, glue stick, markers, and scissors.
Steps:
- Cut several strips of paper in equal lengths. Write numbers or short messages on each strip if you want it to be a countdown.
- Form the first strip into a loop and glue the ends together. Slide the next strip through the loop and glue its ends to create a chain.
- Continue linking the strips until the garland is finished.
7. Snowflake Cutouts
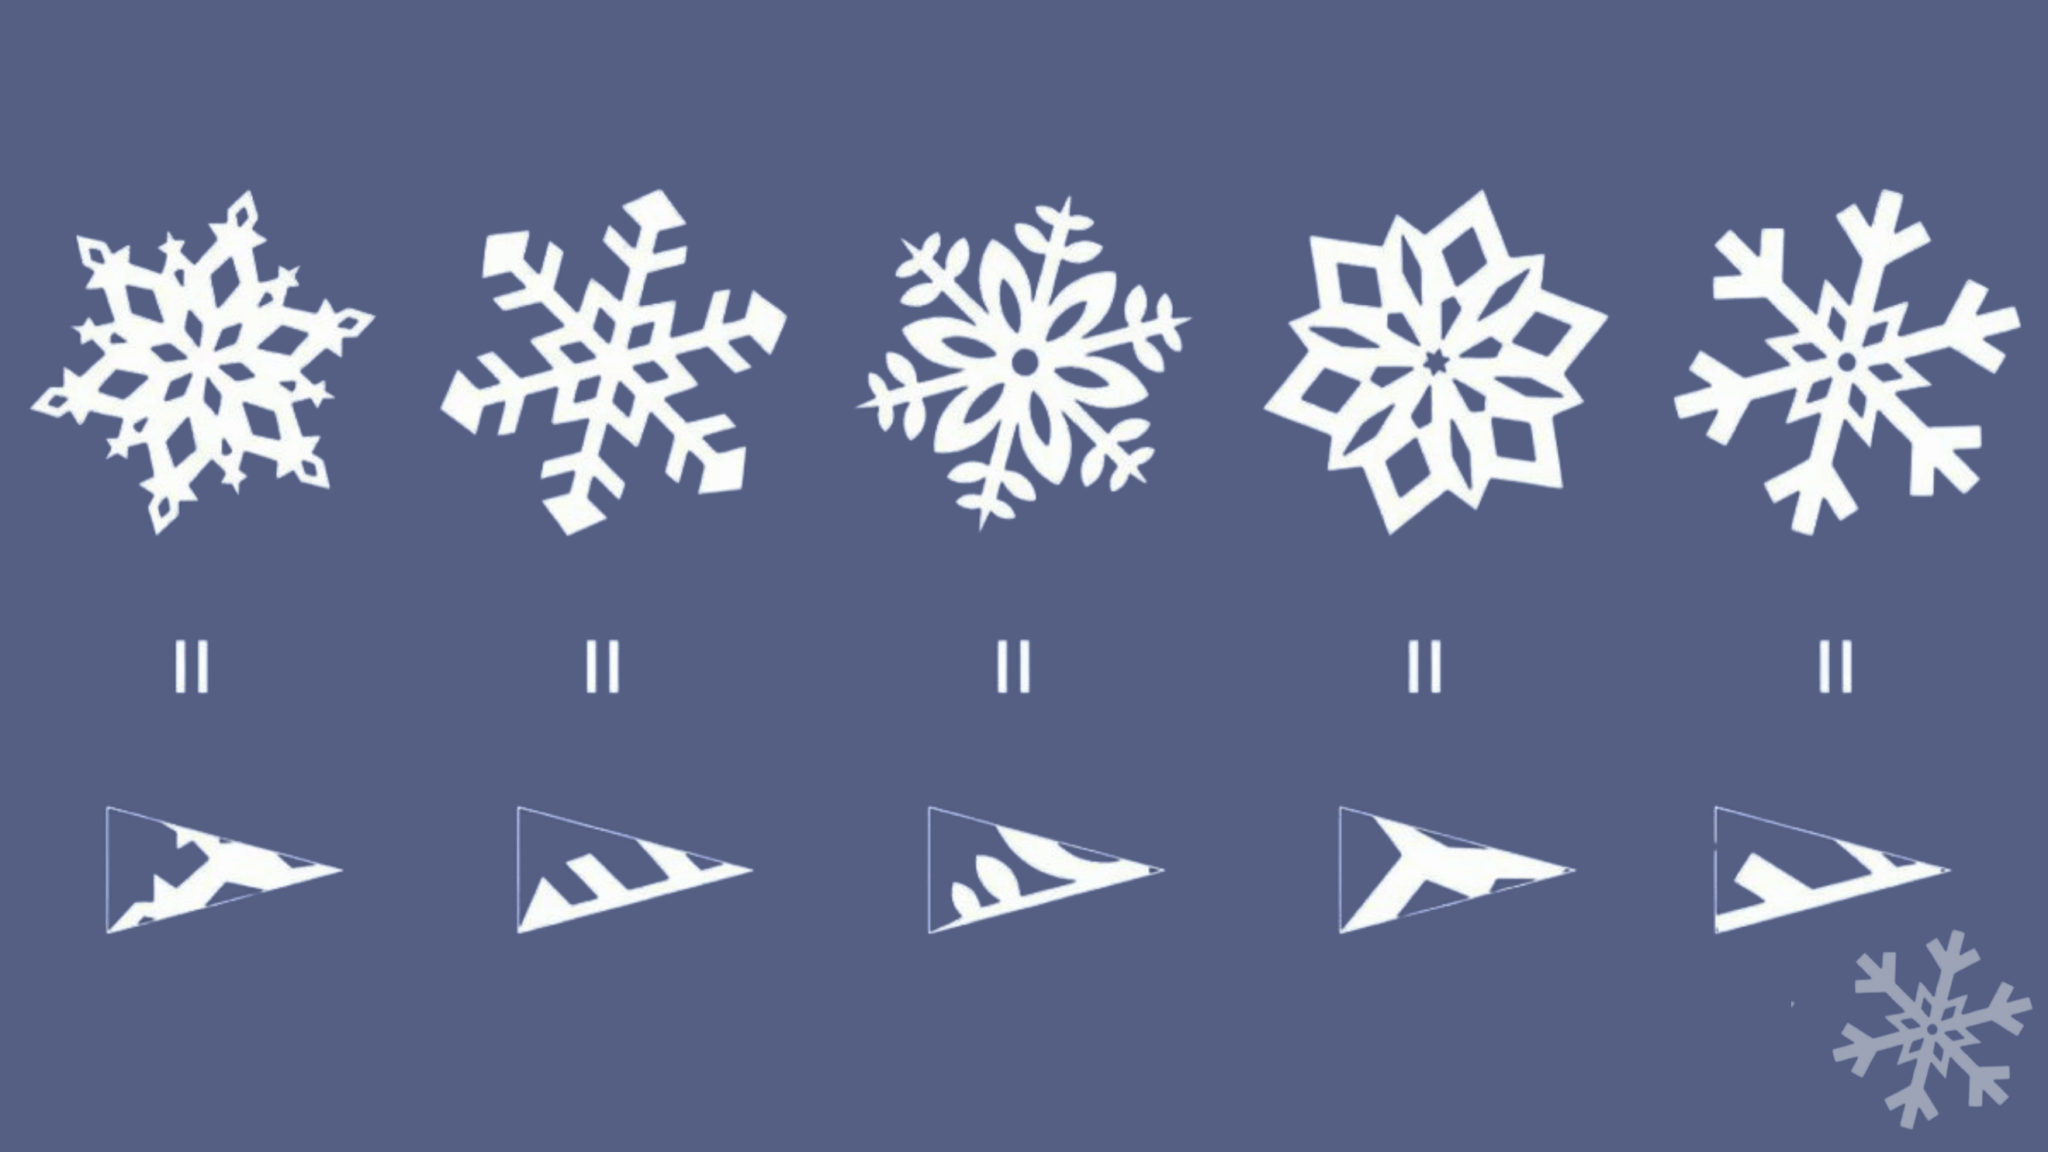
Materials: White paper, scissors, and optional glitter glue.
Steps:
- Fold a square piece of paper in half and then fold it again to make a smaller triangle.
- Fold the triangle one more time to create a narrow shape.
- Carefully snip small shapes along the edges without cutting the folded point. Open the paper slowly to reveal the snowflake pattern.
- Add glitter glue if you want a sparkly finish.
8. Paper Gingerbread House Templates
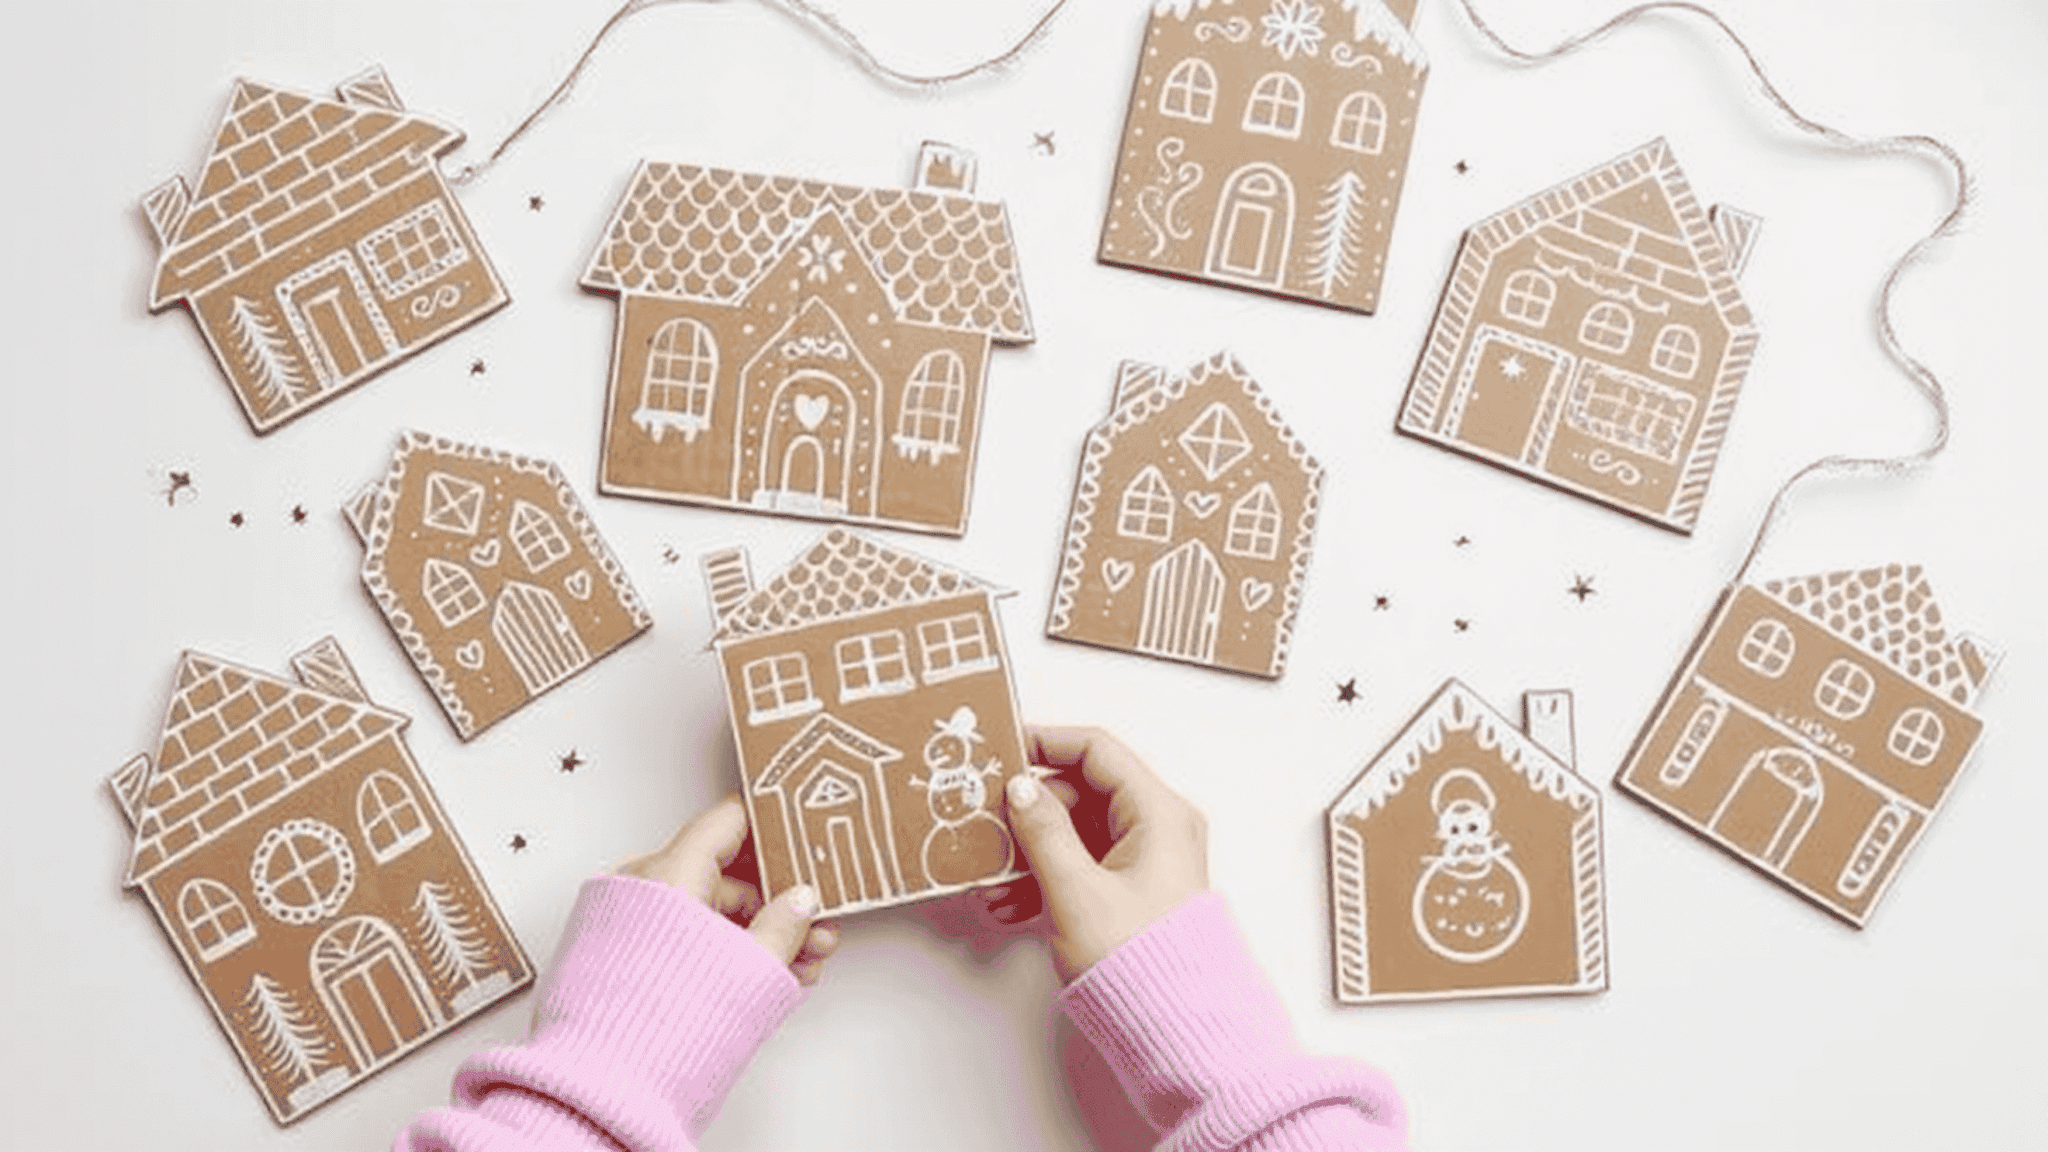
Materials: Brown cardstock, markers, scissors, glue, and cotton balls.
Steps:
- Cut the cardstock into a house shape with a pointed roof. Draw doors, windows, and simple details using markers.
- Glue cotton balls along the roof to mimic snowy edges. Add patterns like dots or lines around the windows to resemble icing.
- Let the house dry completely before displaying it.
9. Paper Candy Cane Stripes Craft
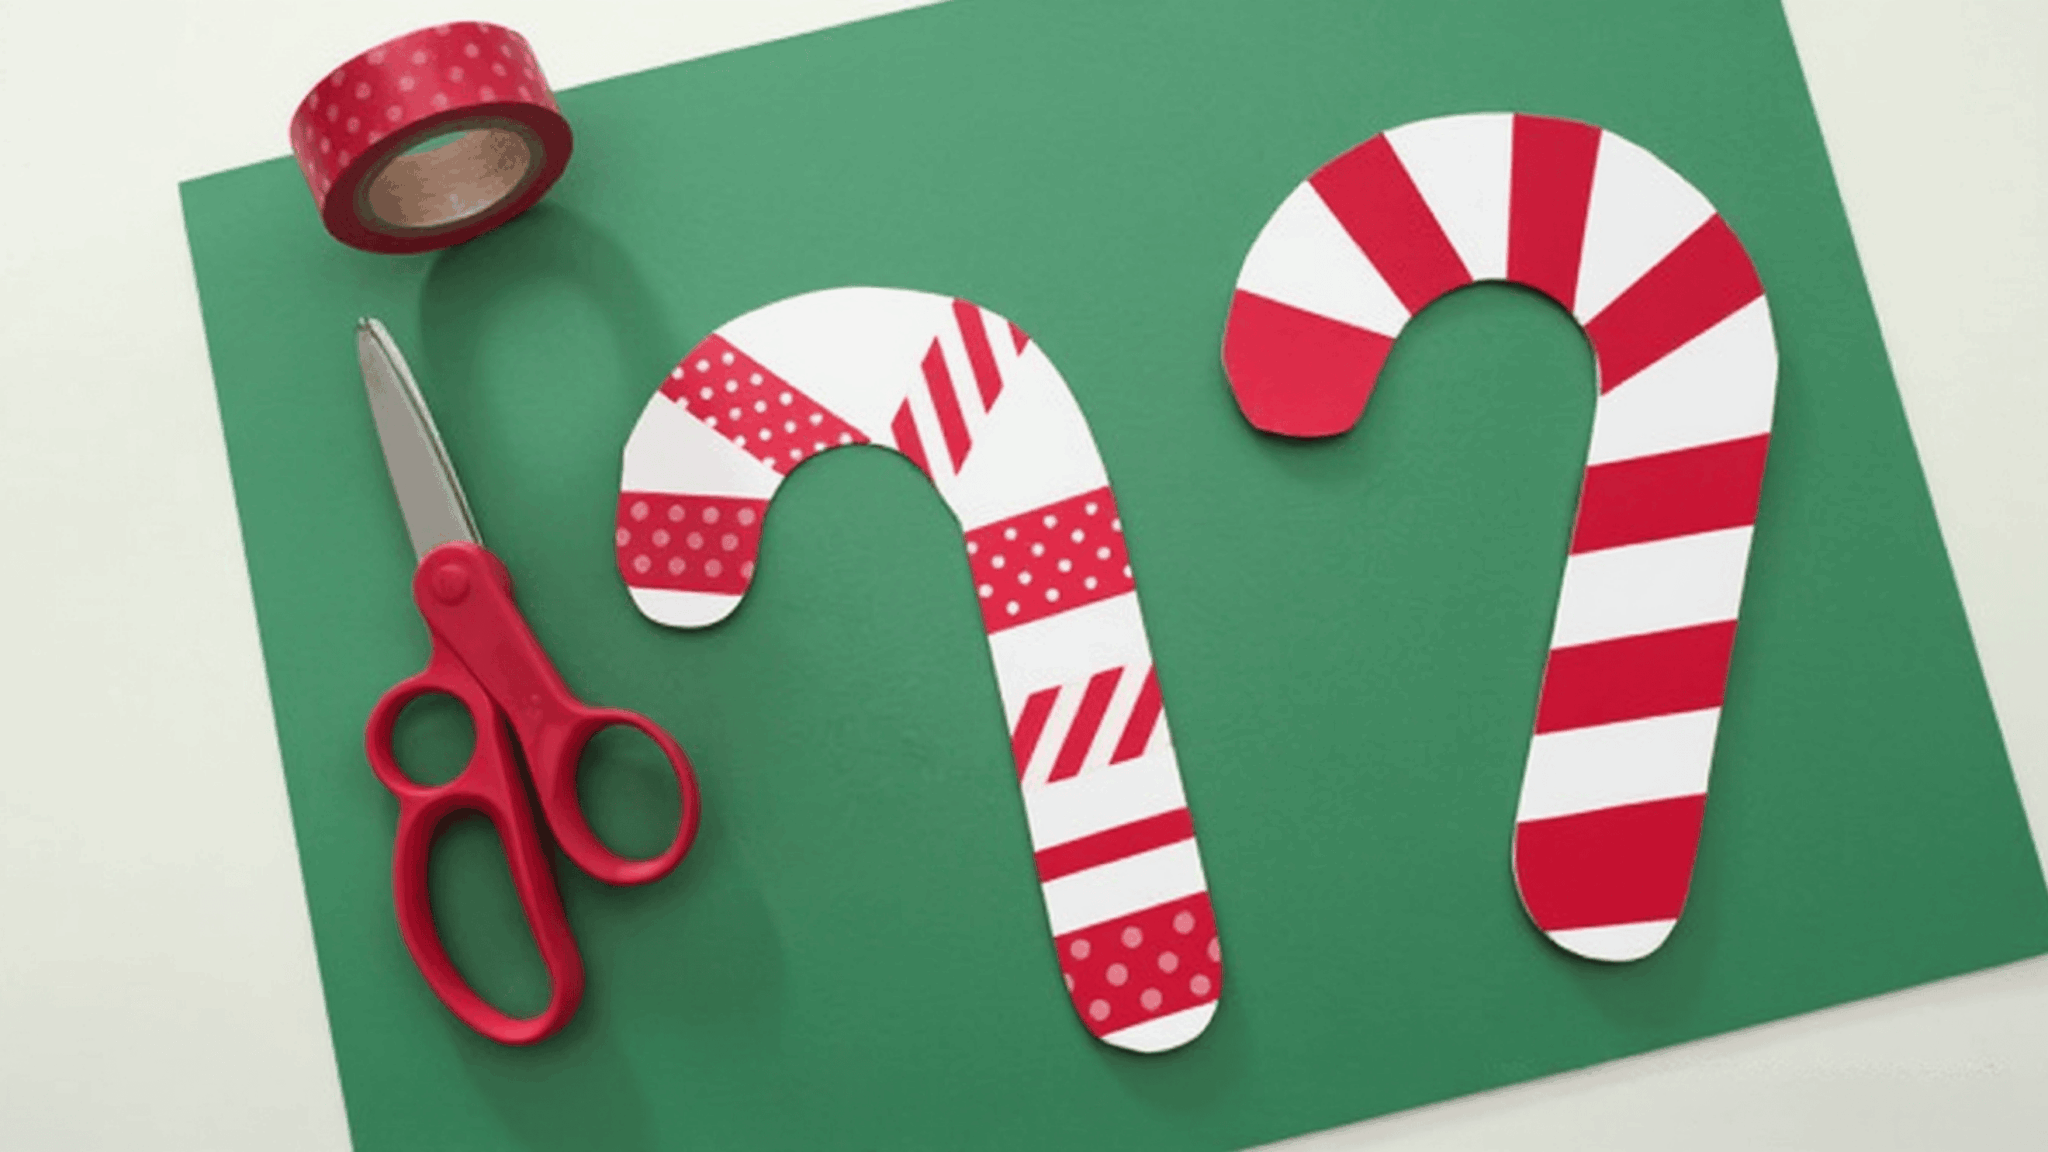
Materials: White paper, red paper strips, scissors, and glue.
Steps:
- Cut a large candy cane shape from the white paper. Cut thin red strips long enough to stretch across the shape.
- Glue the red strips diagonally across the candy cane. Trim any extra paper hanging over the edges.
- Let the craft dry flat so the strips stay secure.
10. Tissue Paper Tree Mosaic
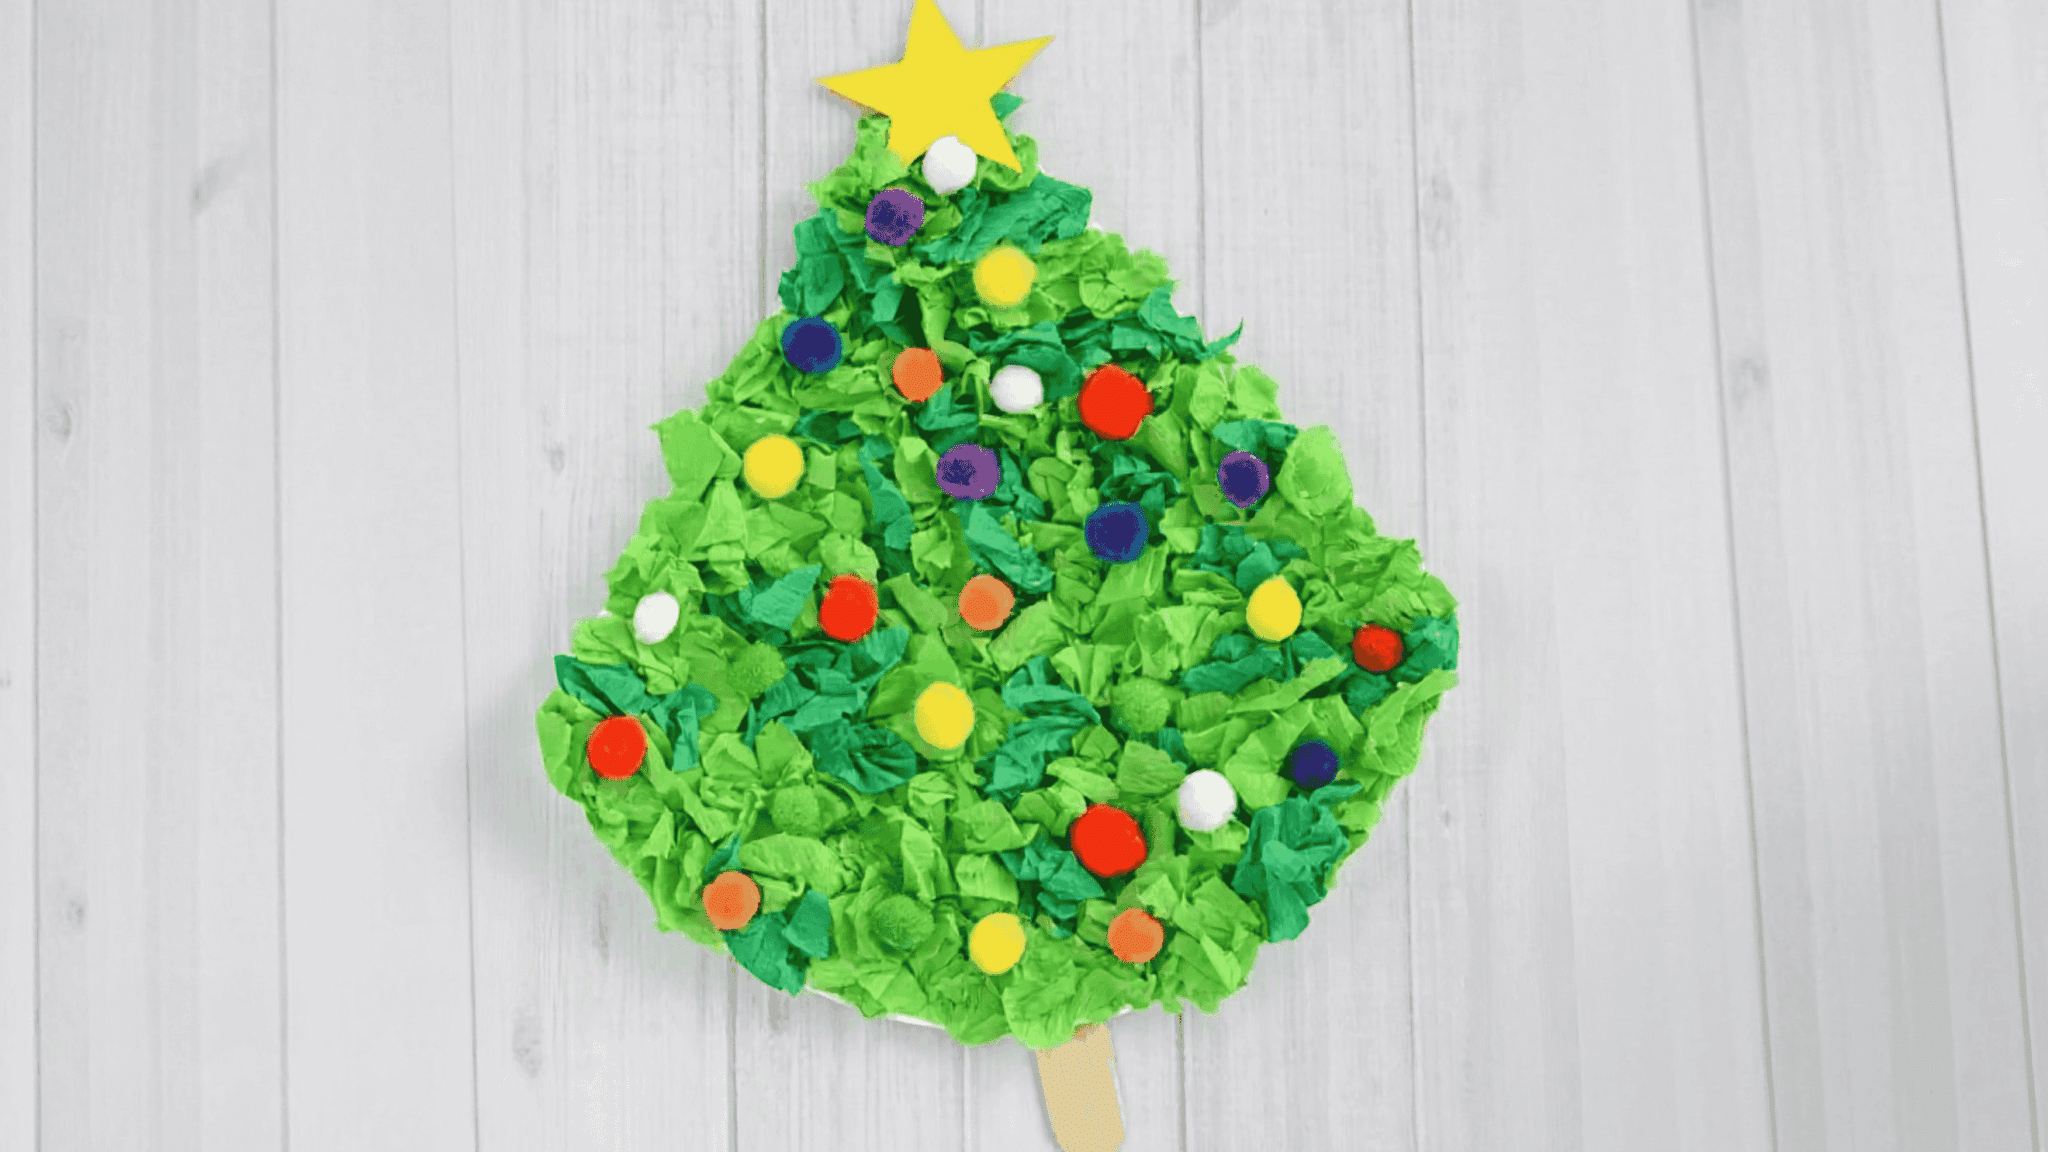
Materials: Green tissue paper, cardstock, glue, scissors, and small decorations like sequins or stickers.
Steps:
- Cut a simple tree shape from cardstock.
- Tear the tissue paper into small squares or loose pieces.
- Spread glue over the tree shape in sections.
- Press the tissue pieces onto the glued areas to create a layered mosaic look.
- Add small decorations to finish the tree.
11. Salt Dough Ornaments
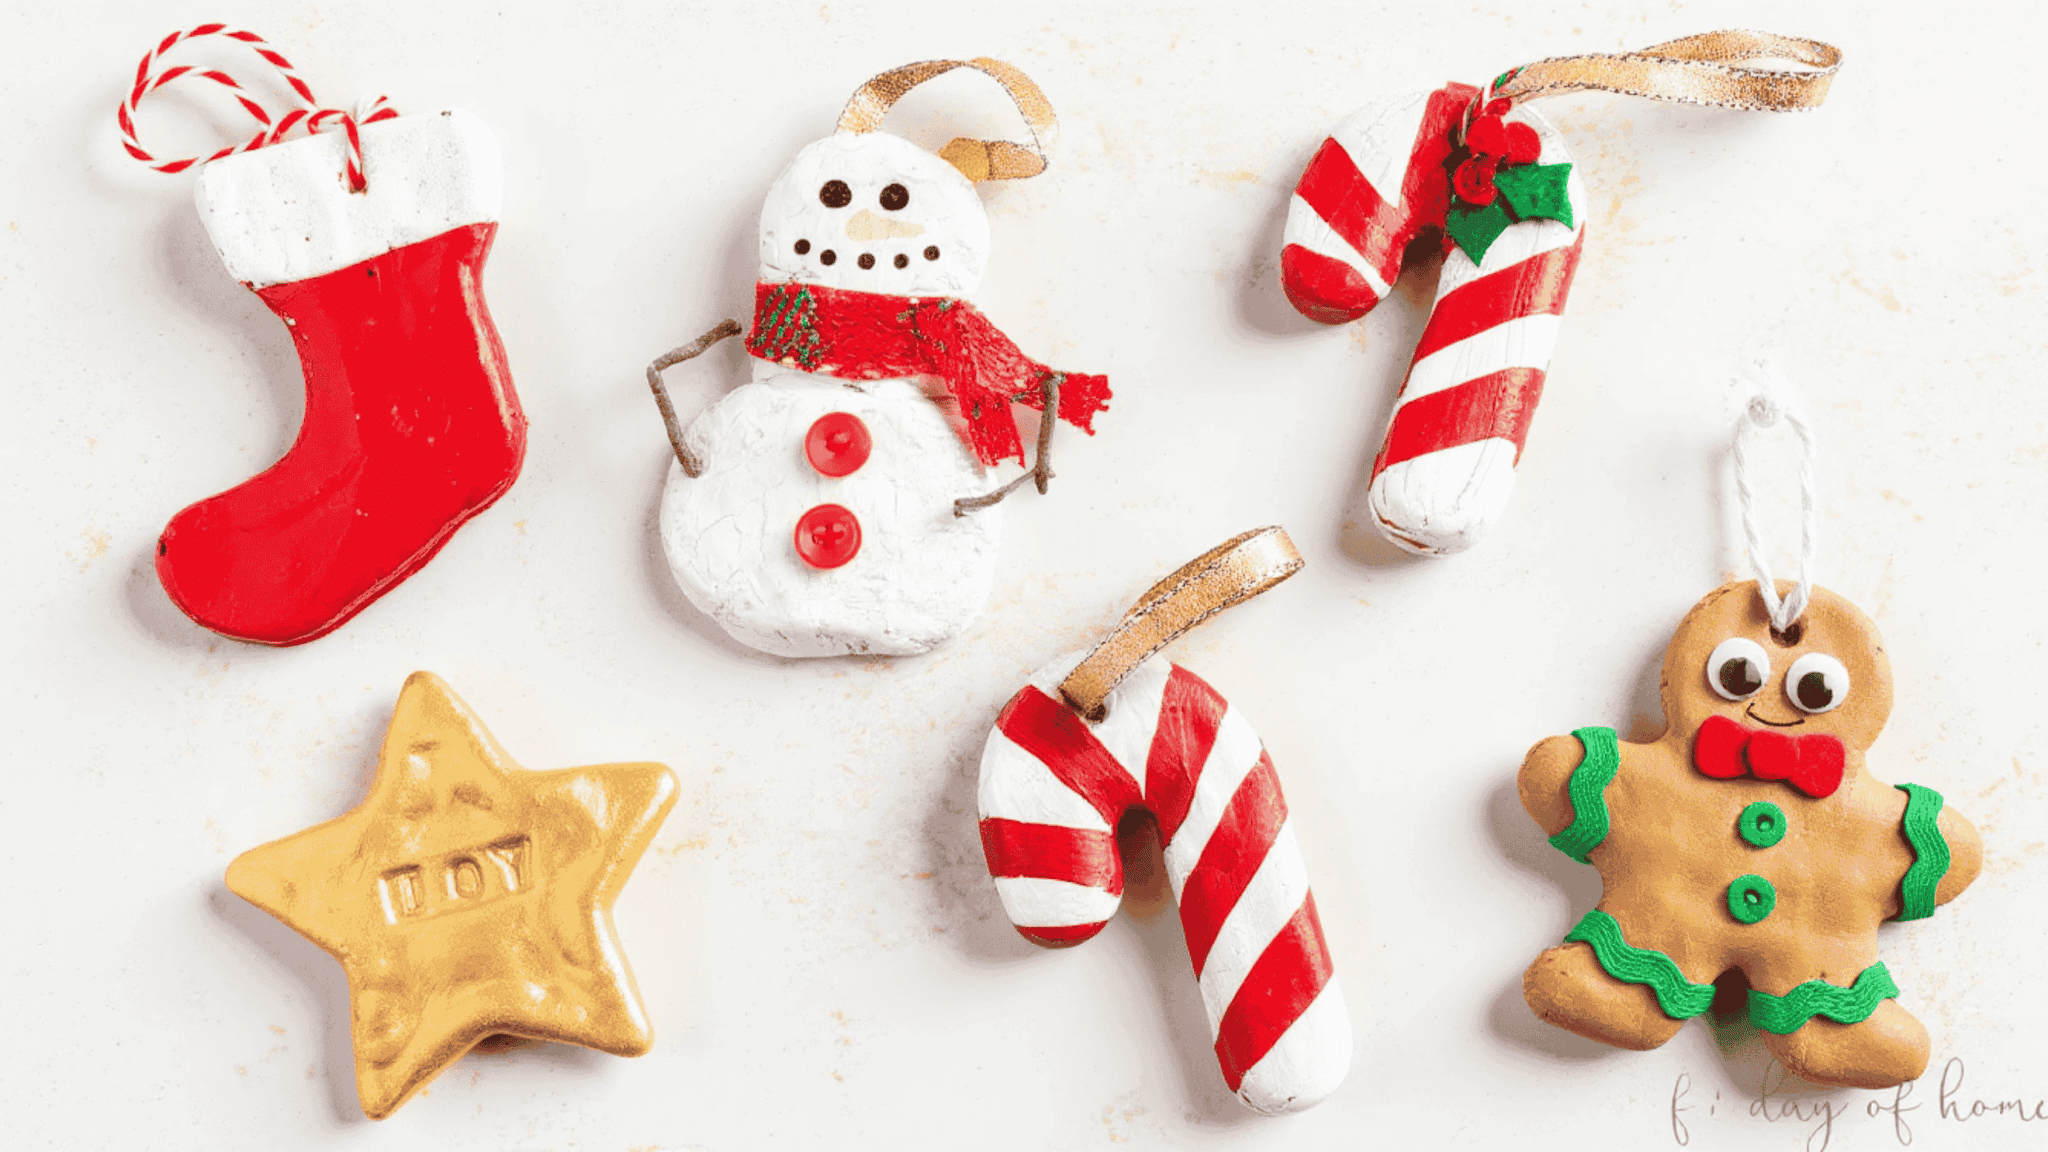
Materials: Flour, salt, water, rolling pin, cookie cutters, and ribbon.
Steps:
- Mix flour, salt, and water to form a smooth dough.
- Roll the dough flat and press cookie cutters into it.
- Make a small hole at the top for the ribbon and bake until firm.
- Let them cool before adding ribbon and hanging.
If you want more handmade ideas, take a look at Christmas Ornaments DIY – Ideas and Inspirations for simple projects that pair well with these crafts.
12. Clear Plastic Bauble Fillers
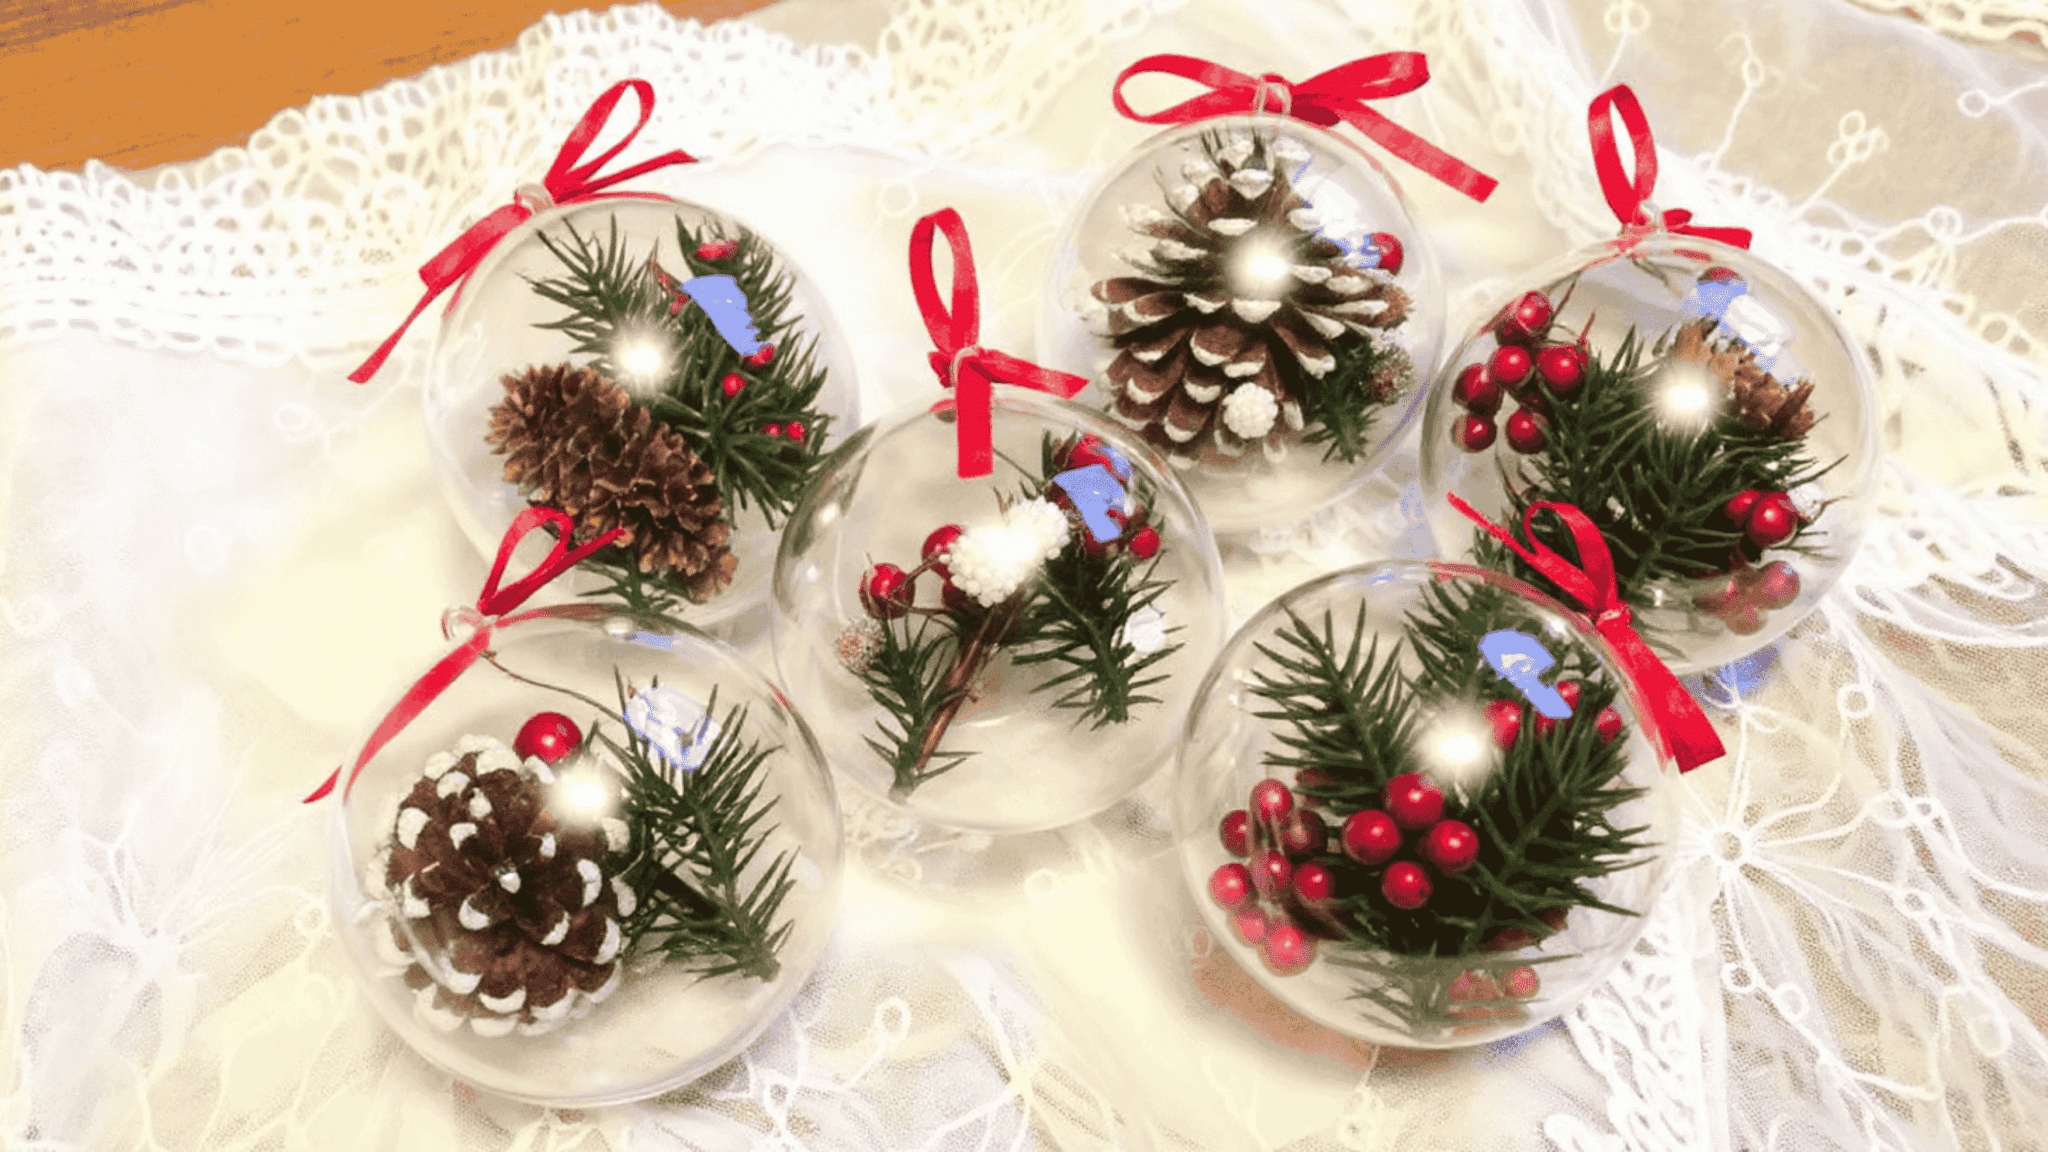
Materials: Clear plastic ornaments, small craft items, ribbon, and paper strips.
Steps:
- Open the plastic bauble and fill it with small items such as paper curls or glitter.
- Close the ornament securely and check that the contents stay in place.
- Add a ribbon loop at the top for hanging.
13. Pipe Cleaner Candy Canes

Materials: Red and white pipe cleaners.
Steps:
- Twist a red and white pipe cleaner together tightly.
- Shape the twisted piece into a candy cane curve at the top.
- Trim the ends if needed.
14. Cinnamon Stick Ornaments
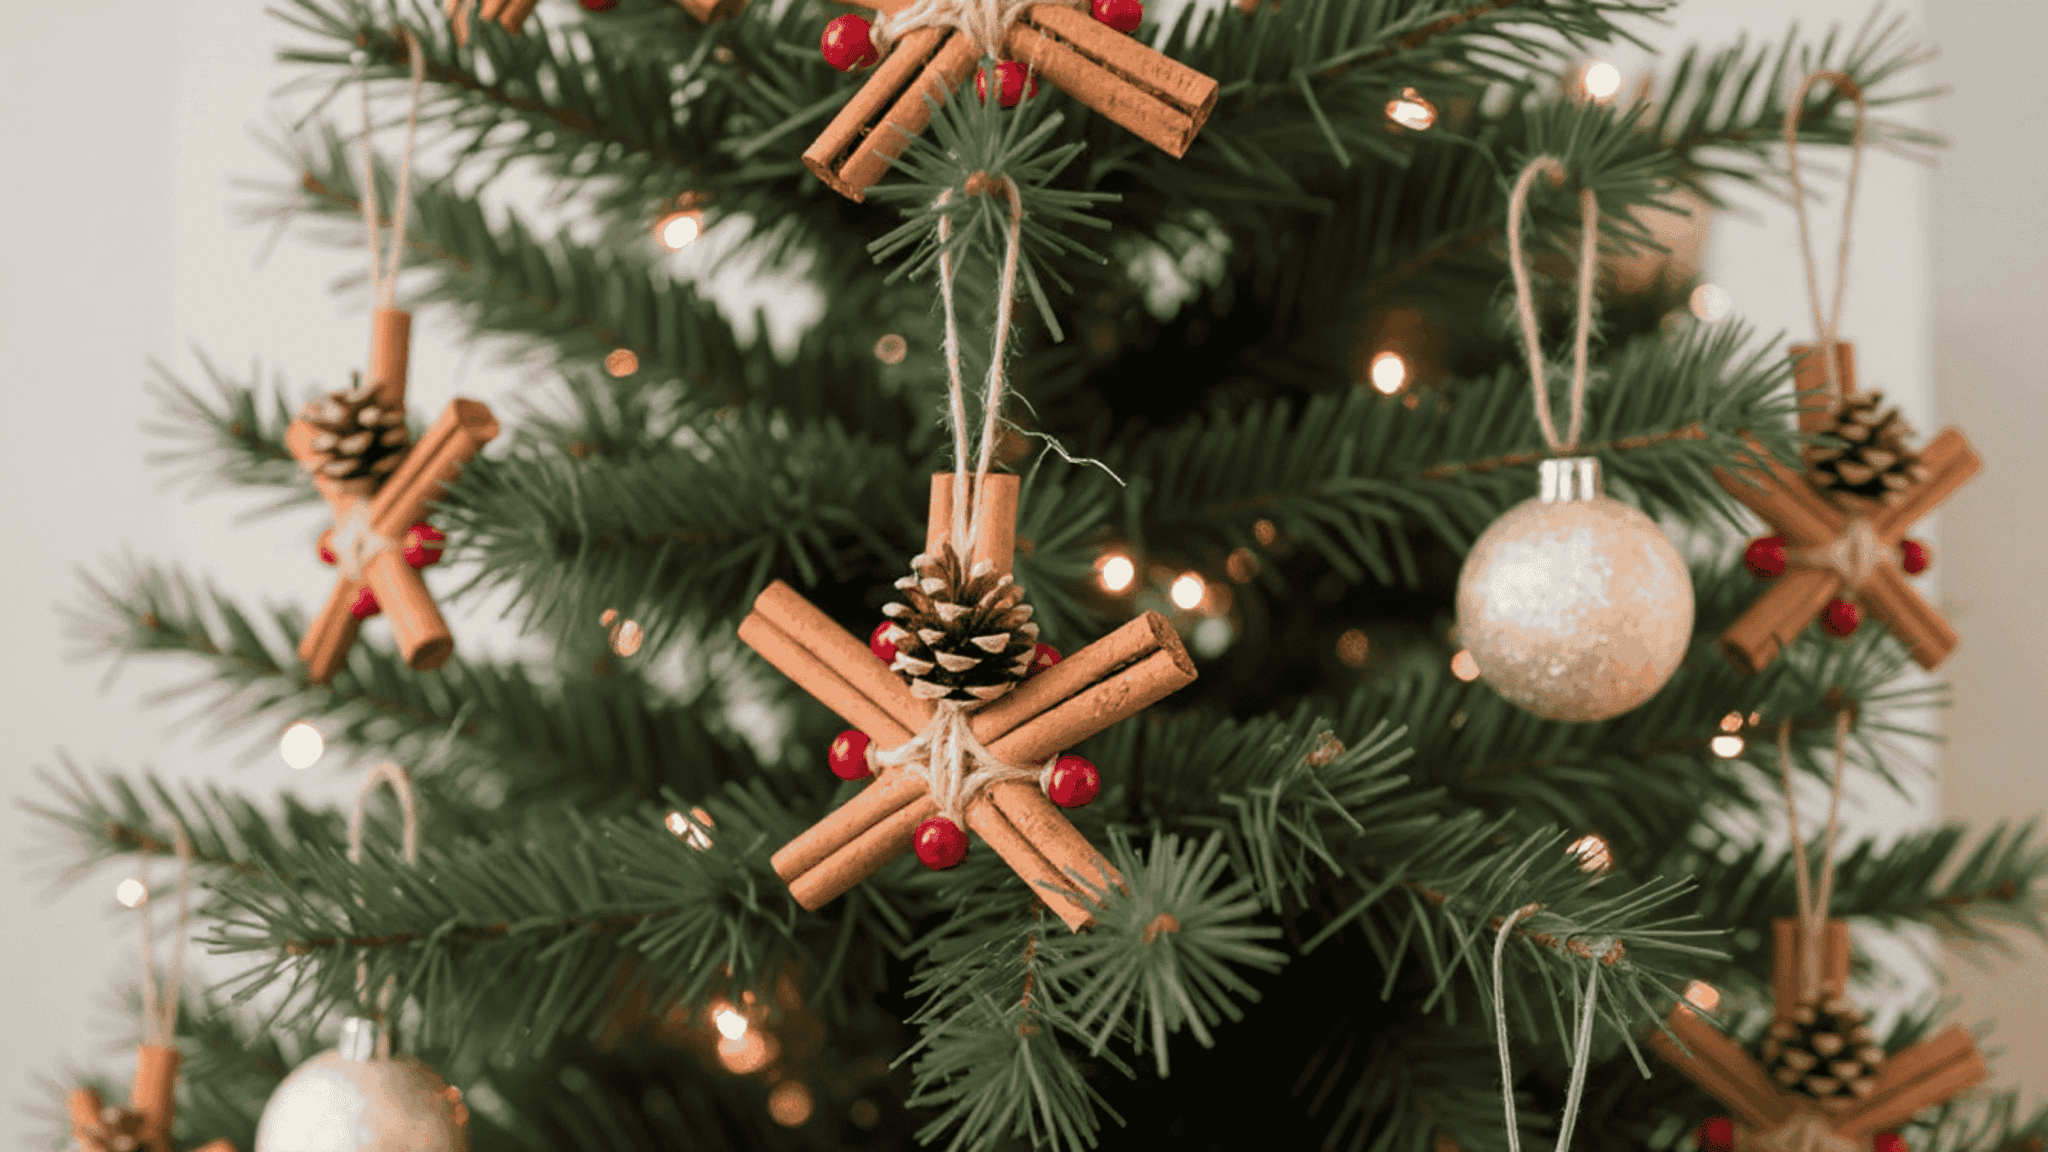
Materials: Cinnamon sticks, ribbon, glue, and small decorations.
Steps:
- Glue small decorations such as beads or paper shapes onto the cinnamon stick.
- Tie a piece of ribbon at the top to make a hanging loop.
- Let it dry completely before using.
15. Beaded Star Ornaments
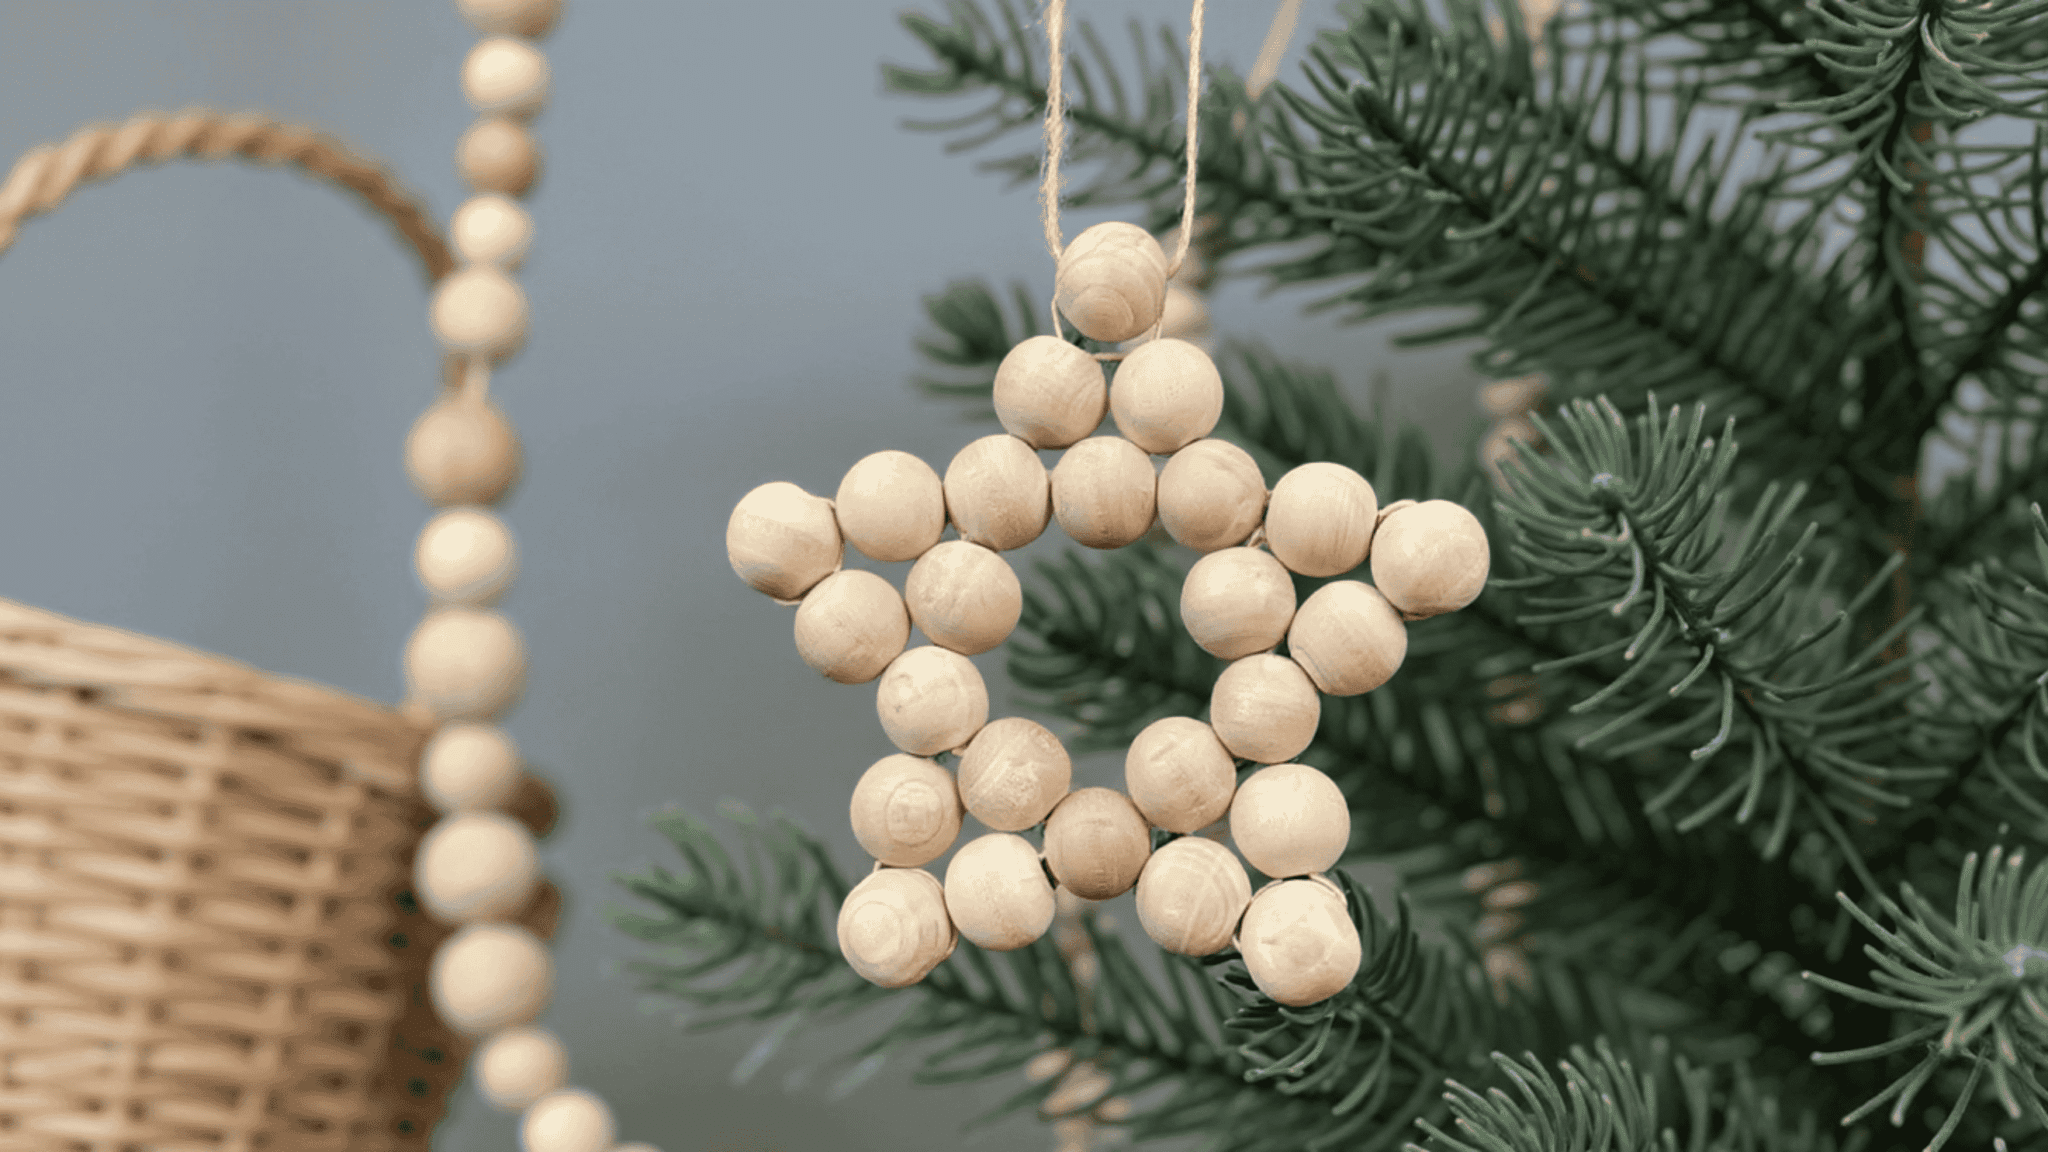
Materials: Pipe cleaners and assorted beads.
Steps:
- Bend a pipe cleaner into a star shape. Slide beads onto each point of the star.
- Fold the ends to secure the beads and form a loop for hanging.
Looking for another fun activity?
Take a look at the Christmas Light Scavenger Hunt Ideas for an easy way to add more excitement to your holiday week.
Other Kids Christmas Crafts
A mix of easy seasonal projects that use everyday materials and offer kids fresh ways to create, play, and enjoy the holiday spirit.
16. Popsicle Stick Frames
Materials: Popsicle sticks, glue, markers, and ribbon.
Steps:
- Glue four sticks into a square frame.
- Decorate the frame with markers or small items.
- Add a loop of ribbon at the top for hanging.
17. Felt Mini Stockings
Materials: Felt sheets, scissors, glue, and markers.
Steps:
- Cut two matching stocking shapes from the felt. Glue the edges together, leaving the top open.
- Add simple decorations or drawings on the front.
18. Painted Wood Slice Ornaments
Materials: Wood slices, paint, paintbrushes, and twine.
Steps:
- Paint a Christmas shape or simple pattern on one side of the wood slice.
- Let it dry before adding a second layer if needed. Thread twine through the predrilled hole for hanging.
19. Pom-Pom Wreath Ornaments
Materials: Green pom-poms, glue, cardboard ring, and ribbon.
Steps:
- Cut a small ring from cardboard to use as the base. Glue green pom-poms all around the ring.
- Add a ribbon loop at the top once dry.
20. Ribbon Bow Ornaments
Materials: Ribbon, glue, scissors, and string for hanging.
Steps:
- Tie the ribbon into a neat bow. Trim the ends evenly to shape the bow.
- Attach a piece of string at the back for hanging.
21. Paper Plate Santa
Materials: Paper plate, cotton balls, red paper, glue, scissors, and markers.
Steps:
- Glue cotton balls around the bottom half of the plate to form the beard.
- Cut a red paper hat and attach it to the top of the plate. Add eyes, a nose, and simple details with markers.
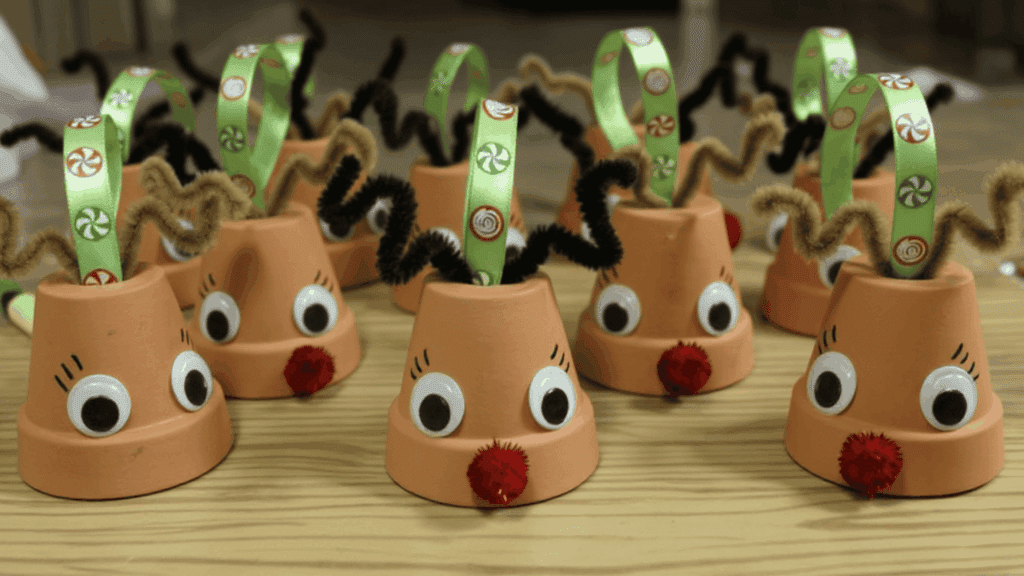
22. Toilet Roll Reindeer
Materials: Toilet paper roll, brown paint, glue, googly eyes, red paper, and pipe cleaners.
Steps:
- Paint the toilet roll brown and let it dry. Glue on the eyes and a small red nose.
- Bend pipe cleaners into antlers and attach them at the top.
23. Elf Hat Craft
Materials: Green paper, scissors, glue, cotton balls, and markers.
Steps:
- Cut a large triangle from green paper to create the hat shape.
- Glue cotton balls along the bottom edge for trim.
- Draw or glue a small bell shape at the tip.
24. Santa Beard Cotton Project
Materials: Paper, glue, cotton balls, scissors, and markers.
Steps:
- Draw a simple Santa face outline on the paper.
- Glue cotton balls along the beard area.
- Add details such as the hat and eyes with markers.
25. Reindeer Puppet Sticks
Materials: Craft sticks, brown paper, glue, markers, and googly eyes.
Steps:
- Cut a reindeer head shape from brown paper.
- Glue it onto the craft stick.
- Add eyes, a nose, and simple lines for detail.
26. Pom-Pom-Nose Rudolph Art
Materials: Paper, glue, markers, and a red pom-pom.
Steps:
- Draw a reindeer face outline on the paper. Glue a red pom-pom in place for the nose.
- Add the rest of the facial features with markers.
27. Elf Face Drawing Activity
Materials: Paper, crayons, and markers.
Steps:
- Draw a large oval to start the elf’s face.
- Add features such as eyes, a hat, and pointed ears.
- Color the face with bright shades.
28. Santa Countdown Calendar
Materials: Paper, cotton balls, scissors, markers, and glue.
Steps:
- Draw a Santa face with a long beard space.
- Number small circles or squares on the beard area.
- Glue one cotton ball per day to count down to Christmas.
29. Handprint Santa Hat
Materials: Red paper, white paper, scissors, glue, and markers.
Steps:
-
Trace and cut out a handprint on red paper to form the main hat shape. Cut a strip of white paper for the hat trim and glue it in place.
-
Add a white circle at the top for the pom-pom.
30. Reindeer Footprint Card
Materials: Brown paint, white cardstock, markers, and glue.
Steps:
- Paint the bottom of the foot and press it onto the cardstock.
- Turn the print upside down to form the reindeer head.
- Add eyes, a nose, and antlers with markers.
31. Mini Paper Wreaths
Materials: Green paper, scissors, glue, and small decorations like sequins.
Steps:
- Cut a ring shape from green paper to form the base.
- Cut small leaf shapes and glue them around the ring.
- Add a few small decorations to finish the wreath.
32. Holiday Window Suncatchers
Materials: Clear contact paper, tissue paper pieces, scissors, and black paper.
Steps:
- Cut a frame shape from black paper and place it on sticky contact paper. Press colorful tissue pieces inside the frame.
- Seal with another layer of contact paper and trim the edges.
33. Garland Made of Painted Shapes
Materials: Paper, paint, scissors, hole punch, and string.
Steps:
- Cut out simple shapes such as stars or trees. Paint each shape and let them dry.
- Punch holes at the top and thread them onto a string.
34. Christmas Banner Letters
Materials: Cardstock, markers, scissors, hole punch, and ribbon.
Steps:
- Cut cardstock into triangle or rectangle banner pieces.
- Write one large letter on each piece to form a phrase.
- Punch holes and thread them onto ribbon.
35. Sparkly Star Wall Hangers
Materials: Cardstock, glue, glitter, scissors, and string.
Steps:
- Cut several star shapes from cardstock.
- Cover the surface with glue and sprinkle glitter on top.
- Add a small string loop at the back for hanging.
36. DIY Mini Stockings
Materials: Felt, scissors, glue, and markers.
Steps:
- Cut two matching stocking shapes from felt. Glue the edges together, leaving the top open.
- Add simple decorations with markers or small pieces of felt.
37. Paper Lanterns
Materials: Construction paper, scissors, glue, and markers.
Steps:
- Fold a piece of paper in half lengthwise. Cut slits along the folded edge without cutting to the top.
- Unfold and roll it into a tube shape, then glue the edges.
38. Festive Name Tags
Materials: Cardstock, markers, stickers, and string.
Steps:
- Cut small rectangles from cardstock. Write names and add simple drawings or stickers.
- Punch a hole and tie a string to attach them.
39. Holiday Photo Booth Props
Materials: Cardstock, markers, scissors, glue, and craft sticks.
Steps:
- Draw fun shapes such as hats, beards, or glasses on cardstock.
- Cut them out and add color with markers.
- Glue each piece onto a craft stick.
40. Pom-Pom Garland
Materials: Pom-poms, needle, and yarn.
Steps:
- Thread a yarn needle through the center of each pom-pom.
- Slide them along the yarn to space them evenly.
- Tie knots at both ends to keep them secure.
41. Christmas Playdough Kits
Materials: Playdough, small cutters, beads, buttons, and a container.
Steps:
- Place small pieces of playdough into a container.
- Add cutters, beads, and buttons to create a simple themed kit.
- Close the container securely so kids can take it anywhere.
42. Holiday Slime Jars
Materials: Clear slime, glitter, small beads, and jars with lids.
Steps:
- Knead glitter and small beads into the clear slime until blended. Pack the slime into jars, pressing it gently to remove air pockets.
- Seal the jars and decorate the lids if you want a festive touch.
43. Pinecone Painting
Materials: Pinecones, paint, brushes, and paper plates.
Steps:
- Place a pinecone on a plate to keep the area clean.
- Brush paint onto the tips or across the entire surface. Let it dry completely before handling.
44. Sensory Trays with Seasonal Items
Materials: Tray, rice or beads, small Christmas shapes, and scoops.
Steps:
- Fill the tray with rice or beads to form the base.
- Add small themed items such as bells or shapes.
- Include scoops or cups so kids can move items around freely.
- Keep everything shallow so it is easy to manage.
45. Snow-Texture Craft with Cotton
Materials: Cotton balls, glue, paper, and markers.
Steps:
- Draw a winter scene on the paper such as trees or houses.
- Tear cotton into small pieces and glue them onto areas where you want snow.
- Press each piece down gently so it stays in place while drying.
46. Felt Tree with Moveable Ornaments
Materials: Felt sheets, scissors, and small felt shapes.
Steps:
- Cut a large tree shape from green felt. Cut several small shapes to use as ornaments.
- Place the tree on a flat surface and let kids stick the ornaments anywhere they like.
- Rearrange the pieces as many times as needed.
47. Pom-Pom Sorting Activity
Materials: Pom-poms, cups, and tongs or spoons.
Steps:
- Spread pom-poms across the table.
- Place several cups or containers nearby.
- Ask kids to sort the pom-poms by size or color using tongs or spoons.
48. Holiday Sticker Scenes
Materials: Paper, stickers, and crayons.
Steps:
- Give kids a blank sheet or a simple background drawing.
- Hand out themed stickers so they can place them anywhere they like.
- Add extra details with crayons to complete the scene.
49. Gingerbread Play Mat Drawing
Materials: Paper, markers, and crayons.
Steps:
- Draw the outline of a gingerbread house or walkway on paper.
- Let kids add doors, windows, paths, or candy shapes.
- Color in the final design together or leave parts open for repeated use.
50. DIY Christmas Puzzles
Materials: Cardboard, markers, scissors, and tape.
Steps:
- Draw a simple Christmas image on a piece of cardboard.
- Cut the board into several puzzle-style pieces.
- Tape the back lightly if you want extra support.
- Mix the pieces and solve the puzzle.
51. Popsicle Stick Puppets for Story Play
Materials: Popsicle sticks, paper, glue, scissors, and markers.
Steps:
- Draw small characters such as trees, elves, or animals on paper.
- Cut them out and glue each one onto a popsicle stick.
- Let the pieces dry so they can be used for pretend stories.
Conclusion
The holiday season becomes even more meaningful when kids can shape it with their own creations.
These simple projects offer a calm, hands-on way for children to experiment with colors, textures, and ideas while adding a personal touch to decorations and gifts.
Easy christmas arts and crafts for kids diy activities also give families and classrooms a chance to slow down and enjoy time together.
If any of the crafts sparked excitement or led to a new idea, share your thoughts or your child’s favorite project in the comments.
Your feedback can inspire even more creative moments for others.