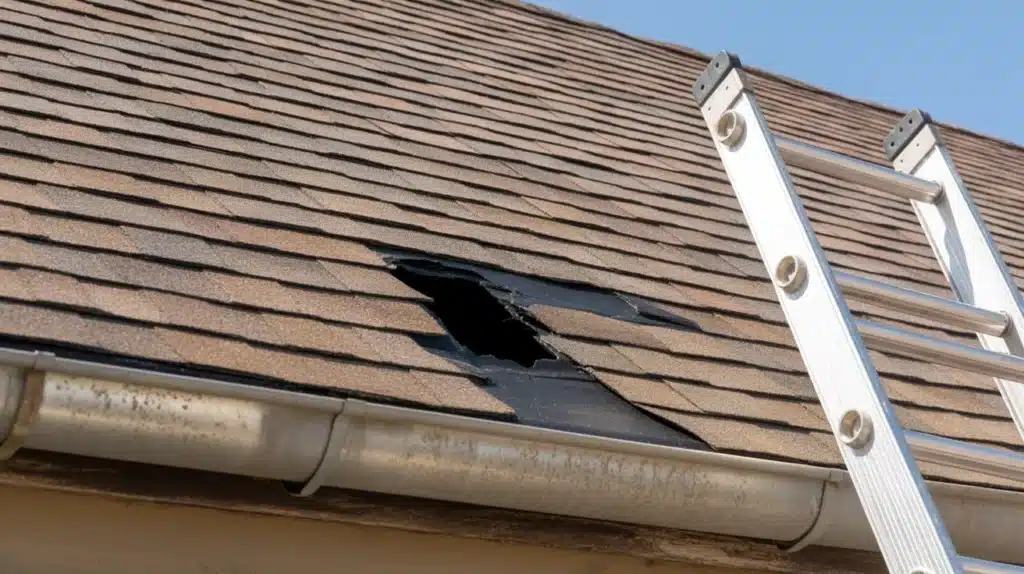
A small brown spot on your ceiling after heavy rain. You wipe it, forget about it, and two weeks later, it is the size of a dinner plate. That is how most roof leaks go. They do not show up loud.
They show up quietly, and by the time you notice them, the damage underneath is already done.
The good part is that fixing a roof leak is not always a big job. A lot of leaks come down to one bad nail, cracked sealant, or a loose shingle.
This guide walks you through how to repair a roof leak the right way, from finding the source to finishing the fix.
Why You Should Never Ignore a Roof Leak?
Water does not stay where it enters. It travels along roof decking, rafters, and insulation before it drips onto your ceiling, often landing far from where it actually got in.
By that time, the wood has started to rot, the insulation has stopped working, and the mold has found the perfect place to grow.
A $200 repair today can easily become a $3,000 problem if you leave it for a few more months.
Common Causes of Roof Leaks

Roof leaks do not just happen randomly. Most of the time, there is a clear reason behind them, and spotting it early makes the fix much simpler.
- Misplaced or rusted nails: A nail set too low in the shingle creates a hole in the roof deck over time and lets water pass straight through.
- Damaged or missing shingles: Cracked, curled, or blown-off shingles expose the underlayment and allow rain to get in directly.
- Worn roof flashing: Flashing around chimneys, skylights, and vents wears down over time, leaving gaps where water can enter.
- Clogged gutters: When gutters fill up, water backs up and pushes under the shingles along the roof edge.
- Ice dams: In cold weather, melting snow refreezes at the roof edge, blocks drainage, and forces water under shingles.
- Damaged roof valleys: Where two slopes meet, water runs in heavy volume, and any wear in that area leads to fast leaks.
- Old or cracked sealant: Sealant around vents and joints dries out over the, creating gaps if not replaced promptly.
- Attic condensation: Sometimes what looks like a roof leak is actually moisture from poor attic ventilation dripping down onto the ceiling.
How to Find Where Your Roof Is Leaking?
Start in the attic, not on the roof. Bring a flashlight and look for wet stains, dark spots, or daylight coming through the decking.
The stain on your ceiling is rarely right below where water enters. Water travels along rafters before dropping.
Once you narrow down the area from inside, go up on the roof and check 2 to 3 feet above and around that spot. Look at flashing, shingles, and any nearby vents or penetrations.
If the source is still not clear, a slow garden hose test works well. Have one person spray the roof in small sections while another watches for drips inside the attic.
Tools and Materials You Need to Repair a Roof Leak
Before you climb up, make sure you have everything within reach. Stopping mid-repair to run back down for a tool or material is not just annoying. It can be unsafe.
Tools
| Tool | Purpose |
|---|---|
| Safety harness or fall arrest system | Keeps you secure while working at height |
| Sturdy extension ladder | Safe roof access |
| Flat pry bar | Lifts shingles without cracking them |
| Hammer or roofing hatchet | Driving and removing nails |
| Utility knife | Trimming shingles or flashing |
| Caulking gun | Applying sealant with control |
| Putty knife | Spreading roofing cement evenly |
Materials
| Material | Used For |
|---|---|
| Replacement shingles | Swapping out cracked or missing ones |
| Aluminum flashing | Covering nail holes and gaps under shingles |
| Roofing cement or sealant | Sealing holes, nail heads, and joints |
| Self-adhesive roofing tape | Quick patches on flat surfaces |
| Roofing nails with rubber washers | Securing metal roofing and flashing |
| Silicone or polyurethane sealant | Sealing around vents, skylights, and metal roofs |
| Waterproof tarp and 2×4 boards | Temporary cover for emergency situations |
Safety Note: Falls from roofs cause thousands of injuries every year. Always use a safety harness. Never work on a wet, icy, or storm-damaged roof.
How to Repair a Roof Leak: DIY Method
This method is based on a real-world repair demonstrated by Brian at Grand Roofing. It works well for one of the most common causes of leaks in roofs aged 5 to 12 years: a misplaced or rusted nail.
Step 1: Find the Problem Spot
Walk the roof carefully and look closely at the area directly above where the leak shows inside. Look for shingles that sit slightly higher than the ones around them.
That raised edge often means the nail below was placed too low. Over time, that nail rusts out and opens a small hole right through the roof deck.
Water runs down, hits the nail head, and follows it straight inside. No missing shingles. No obvious damage. Just one nail in the wrong spot is doing quite a damage for months.
What to look for:
- A shingle that looks slightly lifted or uneven compared to those around it
- Any rust staining on or near the shingle surface
- The spot should be roughly 2 to 3 feet above where the leak appears inside
Step 2: Lift the Shingle and Pull the Bad Nail
Slide a flat bar gently under the raised shingle. It should lift without much force. If the nail is already loose, it may come free with just your fingers.
That looseness is a sign it has been letting water in for a while. Use your flat bar to pop the nail out completely. Be careful not to crack the shingle as you work.
Take your time here. Rushing this step can split the shingle and create a bigger repair job.
What you need:
- Flat pry bar
- Hammer
Pro Tip: If the shingle lifts too easily with just your finger, the nail has likely been loose and rusted for months. The leak has been going on longer than you thought.
Step 3: Slide the aluminum flashing over the hole.
Cut a piece of aluminum flashing large enough to cover the nail hole completely, with a few inches of overlap on all sides. Aluminum is the right choice here because it will not rust over time.
Before sliding it in, use a hammer and a flat surface to knock out any bends or creases so it sits completely flat.
Slide the flashing in and up under the shingle, past the hole. The goal is for the flashing to sit directly beneath the hole so that any water coming down lands on the metal and runs off rather than going through the deck.
Add a small amount of roofing sealant under the flashing as you push it in to help it stay in place.
What you need:
- Aluminum flashing (cut to size)
- Hammer
- Roofing sealant or cement
- Putty knife or caulking gun
Step 4: Nail the Shingle Back Down
Once the flashing is in position, press the shingle back down flat. Nail it back into place at the correct position, higher than the old nail was. This step matters.
The original nail was placed too low, which caused the whole problem. Place the new nail in the right spot so the shingle sits flush and does not lift again.
Drive the nail straight in. Do not angle it to the side.
Quick check: Press down on the shingle after nailing. It should feel firmly seated with no movement or lift at the edges.
Step 5: Seal the Hole and Nail Heads
Apply roofing sealant directly into the original nail hole to seal it. Then add small dabs of sealant over each nail head you drove in. Do not lay a solid, thick line of sealant across the shingle.
A solid line can trap water at its edge and push it sideways under the shingle rather than shedding it. Use small, focused dab points right over each nail.
Press the sealant down gently with your finger or a putty knife so it sits flat against the shingle. If the sealant is left raised and you are working in cold weather, it will cure in that raised position and never lay flat or seal properly.
What you need:
- Roofing sealant or roofing cement
- Caulking gun
- Putty knife
Final check: Run your hand over the repaired area. Everything should feel flat, sealed, and firm. No raised edges. No loose nail heads.
Cost Note: A professional callout for this same repair can run anywhere from $150 to $550 or more depending on the company. For a single nail issue on a safe, dry day, it is a very manageable DIY job that takes under 10 minutes once you have your materials ready.
Video Tutorial
I’d like to give credit to Grand Roofing Inc. for their informative video, which served as a reference for this guide.
Temporary Roof Leak Fixes for Emergencies
Sometimes the weather does not cooperate and a permanent repair has to wait. In that case, a temporary fix can stop the damage from spreading until conditions are safe and you are ready to do the full job.
- Roof tarp: Lay a thick, waterproof tarp over the damaged section past the ridge line and secure it with 2×4 boards nailed along each edge. Do not use duct tape or bungee cords, as they will not hold in wind.
- Roofing tape or self-adhesive patch: Press waterproof roofing tape firmly over the cracked or damaged spot for a quick, short-term seal on flat areas.
- Roofing cement: Spread roofing cement over a small hole or exposed nail with a putty knife to block water entry until a proper repair can be made.
- Buckets and plastic sheeting inside: Place buckets under active drips and cover floors and furniture with plastic sheets to limit interior damage.
- Document everything: Take clear photos of all damage before and after any temporary fix. This helps significantly when filing a homeowner’s insurance claim later.
DIY vs. Hiring a Professional: How to Decide
Not every roof leak needs a professional, and not every roof leak should be handled alone. Knowing where that line sits saves you money on one side and stops you from making things worse on the other.
| Situation | Best Approach |
|---|---|
| Missing or cracked shingles in an easy-to-reach spot | DIY |
| Resealing a vent or pipe boot | DIY |
| Misplaced nail with no wood damage underneath | DIY |
| Flashing repair around a chimney or skylight | Professional |
| The leak keeps coming back after a DIY attempt | Professional |
| Mold, rot, or structural damage found | Professional |
| The roof is at least 20 years old. | Professional |
| More than 25% of the roof area is affected | Professional |
| Steep pitch or unsafe roof access | Professional |
| The roof is still under manufacturer’s warranty | Check warranty terms before any work |
How to Prevent Roof Leaks from Coming Back?
Prevention comes down to two things: regular checks and quick action on small problems. Inspect your roof twice a year, once in spring and once in fall, and always after a major storm.
Clean your gutters before water backs up under the shingles. Trim branches that hang over the roof. Reseal flashing and joints every few years before the old sealant cracks fully open.
Check your attic ventilation to ensure moisture is not building up. Small issues like a slightly lifted shingle edge or a hairline crack in the sealant are quick and inexpensive to fix.
Left alone, they are exactly the kind of thing that can turn into a leak costing hundreds of dollars to repair.
Conclusion
Fixing a roof leak does not have to be a big, stressful ordeal. Most leaks start from something small, a single misplaced nail, dried-out sealant, or one lifted shingle, and can be stopped before they cause real damage.
The key is to catch them early and know what to do next. Whether you handle it yourself or bring in a professional, acting fast is what protects your home and your wallet.
We hope this guide gave you a clear, simple path to get your roof leak fixed right.
Have you dealt with a roof leak before? Did you go the DIY route or call a pro? Tell us what worked for you in the comments below.
Frequently Asked Questions
How Much Will It Cost to Fix a Roof Leak?
Minor repairs typically run between $150 and $400, while moderate damage like worn flashing or underlayment can cost $400 to $800. Major structural leaks can go well above $2,000.
Can You Repair a Leaking Roof From the Inside?
You can temporarily slow the water from inside by applying roofing tape or sealant to exposed decking, but a lasting fix always requires addressing the damaged area on the roof itself.
How Do I Stop My Roof from Leaking in Heavy Rain?
Place a thick waterproof tarp over the affected section and secure it past the ridge line with 2×4 boards. Inside, use buckets and plastic sheeting to protect your floors and belongings until a proper repair can be made.