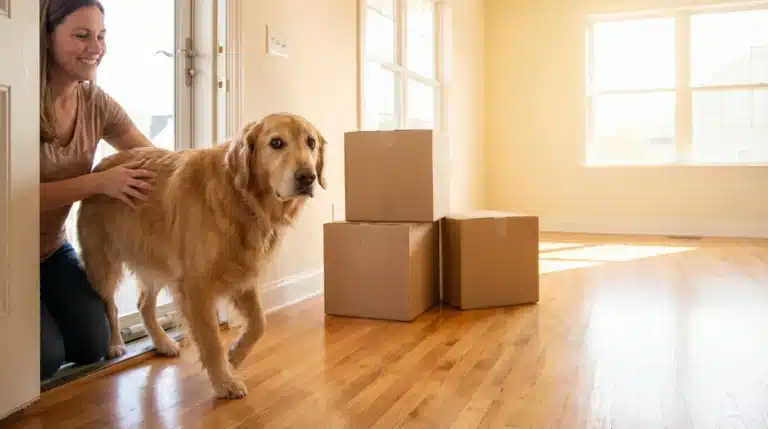
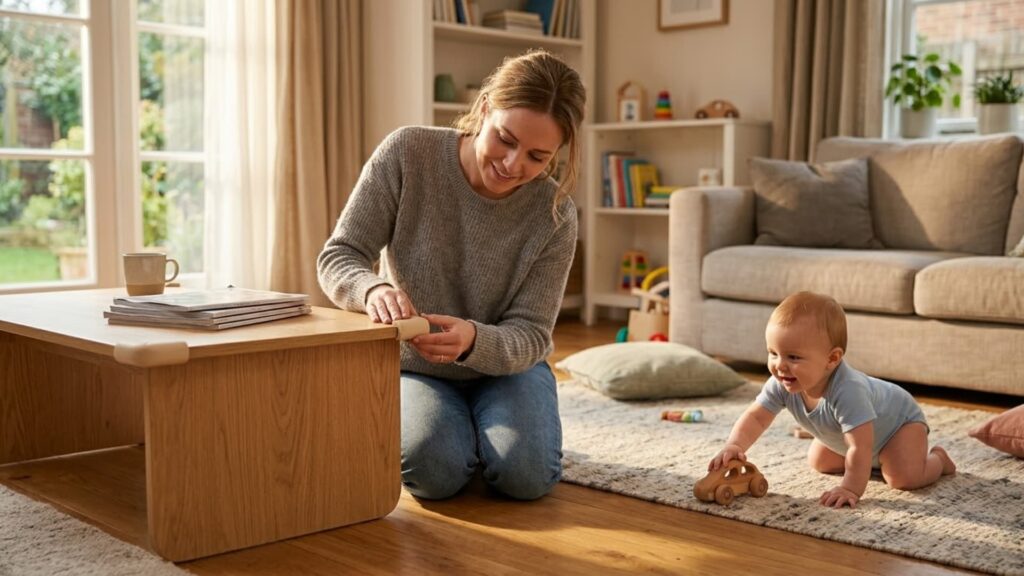
One day, your baby is just lying there, staring at the ceiling fan. Next, they’ve rolled across the room and found the one cord you forgot to hide. It catches every parent off guard.
The scary part? Most homes have far more dangers than parents ever notice until the baby starts moving. A chewed-on wire here. An open cabinet is there.
It adds up fast. Pediatric emergency doctors say sleep risks, drowning, and vehicle accidents account for nearly 79% of accidental infant deaths in the first year. Most are preventable.
This baby proofing checklist walks you through every room, every product, and every age stage, so you stay one step ahead.
What Is Baby Proofing and Why Does It Matter?
Baby proofing is the process of identifying and removing potential hazards in your home before your baby encounters them.
Dr. Denise Scott, MD, an Oklahoma-based pediatrician, describes it as creating a space where babies can play and move safely, free of hazards. It is not just about protecting your baby, either.
Think about walking your hallway in the dark at 3 a.m. with your baby in your arms. Slippery rugs and wobbly furniture become your hazards, too.
The CDC lists unintentional injury as a leading cause of death in children aged 1 to 4. Getting this right and getting it done early is not optional. It is just part of being a parent.
When Should You Start Baby Proofing Your Home?
Most parents assume they have time. Then one morning, the baby rolls off the play mat, and that assumption is gone. Child safety experts unanimously agree: start before you think you need to.
| Phase | When | What to Focus On |
|---|---|---|
| Phase 1: Before Birth | During pregnancy | Safe crib setup, smoke and CO detectors, water heater set to 120°F, fire extinguisher on every floor |
| Phase 2: At 4 to 6 Months | When the baby starts rolling and reaching | Outlet covers, cord management, crib safety checks, and cabinet latches on lower levels |
| Phase 3: At 6 to 10 Months | When crawling begins | Full home safety sweep, stair gates, furniture anchoring, toilet locks |
| Phase 4: At 10 to 18 Months | When walking and climbing start | Stove knob covers, window guards, doorknob covers, and balcony safety |
| Phase 5: Every 2 to 3 Months | Ongoing | Recheck all products, update based on your baby’s new abilities |
Pro Tip: Get on all fours and crawl through every room. It is the fastest way to spot what your baby will go for first.
Baby Proofing Checklist by Room
Baby Proofing Checklist by Room
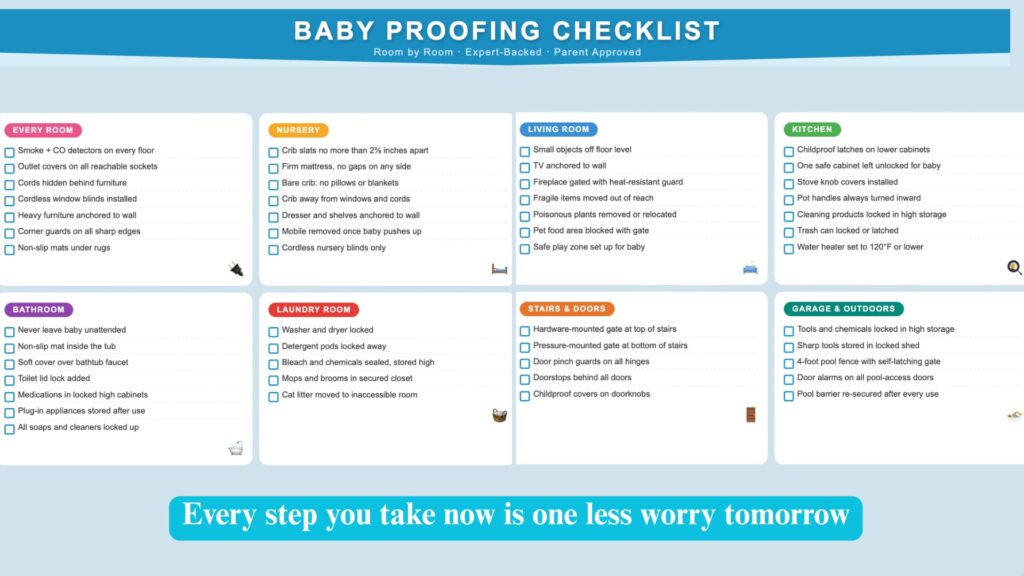
Every room in your home carries its own set of risks. Work through this list one room at a time, so nothing gets missed.
1. General Safety Checks for Every Room
These apply no matter which room you are in.
✔ Install smoke detectors on every floor, including hallways outside bedrooms
✔ Install carbon monoxide detectors on every level of the home
✔ Test detector batteries monthly
✔ Place a fire extinguisher on each floor (a must in the kitchen)
✔ Anchor all heavy furniture and TVs to the wall using anti-tip straps
✔ Cover all electrical outlets within baby’s reach (sliding covers are safer than plug-in caps)
✔ Hide all cords and power strips behind furniture
✔ Replace corded window blinds with cordless versions, or secure cords at ceiling height
✔ Use baby gates at the top and bottom of stairs and in doorways to off-limits rooms
✔ Cover all sharp furniture corners with corner guards
✔ Use non-slip mats on hard floors and under all rugs
2. Nursery and Baby’s Room
Your baby spends the most unattended time here, so this room gets the most attention.
✔ Use a crib that meets current safety standards. Crib slats must be no more than 2 3/8 inches apart.
✔ Use a firm mattress that fits snugly with no gaps between it and the crib sides
✔ Keep the crib completely bare. No pillows, blankets, stuffed toys, or bumpers.
✔ Place the crib away from windows, curtains, cords, vents, and furniture
✔ Keep all diaper supplies within your reach at the changing table, but not within your baby’s reach
✔ Anchor dressers and bookshelves to the wall
✔ Remove mobiles once baby can push up on hands and knees (or by 5 months, whichever comes first) ✔ Use cordless blinds on all nursery windows
✔ Keep the baby monitor cord secured and out of reach
Safety Note: The American Academy of Pediatrics (AAP) recommends placing babies on their backs to sleep in a crib or bassinet. Room-sharing (not bed-sharing) for the first six months reduces the risk of SIDS significantly.
3. Living Room and Common Areas
This is where your baby will spend the most time moving around, so every corner counts.
✔ Remove small objects from floor level: coins, buttons, magnets, key fobs, and remote batteries
✔ Anchor the TV to the wall
✔ Block the fireplace with a heat-resistant gate
✔ Clear clutter off the floor and store toys in bins
✔ Move fragile and breakable items out of reach
✔ Remove or relocate any poisonous indoor plants
✔ Use baby gates to block off pet food, water bowls, and litter boxes
✔ Set up a dedicated play zone with age-appropriate toys
4. Kitchen
The kitchen has more hazards per square foot than any other room in your home.
✔ Install childproof latches on all lower cabinets and drawers
✔ Leave one safe cabinet unlocked and filled with plastic containers for the baby to explore
✔ Use stove knob covers to prevent accidental burner activation
✔ Always turn pot handles inward, away from the front of the stove
✔ Never cook with your baby in your arms
✔ Lock or secure your trash can so your baby cannot pull it open
✔ Store dishwasher pods, cleaning products, and chemicals in locked, high-up storage
✔ Set your water heater to 120°F or lower to prevent scalding
✔ Keep the dishwasher closed at all times
Pro Tip: Tablecloths are a real hazard. A baby can pull the entire cloth and everything on the table down on top of themselves. Consider skipping the tablecloth for now.
5. Bathroom
Babies can drown in just a few inches of water. Never leave your baby alone in the bathroom, even for a moment.
✔ Install a non-slip mat or adhesive strips inside the bathtub
✔ Use a soft faucet cover to protect your baby’s head from bumps against the tap
✔ Add a toilet lid lock
✔ Store all medications in childproof-locked, high cabinets
✔ Keep hairdryers, shavers, and all plug-in appliances stored away after every use
✔ Lock up all cleaning sprays, wipes, sanitizers, and soaps
✔ Install an anti-scald device on faucets, or set the water heater to 120°F
Safety Note: The CPSC recommends setting water heaters to 120°F or lower as a key step in preventing scalds and burns in young children.
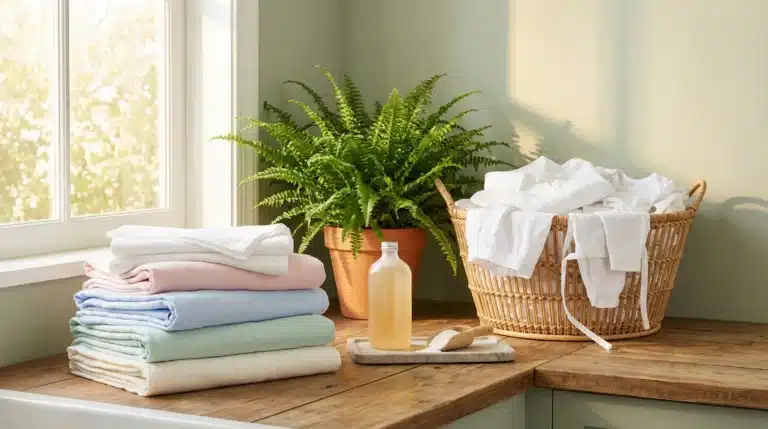
6. Laundry Room
Keep this room completely off-limits when you are not in it.
✔ Use childproof locks on the washer and dryer
✔ Store laundry detergent pods locked up and out of reach
✔ Keep bleach, fabric softener, and all laundry chemicals in tightly sealed, locked storage
✔ Store mops, brooms, and anything that could fall over in a secure, closed closet
✔ If you have cats, move the litter tray to a room your baby cannot access
7. Stairs, Hallways, and Doors
Falls on stairs are one of the most common causes of injury in babies and toddlers.
✔ Use a hardware-mounted gate at the top of every staircase. Pressure-mounted gates are not safe at stair tops.
✔ Use a pressure-mounted gate at the bottom of stairs or in doorways
✔ Install door pinch guards to prevent fingers from getting caught in hinges
✔ Use doorstops behind all doors to prevent slamming
✔ Add childproof doorknob covers on all doors to rooms that are off-limits
8. Garage and Outdoor Areas
This space should always be off-limits to your baby unless you are right there.
✔ Store all tools, chemicals, antifreeze, paint, fertilizer, and insecticides on high, locked shelves
✔ Keep all sharp garden tools in a locked shed or cabinet
✔ Install a 4-foot fence with a self-closing, self-latching gate around the full pool
✔ Always check the pool first if your child goes missing suddenly
✔ Re-establish the pool barrier after every session before you step away
CPSC Guidance: The U.S. Consumer Product Safety Commission recommends using multiple layers of protection around pools, including power safety covers, pool alarms, and perimeter fencing, because no single barrier is enough on its own.
Age-by-Age Baby Proofing Guide
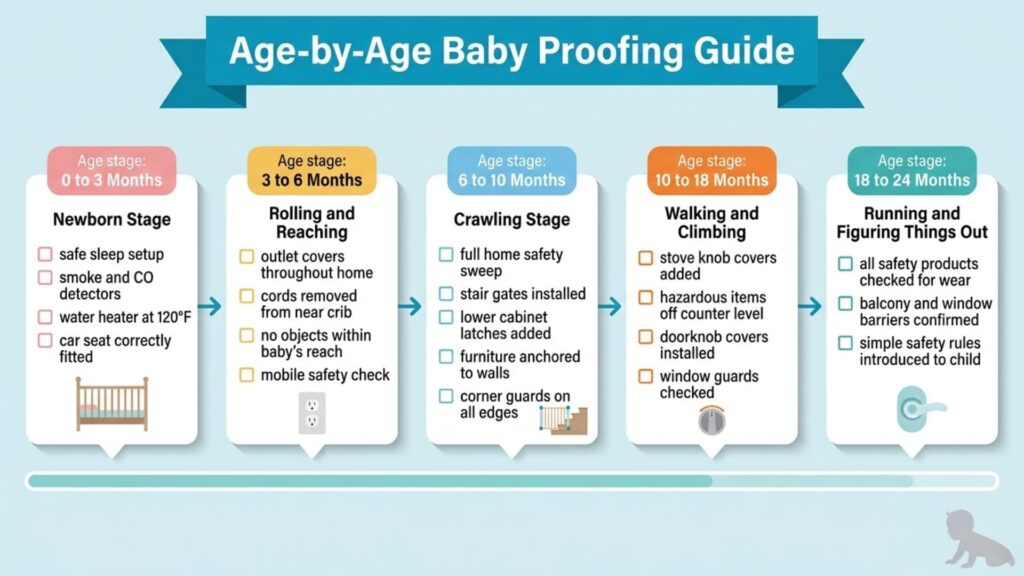
Your baby changes fast. What was safe at 3 months is a different story at 7 months. Here is what to prioritize at each stage to keep your checklist up to date.
0 to 3 Months (Newborn Stage)
Your newborn is not moving around yet, but this is exactly the right time to set the groundwork. Focus on a safe sleep setup: a bare crib, a firm mattress, and the baby on their back.
Install smoke and carbon monoxide detectors, set the water heater to 120°F, and make sure your car seat is correctly fitted.
Young babies reflexively bring their hands to their mouths, so start thinking about choking hazards at floor level now.
3 to 6 Months (Rolling and Reaching Stage)
At this stage, babies start rolling over and actively grabbing for things. Check that the crib is completely free of cords and objects. Keep small nightlights out of low outlets.
Make sure nothing is hanging near the crib that your baby could grab. Begin installing outlet covers throughout the home, since this habit takes time to build.
6 to 10 Months (Crawling Stage)
This is when baby proofing becomes urgent. Your baby will cover ground faster than you expect. Complete your full home safety sweep now.
Install stair gates, latch all lower cabinets, add corner guards, and secure every piece of tall furniture to the wall. Anything at floor level is fair game.
10 to 18 Months (Walking and Climbing Stage)
Walking babies reach higher and move more quickly. Add stove knob covers, move hazardous items from counter level, and install doorknob covers on rooms you want to keep closed.
Check that window guards are in place, since toddlers often try to climb onto furniture near windows.
18 to 24 Months (Running and Figuring Things Out Stage)
By now, your toddler may have already defeated a couple of cabinet latches. Check all safety products for wear and replace anything that no longer meets safety standards.
Add balcony safety checks and consider whether your outdoor space needs stronger barriers. At this stage, it also helps to start teaching simple safety rules alongside your physical safety measures.
Baby Proofing on a Budget
Baby proofing does not have to be expensive. A few key items go a long way, and much of what’s marketed to new parents is simply not necessary. Here is an honest breakdown.
| Category | Must-Have | Can Skip or Find Cheaper |
|---|---|---|
| Outlets | Sliding outlet covers (safer and more durable than plug-in caps) | Branded “smart” outlet covers |
| Cabinets | Magnetic locks or adhesive latches for lower cabinets | Premium cabinet lock sets when basic adhesive versions work fine |
| Stairs | Hardware-mounted stair gate (non-negotiable at the top of stairs) | Decorative gates sold as “designer” options |
| Furniture | Anti-tip furniture straps for dressers, bookshelves, and TVs | Professional installation if you are comfortable doing it yourself |
| Corners | Foam corner guards | Any brand is fine. Generic ones work just as well. |
| Bath | Non-slip bath mat and soft faucet cover | High-tech sensor bath mats |
| Windows | Window stops or window guards (limit opening to 4 inches) | Expensive window alarm systems for most ground-level windows |
| Toilet | Basic toilet lid lock | Premium models with sensors |
| Door safety | Door pinch guards and doorstops | A foam pool noodle cut lengthwise works as a pinch guard in a pinch |
Real Talk: Professional baby proofing services can cost anywhere from $75 to several thousand dollars. Pediatricians, including AAP spokesperson Dr. Dina DiMaggio Walters, actually recommend that parents do it themselves.
When you install each safety measure yourself, you know exactly where every hazard is, which helps you stay alert even outside your own home.
Seasonal Baby Proofing Hazards to Know
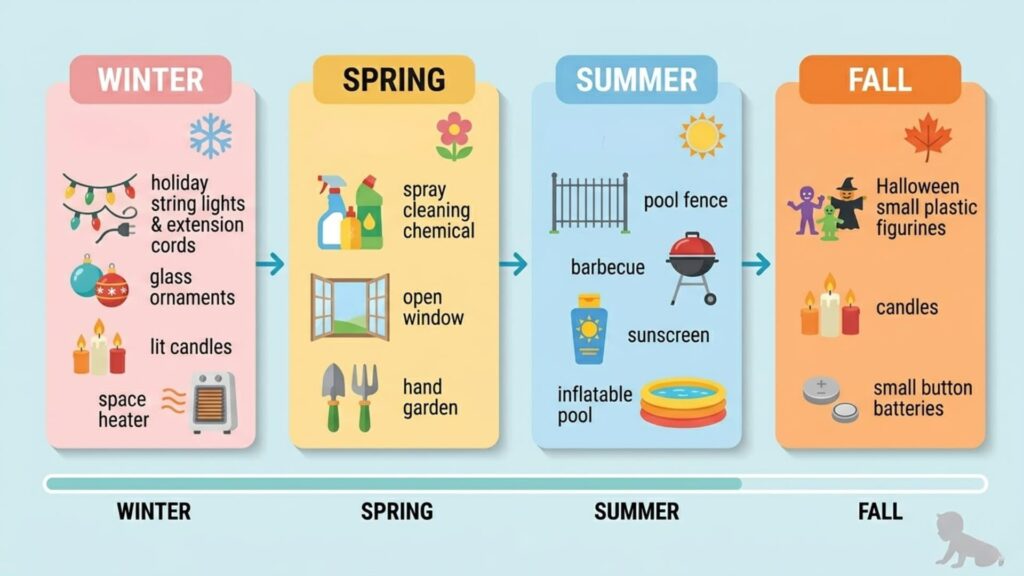
Some hazards only show up at certain times of year. These are easy to miss on a standard checklist, so they get their own section here.
Winter and Holiday Season
- Holiday lights and extension cords need to be hidden or secured behind furniture
- Small or glass ornaments on Christmas trees are both choking and cutting hazards. Keep lower branches ornament-free.
- Gift boxes often contain small parts, button batteries, and toys not suited for babies. Check every gift before it lands on the floor.
- Candles and holiday fireplaces need guarded barriers, not just supervision
- Space heaters must have safety cages and should never be left on without an adult in the room
Spring and Summer
- Complete a full pool safety check before the first swim of the season. Confirm all gates, latches, and alarms are working.
- Sunscreen, bug spray, and outdoor chemical products are toxic if swallowed. Store them locked up, even in the car.
- Barbecue grills and fire pits need a gate around them when in use
- Inflatable pools must be emptied and stored after every use
Year-Round Hazards to Stay On Top Of
- Button batteries from remote controls, key fobs, and greeting cards are one of the most dangerous swallowing hazards for children under 4. They cause severe internal burns within hours.
- Outdoor shoes brought inside carry chemicals and small debris. Leave them at the door.
- Seasonal décor (Halloween, Easter, Christmas) often includes small figurines and candles. Store them up high.
Baby Proofing Products Recommended by Pediatricians
Child safety experts agree on a core set of products that actually do their job. These are what pediatricians and child safety specialists consistently point to. Here is a quick rundown.
- Hardware-mounted stair gate: The only safe option at the top of a staircase. Screws into the wall for a firm hold.
- Magnetic cabinet locks: These hide inside the cabinet door. A magnetic key opens them. Children cannot see or feel the latch from the outside.
- Sliding outlet covers: These replace the standard outlet face plate. No plug-in cap to pull out. Much safer for crawlers.
- Anti-tip furniture straps: Essential for dressers, bookshelves, wardrobes, and TV stands. Secured to the wall studs.
- Soft faucet cover: Slips over the bathtub tap to cushion any head bumps during bath time.
- Toilet lid lock: A firm clip that holds the lid shut. Simple to open for adults, difficult for toddlers.
- Corner and edge guards: Foam padding that sticks onto sharp table corners and furniture edges.
- Window stops or window guards: Prevent windows from opening more than 4 inches. Some versions need no tools at all.
- Cordless window blinds: Replace any corded blinds in your home. Cords are a strangulation risk.
- Non-slip bath mat: Stick-on strips inside the tub prevent slipping during bath time.
- Stove knob covers: Fits over existing stove knobs to prevent a toddler from turning on burners.
- Doorknob covers: Fits over round doorknobs. Easy for adults to grip, difficult for small hands.
|
Note from Consumer Reports: CR tested 32 baby proofing products across four categories. Their experts stress that no product replaces a caregiver’s supervision. Check all safety products regularly for wear, cracks, or loosening. |
When to Stop Baby Proofing?
There is no set age at which babyproofing ends.
Consumer Reports experts note that once your child starts figuring out how to open or get past a safety product, it may be time to remove it and rely more on teaching.
Around age 5, most parents begin taking things down in stages, based on their child’s understanding and maturity. That said, some measures should stay in place no matter how old your child is.
Furniture anchoring, locked storage for medicines and chemicals, and pool barriers are not just for babies. They protect everyone in the home.
Summing It Up
Babyproofing is not something you do once and then move on from. Your baby changes, and so does what they can reach, open, and climb.
Every step in this baby proofing checklist brings your home closer to a safer place for your child to grow. No product replaces your eyes on your child, but the right setup gives you breathing room.
Start room by room, check your work every couple of months, and update it as your baby hits new milestones.
Which room in your home felt the most overwhelming to tackle? Or did you find a safety hack that worked really well for your family? Drop it in the comments below. Other parents would love to hear it.