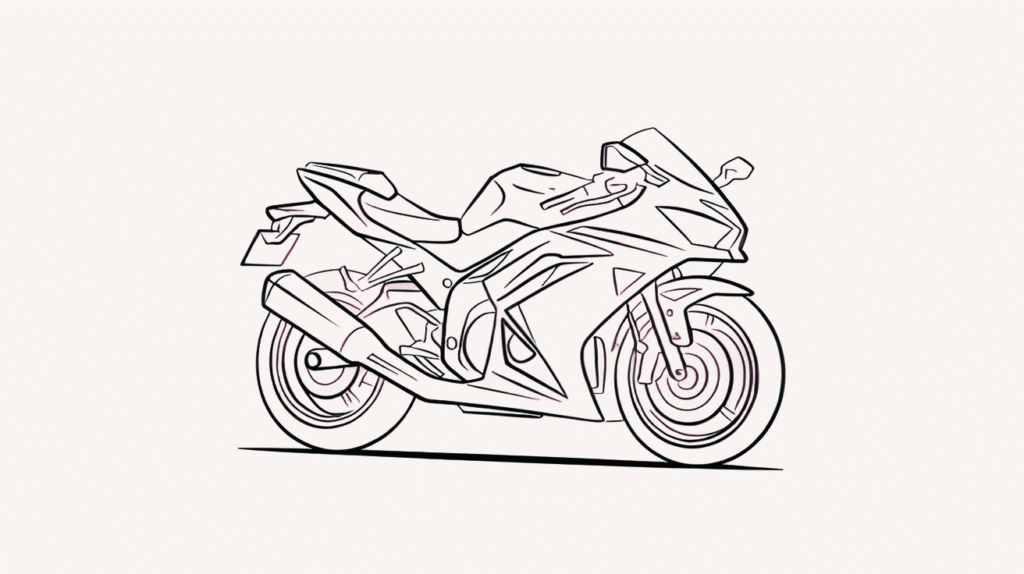
Most people think drawing motorcycles requires years of art training. These powerful machines are actually made up of simple shapes that anyone can master.
When someone learns how to draw a motorcycle easy, they gain a skill that impresses friends and builds confidence.
The process becomes enjoyable rather than frustrating when broken into clear steps. All it takes is grabbing a pencil and following a proven method.
This post shows exactly how to turn basic circles, rectangles, and lines into a motorcycle sketch that looks realistic and professional.
What Makes a Motorcycle Shape Work?
When someone wants to learn how to draw a motorcycle easy, they should start by understanding the basic parts.
Every motorcycle has four main components:
- Two round tires
- A central body frame
- The engine block
- Handlebars up front
The secret lies in seeing these parts as simple shapes first. Tires are circles or ovals. The engine becomes a rectangle or cylinder.
The body frame uses straight lines and gentle curves. Handlebars form basic horizontal lines with small circles for grips. Artists who master this shape-thinking approach find motorcycle drawing much less intimidating.
Instead of getting overwhelmed by details, they focus on these foundation shapes first. Once the basic structure is solid, adding realistic features becomes straightforward and enjoyable.
Materials You’ll Need to Start
Getting started requires just a few basic supplies that most people already have at home.
| Material | Purpose |
|---|---|
| HB Pencil or 4B Pencil | For soft sketching and darker outlines/shading |
| Eraser | To clean the guidelines and adjust the details |
| Ruler | Helps draw rectangles and align shapes proportionally |
| Compass or Round Object | Aids in drawing accurate, symmetrical circles for wheels |
| Drawing Paper | Your canvas – preferably sketchbook-quality for better pencil blending |
| Blending Tool (optional) | To smooth tonal gradients and shading |
6 Simple Steps to Draw a Motorcycle
Breaking down motorcycle drawing into six clear steps removes all the guesswork and confusion. Artists who follow this method find themselves creating better sketches faster than they ever thought possible.
Step 1: Draw the Base – Two Tires, One Line
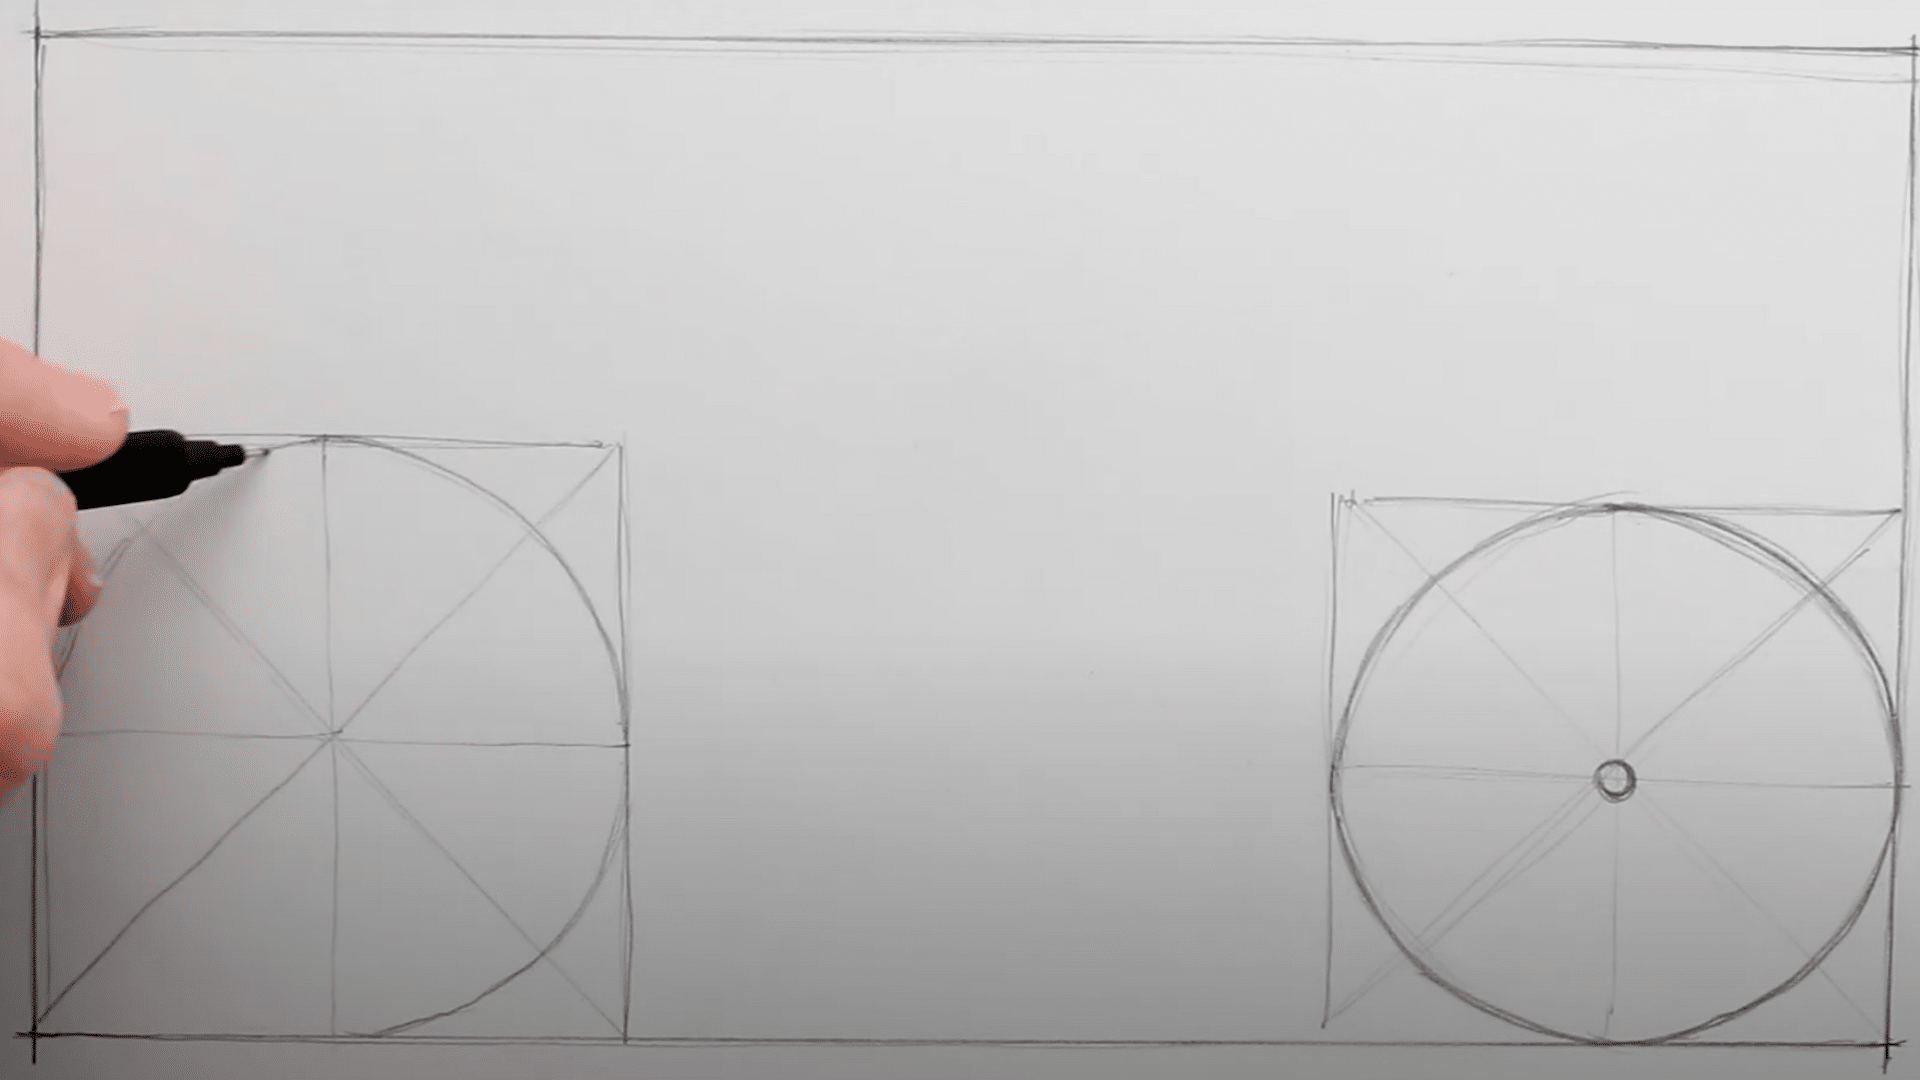
Begin by sketching a horizontal rectangle as your base structure, roughly one and a half times wider than it is tall. This acts as your motorcycle’s frame container.
Next, draw a square at the right corner of this rectangle and use intersecting diagonal and horizontal guidelines inside the square to help draw a perfect circle; this will be the rear wheel.
Repeat the process on the left side with a slightly larger square for the front wheel. Make sure your circles touch all sides of their respective squares to maintain symmetry.
Step 2: Add the Frame, Connect the Wheels with the Backbone
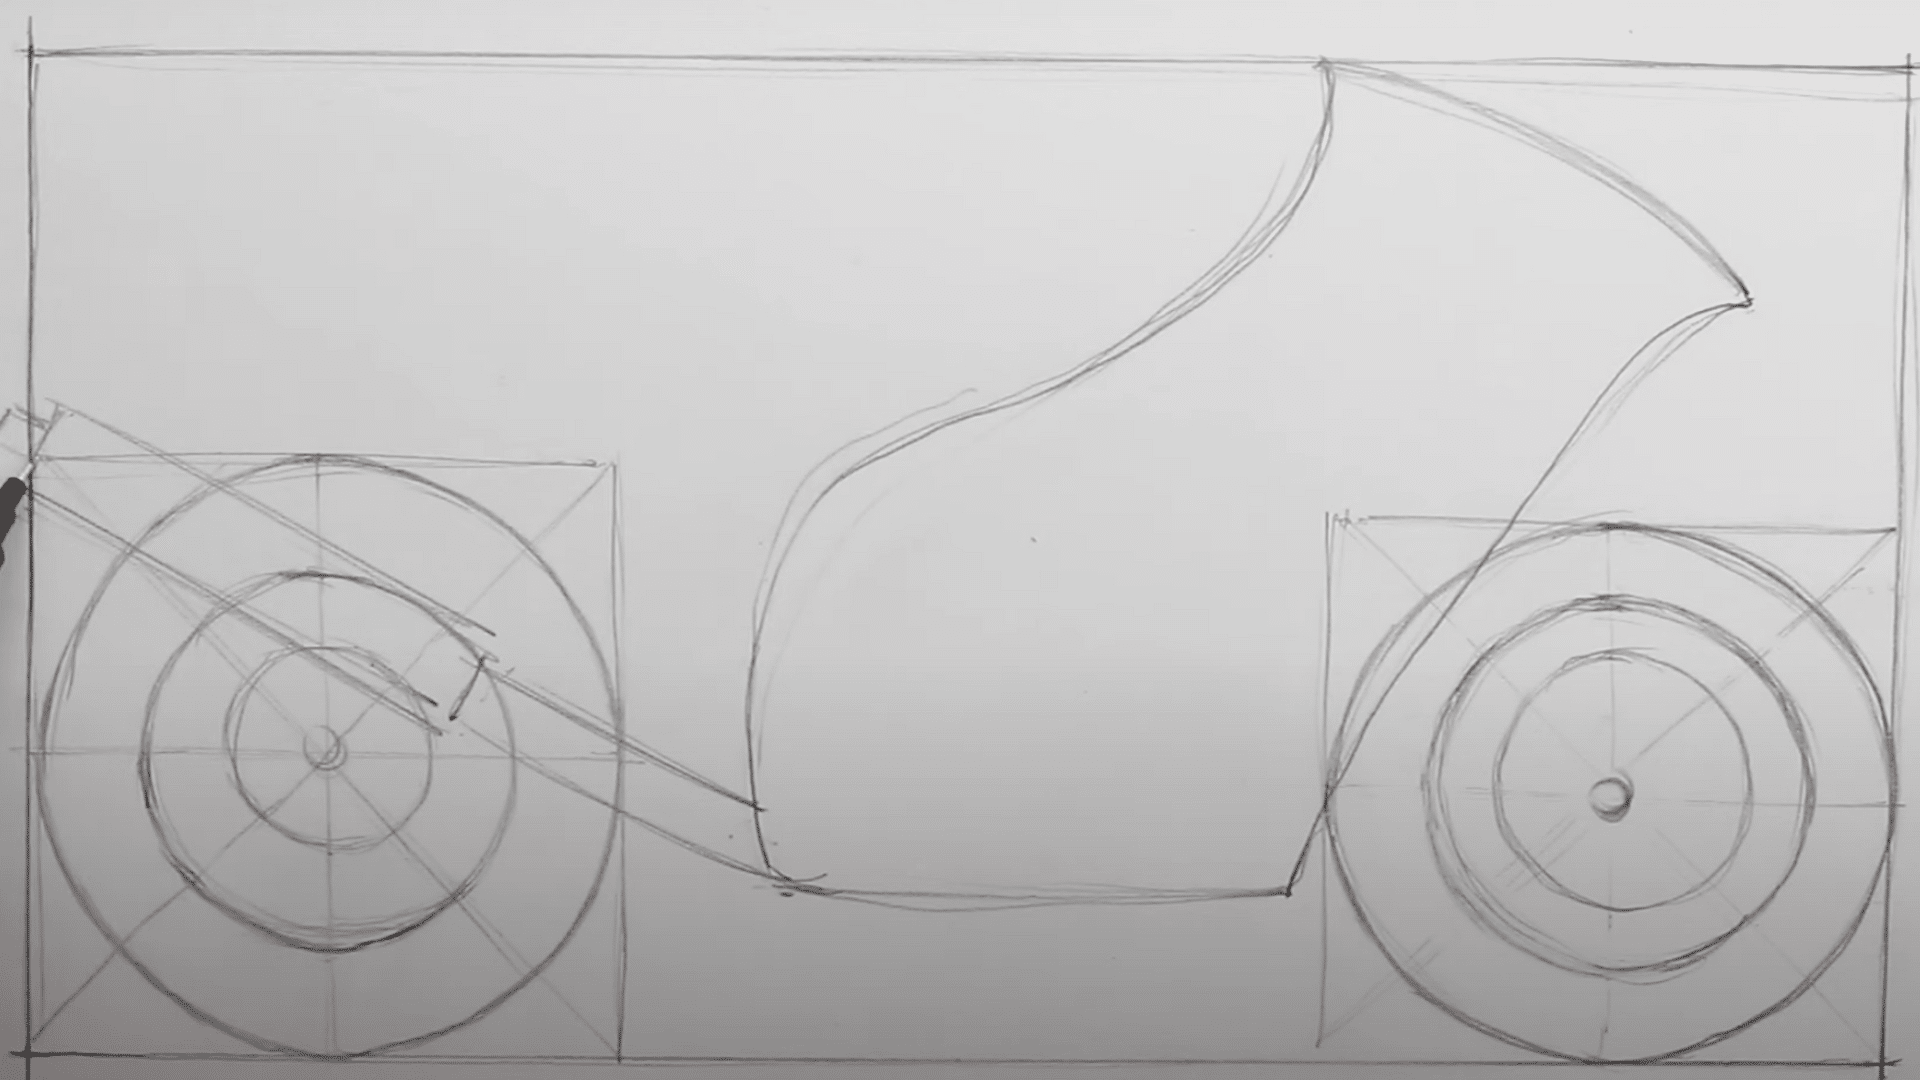
Now connect the wheels using curved and straight lines to create the main frame of the motorcycle.
This “spine” links the rear wheel to the front and supports the body. At this stage, also sketch the inner tire thickness and rotor disks inside each wheel to start adding depth.
Step 3: Sculpt the Seat and Gas Tank
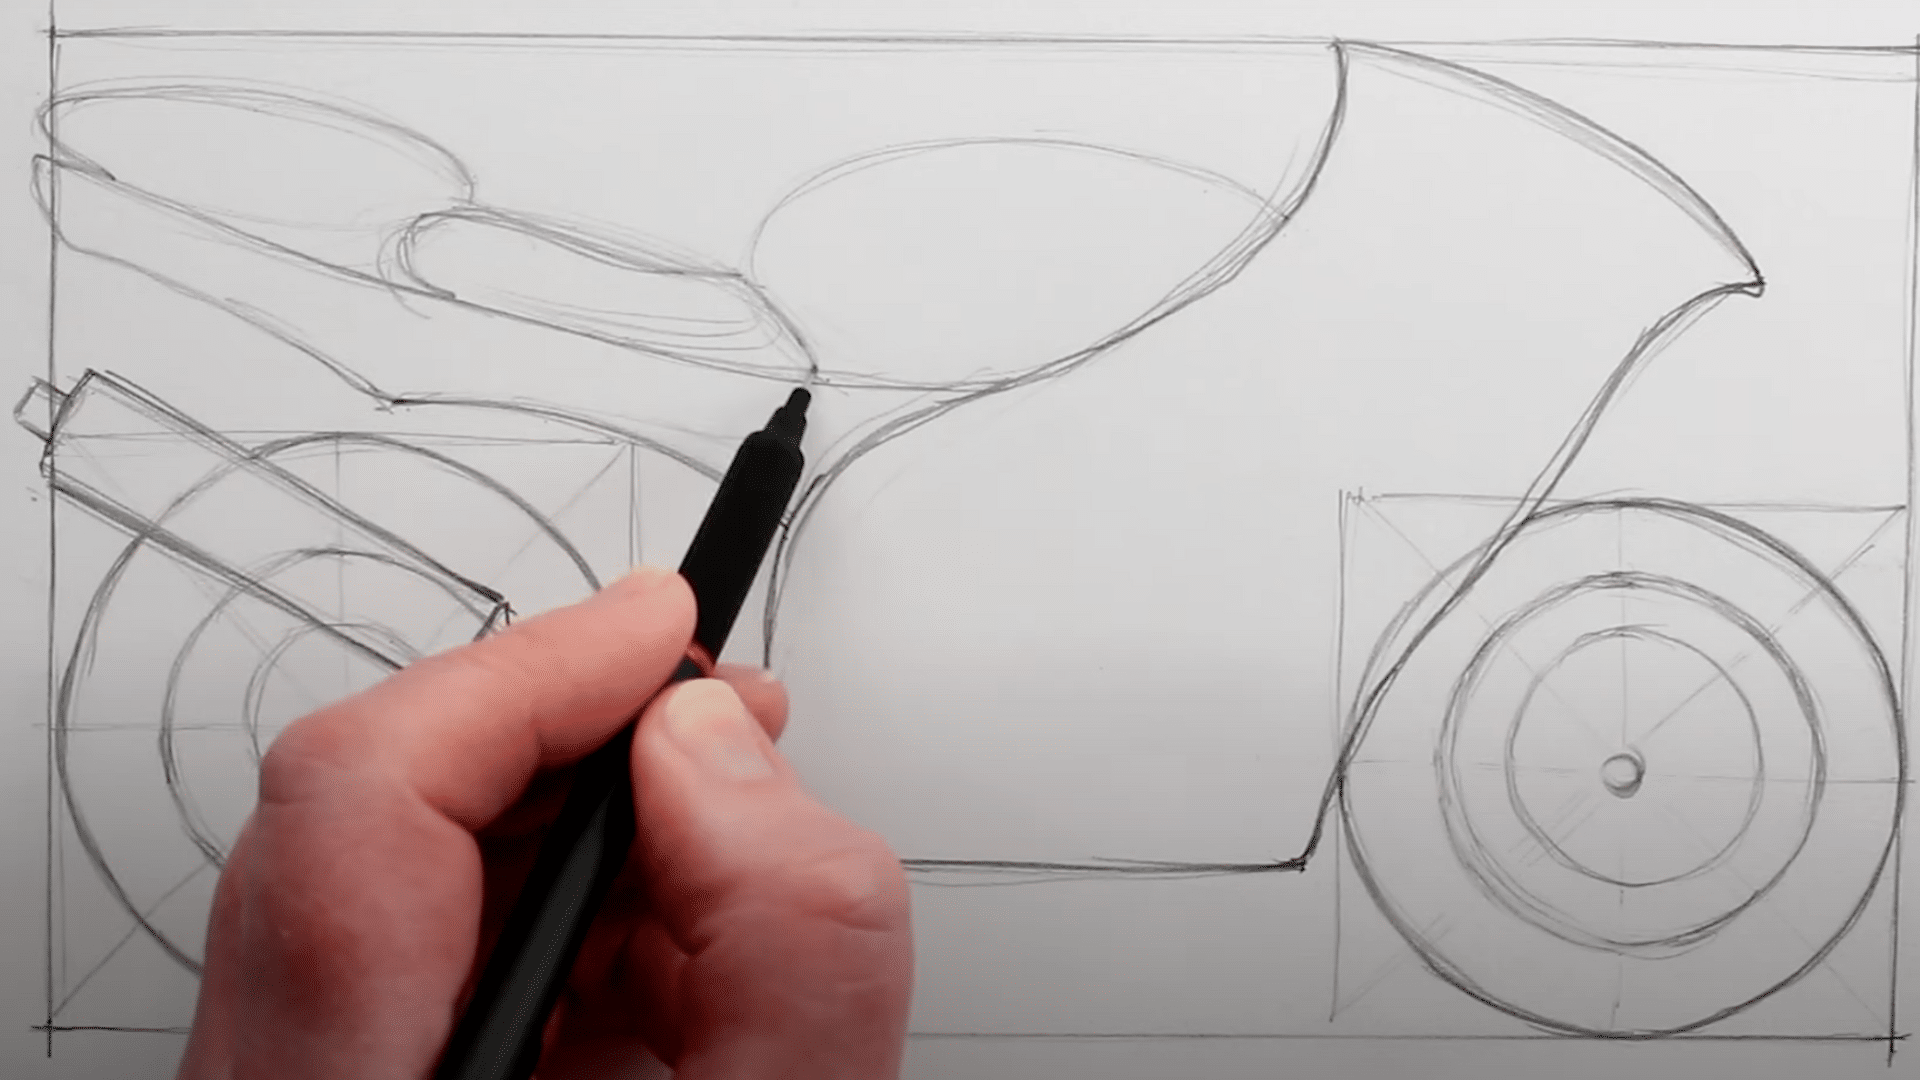
Start sketching the gas tank near the center-top of the frame; it should be the largest of the upper shapes. Right behind it, add the seat, followed by a small cover panel underneath.
These three shapes should connect fluidly to reflect the real motorcycle structure. Curves matter here; use them to shape an aerodynamic look.
Step 4: Sketch the Handlebars and Front Fork
Move to the left (front) side and sketch in the handlebar curving upwards from the front fork. Draw the front fork extending down from the handlebar to the front wheel, making sure it’s in line with the frame.
Keep the handlebar relatively simple but expressive, adding symmetry to both sides.
Step 5: Add Engine and Exhaust Details
Between the frame lines, draw blocky, simplified engine parts using rectangles and cylinders.
From the base, draw an angled exhaust pipe stretching above the rear tire. It helps to visualize this as another set of layered shapes sitting within the frame, connected to the lower part of the body.
Step 6: Final Touches; Lights, Mirrors, and Highlights
Add a headlight to the front, rearview mirrors branching off the handlebars, and any extra styling such as reflectors or indicators. Once you’re satisfied with the structure, begin shading.
Start with the tires, move to the darkest engine parts, then blend in mid-tones and graded tones for curved shiny areas like the gas tank and exhaust.
For a more detailed tutorial on how to draw a motorcycle easy in just a few steps, check out the video below:
Common Beginner Mistakes and Easy Fixes
Even experienced artists made these same mistakes when they first started drawing motorcycles. The good news is that each problem has a simple solution that makes the whole process much smoother.
Mistake 1: Misaligned Wheels and How to Correct Proportions
New artists often draw wheels that don’t line up properly. The front and rear tires end up at different heights or angles.
To fix this, they should draw a light horizontal guideline first. Both wheels should sit on the same baseline. The rear wheel is typically larger than the front one, but both need to touch the ground evenly.
Mistake 2: Overcomplicating the Engine. How to Simplify Without Losing Realism
Beginners get caught up drawing every engine detail they can see. This makes their sketch look messy and confusing.
The better approach is to treat the engine as one solid rectangular block first. Artists can add a few key lines for cylinders and pipes later, but the basic shape should stay simple and clean.
Mistake 3: Skipping Symmetry. How to Balance Both Sides of the Bike
Many people who want to know how to draw a motorcycle easy forget that motorcycles are symmetrical. They draw one side perfectly but ignore the other side completely.
Smart artists draw a center line down their motorcycle first. This helps them keep handlebars, seats, and other parts balanced on both sides.
Wrapping Up
Learning how to draw a motorcycle, easy drawing becomes second nature with practice.
Artists who follow these basic steps – understanding shapes, avoiding common mistakes, and focusing on proportions – will see steady improvement in their sketches.
New artists should show their work to friends or post it online for feedback. This builds confidence and helps them spot areas for improvement.
Ready for the next challenge? Try adding bright colors to make the motorcycle pop off the page. Motion lines can show speed and movement. Some artists even learn to draw riders sitting on their motorcycles for complete scenes.