That sudden red glow from your otherwise silent air-cleaning companion often causes unnecessary panic among homeowners. An air purifier’s red light typically signals that your filter needs attention, though the specific meaning can vary between brands and models. This warning signal helps you maintain your filters properly, extending your device’s lifespan while ensuring you continue breathing cleaner air.
Common Red Light Meanings By Brand
Not all red lights are created equal. Here’s what they typically indicate on popular brands:
Honeywell uses solid red to indicate filter replacement time based strictly on running hours (around 2,000 hours for most models). Their premium units flash red when detecting extremely poor air quality regardless of filter condition.
Dyson purifiers show red when either particle or gas pollution reaches high levels. This is more of an air quality alert than a filter warning, though the two often coincide. Check their app for specific readings explaining exactly what triggered the alert.
Levoit models display red when filters reach end-of-life based on runtime calculations. Their Core series adds air quality monitoring, where red means PM2.5 levels above 150 μg/m³, indicating seriously compromised air.
Coway units feature a ring light that turns red after approximately 6 months of operation. Their newer models use an air purifier’s red light feature that flashes when detecting smoke or cooking fumes, then returns to normal once the air clears.
Blueair purifiers use a progressive system where the light changes from blue to yellow to red as filter life diminishes. When solid red appears, their filters have typically processed air for 6 months under normal conditions.
Winix models show red for both poor air quality (temporary) and filter replacement needs (constant). Their PlasmaWave models also flash red when their proprietary technology needs servicing.
Quick Check: Filter Problem or Something Else?
Before opening your machine, figure out if you’re dealing with a filter issue or a different problem:
A steady red light almost always means filter replacement time. This timer-based alert triggers after predetermined hours of operation.
A blinking or flashing red light typically indicates either extremely poor air quality or a system error, like a dislodged filter or blocked air intake.
Red lights that appear only temporarily during operation usually monitor air quality rather than filter condition. These should return to green or blue when the air improves.
If the red light appeared immediately after moving or cleaning the purifier, you might have a simple assembly issue rather than a dirty filter. Check that all components are properly seated.
Units that run normally despite the red light are likely just telling you about scheduled maintenance rather than experiencing performance problems. These can often wait a few days if needed.
Lights accompanied by unusual noises or smells suggest problems beyond simple filter replacement, possibly motor issues requiring professional attention.
Find Your Filter: Locations By Purifier Type
Before checking any filter, you need to know where to look based on your purifier style:
Tower purifiers typically house filters behind a rear panel that either slides or pops off. Look for indented grip areas or release buttons along the back edges.
Cylindrical units like Dyson models often have a base that twists off, revealing a HEPA filter wrapped around the central column.
Box-style purifiers generally have front or side panels that release with pressure tabs. Some budget models use bottom access panels instead.
Console models (larger units designed to clean whole rooms) typically feature front panels that open like cabinet doors, with multiple filters arranged in sequence.
Portable desktop purifiers often have a simple twist-off base containing a small combination filter that serves multiple functions.
Once you’ve spotted your air purifier’s red light and located the filter compartment, you’re ready for a proper inspection.
Step-By-Step Filter Inspection That Actually Works
Now that you’ve found your filter compartment, follow these practical steps to address that persistent red light:
- Power down completely – Unplug your purifier, not just turn it off. This protects both you and sensitive electronic components during maintenance.
- Remove the access panel – Press release tabs or remove screws as needed. Place any small parts in a container to avoid losing them.
- Take a quick photo – Before removing anything, snap a picture showing how filters are arranged. This reference saves headaches during reassembly.
- Remove filters in sequence – Start with the outermost filter (usually a pre-filter) and work inward. Handle filters by their frames to avoid damaging filter media.
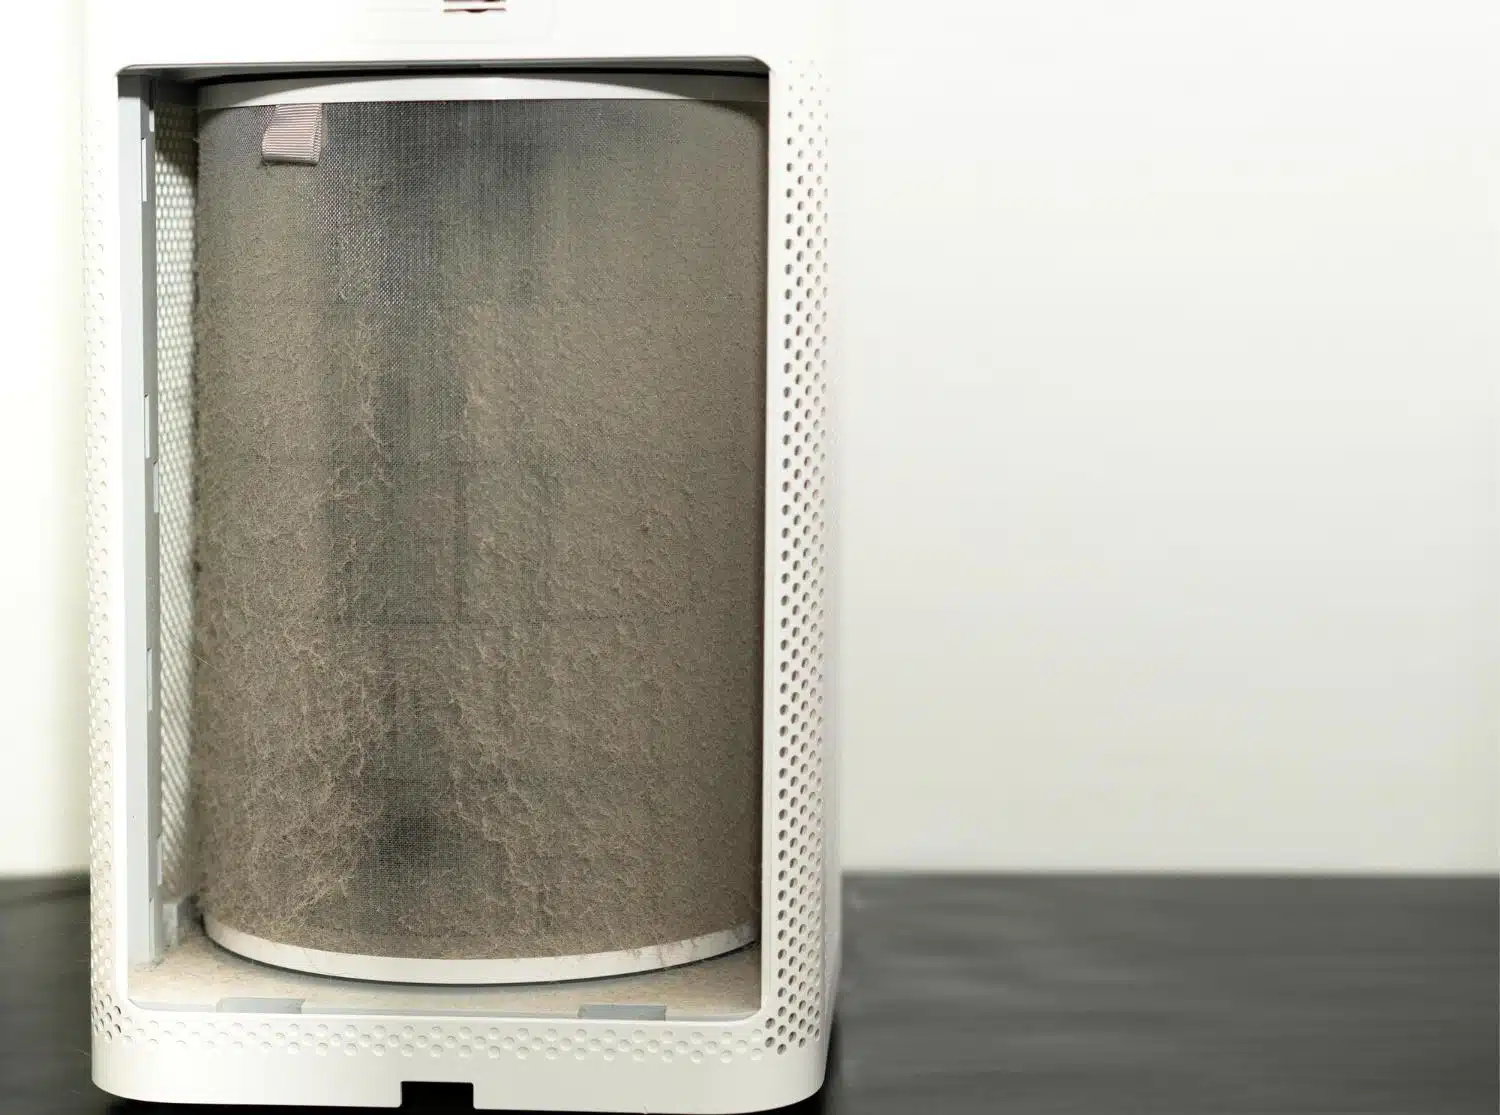
- Check the pre-filter first – This thin outer layer should catch large particles. Hold it up to light—if you can barely see through it, it needs cleaning or replacement.
- Inspect the HEPA filter – Look for discoloration. White or light gray filters that have turned dark gray or brown have captured significant particulates and likely need replacement.
- Examine carbon filters – These black filters won’t show dirt, but may stop absorbing odors effectively when saturated. If household odors persist despite purifier operation, carbon filters likely need changing.
- Look behind the filters – Check for dust buildup on fan blades or sensors. Clean these areas with a soft brush or vacuum attachment using gentle pressure.
Washable vs. Replaceable: The Truth About Filter Cleaning
Some filters can be restored, while others require replacement, despite what some YouTube videos claim. Here’s the honest breakdown:
Washable pre-filters – These can be rinsed under lukewarm water with mild dish soap. Avoid scrubbing harshly, which could damage the material. Air dry completely (24+ hours) before reinstallation.
HEPA filters – Contrary to some advice, true HEPA filters cannot be effectively washed without destroying their filtration ability. Light vacuuming of the intake side can remove surface dust, but won’t restore a heavily soiled filter.
Permanent/washable HEPA – Some purifiers advertise washable HEPA-type filters. These can be rinsed gently, but won’t maintain the same 99.97% efficiency after washing. Follow the manufacturer’s instructions precisely.
Carbon filters – These cannot be restored once saturated with gases and odors. Some minimal refresh can come from leaving them in direct sunlight for several hours, but replacement remains the only effective solution.
Plastic mesh filters – These can be washed with warm, soapy water and a soft brush. Ensure they’re completely dry before reinstallation to prevent mold growth inside your purifier.
Reset That Annoying Red Light (Model-Specific Methods)
After addressing filter issues, you’ll need to reset the warning system:
Button reset – Most models have a dedicated reset button (often labeled “Reset” or “Filter”) that needs pressing for 3-5 seconds until the light changes or turns off.
Combination press – Some units require holding multiple buttons simultaneously, such as power and speed together for 5-10 seconds until seeing a confirmation flash.
App-connected purifiers – These often require resetting through their companion application. Look for maintenance sections with reset options.
Auto-sensing models – Some units reset automatically when properly opening and closing the filter compartment, using sensors to detect the maintenance action.
Power cycling – When all else fails, unplug the unit for 30 seconds before reconnecting. This clears basic system memory on simpler models.
If standard reset procedures fail, consult your manual’s troubleshooting section or the manufacturer’s website for model-specific solutions.
When Cleaning Won’t Cut It: Replacement Time
Sometimes maintenance isn’t enough, and only replacement will solve the issue:
Physical damage – HEPA filters with tears, holes, or warping need immediate replacement regardless of age. Once physically compromised, particles bypass filtration entirely.
Persistent odors – If your purifier stops controlling odors despite cleaning, your carbon filter has reached saturation and needs replacement.
Reduced performance – When rooms that previously felt fresh within 30 minutes now take hours to improve, your filter media has likely degraded beyond functionality.
Mold indicators – Musty smells coming from the unit suggest microbial growth within the filters. This demands complete replacement, as cleaning rarely eliminates embedded mold spores.
Heavy contamination environments – Households with woodstoves, multiple pets, or nearby construction need more frequent replacements than average recommendations.
Smart Prevention: Stop That Red Light Before It Appears
These practical habits help reduce those annoying red light surprises:
Strategic placement – Keep your purifier at least 3 feet from direct sources of heavy particles like cooking areas, woodstoves, or pet beds.
Regular home cleaning – Vacuum floors and surfaces weekly to reduce the particle load your purifier must handle, extending filter life.
Pre-filter checks – Examine and clean pre-filters monthly regardless of indicator lights. This prevents unnecessary strain on more expensive HEPA components.
Humidity control – Maintain home humidity between 30-50%. Excessively dry air increases dust circulation, while overly humid conditions promote mold growth.
Scheduled replacements – Mark your calendar for filter checks based on manufacturer recommendations rather than waiting for warning lights.
Seasonal adjustments – Pollen seasons, winter heating months, and summer open-window habits all impact filter performance differently. Adjust your maintenance schedule accordingly.
When To Call The Pros
While most red light issues on an air purifier relate to filter maintenance, some problems require professional help:
Motor noises – Grinding, squealing, or buzzing suggest mechanical problems requiring professional attention.
Electrical issues – Flickering displays, intermittent operation, or control panel problems indicate electrical component failures.
Persistent red lights – Warning indicators that remain after proper filter replacement and reset attempts may signal sensor failures.
Water damage – Units exposed to flooding or excessive humidity may have internal component damage beyond user serviceability.
Smart features failure – Connected features that stop working might need firmware updates or repairs beyond basic troubleshooting.
That red light might initially seem like a nuisance, but it actually serves as your ally in maintaining indoor air quality. Users who check filters every few months catch small issues before they trigger warning systems altogether. Your reward? Consistently clean air, lower energy bills from properly functioning equipment, and an extended purifier lifespan that saves hundreds in replacement costs. The few minutes spent on filter maintenance deliver one of the best returns on investment for any home appliance care.