Store-bought ornaments all look the same. They cost too much. And they never feel quite right on your tree.
What if you could make ornaments that actually mean something? Ones that won’t break your budget or take hours to finish?
You can. With basic supplies from around your house, you’ll create unique diy christmas ornaments that tell your family’s story. No special skills needed. No expensive materials required.
This guide shows you everything from simple paper snowflakes to salt dough keepsakes.
You’ll learn how to make ornaments with kids, turn recycled items into tree decorations, and store your creations safely.
Ready to fill your tree with homemade christmas ornaments you’ll love for years?
Why DIY Christmas Ornaments Are Worth Making
Making your own ornaments lets you create something truly special for your tree. You save money while spending quality time with family. Kids love getting hands-on with glitter, paint, and glue.
Each homemade christmas ornament becomes a memory you can hang year after year. Store-bought decorations may look nice, but they can’t match the warmth of something you made yourself.
Plus, you control what materials you use and how much you spend. These handmade pieces tell your family’s story in a way nothing else can.
Supplies You Can Use for DIY Christmas Ornaments
You don’t need fancy materials to make beautiful ornaments. Most items are already in your home or are easy to find at any craft store. Here’s what you can use:
| Supply Category | Items You’ll Need | Where to Find Them |
|---|---|---|
| Everyday Household Items | Paper, cardboard, old magazines, newspapers, string, yarn, buttons, fabric scraps, toilet paper rolls, bottle caps, mason jar lids | Around your house |
| Craft Store Basics | Glue sticks, paint, markers, glitter, pom-poms, pipe cleaners, felt sheets, foam sheets, ribbon, beads, wooden shapes | Local craft store or online |
| Optional Tools for Durability | Mod Podge sealer, clear varnish, hot glue gun, hole punch, scissors, cookie cutters (for salt dough), twine or fishing line for hanging | Craft store or hardware store |
Pro Tip: Start with what you have at home first. You can always add craft store items later if you want more color or sparkle.
Easy DIY Christmas Ornaments for Beginners
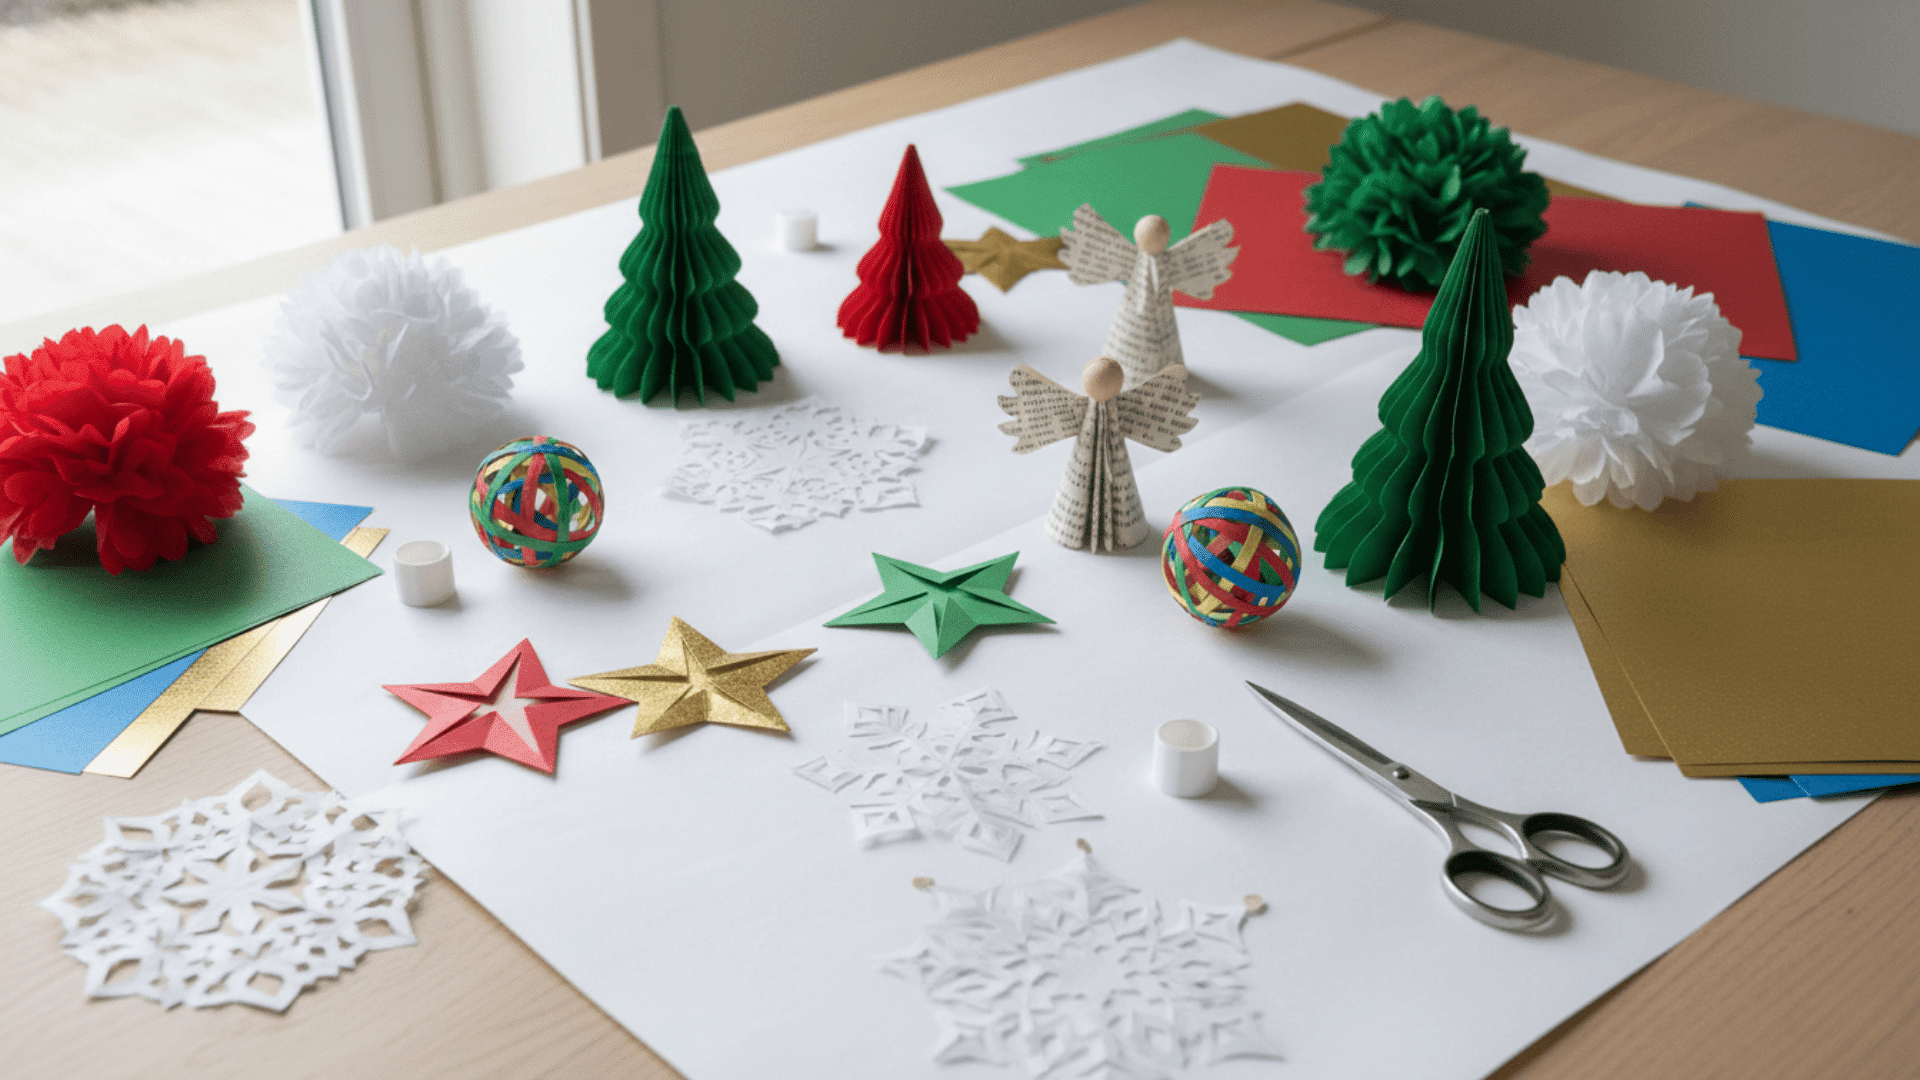
If you’re new to crafting, paper ornaments are your best friend. They’re cheap, easy to make, and look great on any tree.
- Paper snowflakes: Fold white paper and cut patterns to create classic winter shapes. Each snowflake turns out unique, and kids love seeing how different each one looks.
- Cardstock stars: Cut star shapes from thick paper and decorate with markers or glitter. Cardstock holds up better than regular paper and won’t tear easily.
- Accordion paper trees: Fold green paper back and forth, then fan it out into a tree shape. Add a brown trunk at the bottom, and you have instant mini Christmas trees.
- Paper strip baubles: Cut strips of colored paper and glue the ends together to form a round ball. Layer different colors for a striped effect that catches the light.
- Painted cardboard shapes: Cut shapes from old boxes and paint them in festive colors. This is a great way to use packaging you’d generally throw away.
- Book page ornaments: Use old book pages to fold or cut into trees, stars, or angels. The vintage text adds character you can’t get from plain paper.
- Paper cone trees: Roll green paper into cone shapes and add a string to hang. Decorate the cones with sequins or stickers to make them sparkle.
- Folded paper hearts: Fold red or pink paper and cut heart shapes for a sweet look. String several together to make a garland or hang them separately.
- Paper chain ornaments: Link strips of paper into small chains and hang them as loops. Use holiday colors like red, green, and white for a classic feel.
- Tissue paper pom-poms: Stack tissue paper, fold it, and fluff it into soft pom-poms. These lightweight decorations add texture and volume to your tree.
- Paper gingerbread people: Cut gingerbread shapes from brown paper and draw on faces. Add buttons and icing details with white markers or paint.
- Origami ornaments: Fold paper into cranes, stars, or boxes using simple origami techniques. There are tons of free tutorials online if you need help.
- Paper wreath miniatures: Cut circles from green paper and glue them into tiny wreath shapes. Add a red bow at the bottom to complete the traditional look.
- Printable coloring ornaments: Print holiday designs, color them, and cut them out. This keeps kids busy and gives them something they created for the tree.
- Paper angel cutouts: Fold paper and cut angel shapes with wings and halos. Hang them throughout the house or give them as gifts to friends.
- Salt dough handprints: Press little hands into dough before baking to save the memory forever. Write the year and age on the back so you remember when you made it.
- Name-stamped dough ornaments: Use letter stamps to press names or dates into soft dough. These become personalized gifts that people actually want to keep.
- Star-shaped salt dough pieces: Cut stars with cookie cutters and bake until hard. Paint them gold or silver for a more finished look.
- Clay letter ornaments: Form clay into letters that spell out names or holiday words. You can spell JOY, NOEL, or family member names.
- Mini clay wreaths: Roll clay into thin ropes and shape them into small wreath circles. Add tiny clay berries or bows for extra detail.
- Clay snowman faces: Mold white clay into circles and add coal eyes and carrot noses. Give each one a different expression to add personality.
- Dough cookie-style ornaments: Make ornaments that look like gingerbread cookies using brown dough. Decorate with white paint to mimic icing details.
- Pressed texture clay ornaments: Press lace, leaves, or fabric into clay for textured designs. The imprints create beautiful patterns that look professional.
- Painted clay discs: Roll flat clay circles, bake them, and paint holiday scenes on top. Trees, snowmen, and candy canes work well for simple designs.
- Clay ornament gift tags: Shape small tags from clay and write names with a toothpick. Attach them to wrapped presents for a handmade finishing touch.
- Pinecone ornaments: Tie a string around pinecones and hang them as simple nature decorations. You can leave them natural or dust them with white paint for a snowy effect.
- Cinnamon stick bundles: Bind cinnamon sticks together with twine for a spicy scent. Your whole room will smell like the holidays every time you walk by.
- Dried orange slices: Slice oranges thin, dry them in the oven, and thread them with ribbon. They look beautiful and add a citrus smell to your tree.
- Wood slice ornaments: Use thin wood slices and paint or burn designs onto them. You can write names, draw pictures, or leave them natural with just a coat of varnish.
- Twig stars: Glue small twigs together into star shapes for a woodland look. Collect sticks from your yard to make these completely free.
- Acorn cap ornaments: Paint acorn caps and glue them to felt or wooden shapes. These tiny details add charm without taking up much space.
- Dried leaf ornaments: Press and dry colorful fall leaves, then coat them with clear glue. Autumn leaves preserve their color and look stunning against evergreen branches.
- Berry cluster ornaments: Bundle fake or dried berries together with wire and ribbon. Red berries add pops of color throughout your tree.
- Mini evergreen bundles: Tie small sprigs of pine or fir with twine for fresh greenery. These smell fresh and bring the scent of a real tree to any space.
- Bark-wrapped ornaments: Wrap thin bark pieces around foam balls and secure with glue. This creates a natural texture that fits rustic or farmhouse themes.
- Popsicle stick snowflakes: Glue popsicle sticks together in snowflake patterns and paint them white. Add glitter while the paint is still wet for extra sparkle.
- Pom-pom ornaments: String colorful pom-poms onto yarn or glue them to foam shapes. Kids can pick their favorite colors and create rainbow ornaments.
- Foam shape ornaments: Cut foam sheets into shapes and let kids decorate with markers. Foam is easy to cut and safe for younger children to handle.
- Handprint keepsake ornaments: Trace little hands on paper or clay to create lasting keepsakes. These become precious memories as kids grow older each year.
- Fingerprint snowmen: Let kids press fingerprints in white paint to form snowman bodies. Add tiny details like hats and scarves with markers after the paint dries.
- Paper plate ornaments: Cut paper plates into circles and have kids paint holiday designs. The sturdy plates hold up to lots of paint and glue.
- Sticker-decorated baubles: Give kids plain ornaments and sheets of holiday stickers to apply. This is mess-free and perfect for toddlers who can’t paint yet.
- Crayon-melt ornaments: Melt crayon shavings between wax paper for colorful designs. The heat creates swirled patterns that look like stained glass.
- Felt shape ornaments: Cut simple shapes from felt and let kids glue them together. Felt sticks easily and doesn’t need sewing for quick projects.
- Pipe cleaner candy canes: Twist red and white pipe cleaners into candy cane shapes. Bend the top into a hook so they hang on branches perfectly.
- Bead-and-string ornaments: Thread large beads onto a string to make colorful hanging decorations. This helps young kids practice fine motor skills while crafting.
- Button collage ornaments: Glue buttons onto cardboard circles in fun patterns and colors. Sort through your button jar and let kids pick their favorites.
- Painted rock ornaments: Let kids paint small, smooth rocks with festive designs. Seal them with clear varnish so the paint doesn’t chip off.
- Sponge-painted ornaments: Dip sponges in paint and press onto cardstock for textured art. Cut the sponges into holiday shapes like trees or stars for themed prints.
- Glitter-free sensory ornaments: Fill clear plastic balls with rice, beads, or sequins for safe sensory play. These make gentle rattling sounds when kids shake the tree branches.
- Mason jar lid ornaments: Paint jar lids and add photos or small decorations inside the rings. The metal ring holds everything in place and creates a frame effect.
- Bottle cap ornaments: Decorate metal bottle caps with paint, paper, or tiny holiday scenes. Glue ribbon loops on the back for easy hanging.
- Old CD snowflakes: Cut or break CDs into pieces and glue them into shiny snowflake shapes. The reflective surface catches light beautifully on the tree.
- Fabric scrap ornaments: Sew or glue leftover fabric pieces into small stuffed shapes. Use patterns from old clothes to make ornaments with sentimental value.
- Wine cork reindeer: Glue wine corks together and add googly eyes and pipe cleaner antlers. These work great as place card holders at holiday dinners, too.
- Light bulb ornaments: Paint old light bulbs to look like snowmen, penguins, or Santas. The bulb shape naturally creates round bodies perfect for winter characters.
- Toilet paper roll stars: Cut toilet paper rolls into rings and arrange them into star patterns. Paint them all one color or make each point a different shade.
- Tin can lid ornaments: Clean tin lids, punch designs into them, and paint them bright colors. The punched holes let light shine through when hung near candles or lamps.
- Scrap ribbon ornaments: Tie leftover ribbon pieces into bows or weave them into shapes. Mix patterns and textures for a collected-over-time look.
- Upcycled puzzle piece ornaments: Paint old puzzle pieces and glue them into wreaths or snowflakes. This gives new life to puzzles with missing pieces.
- Clear fillable ball ornaments: Fill clear plastic or glass balls with fake snow, greenery, or beads. Layer different materials inside for depth and visual interest.
- Beaded hoop ornaments: Wrap metal hoops with beads and wire for a modern boho style. Gold or silver beads work well for a sophisticated look.
- Neutral fabric baubles: Cover foam balls with linen, burlap, or cream fabric for subtle tones. These blend into any color scheme and never look outdated.
- Velvet ribbon ornaments: Tie luxe velvet ribbon into bows or wrap it around simple shapes. The soft texture adds richness to your tree without being flashy.
- Gold-painted wood shapes: Cut wood into simple shapes and paint them gold or bronze. The metallic shine looks expensive but costs very little to make.
- Monogram letter ornaments: Create personalized letters from wood, clay, or cardboard in matching colors. These work as gifts or to identify stockings and presents.
- Minimalist line-art ornaments: Draw simple wire shapes like trees, stars, or reindeer outlines. Less is more with these clean designs that suit modern homes.
- Pressed flower ornaments: Preserve real flowers between glass or resin for a delicate look. Choose flowers from your garden to make them even more meaningful.
- Frosted glass ornaments: Coat glass ornaments with frosted spray paint for an icy finish. This technique makes old ornaments look brand new and cohesive.
- Scandinavian-style straw ornaments: Weave straw or raffia into geometric shapes for a Nordic feel. Traditional patterns like stars and hearts work beautifully in natural tones.
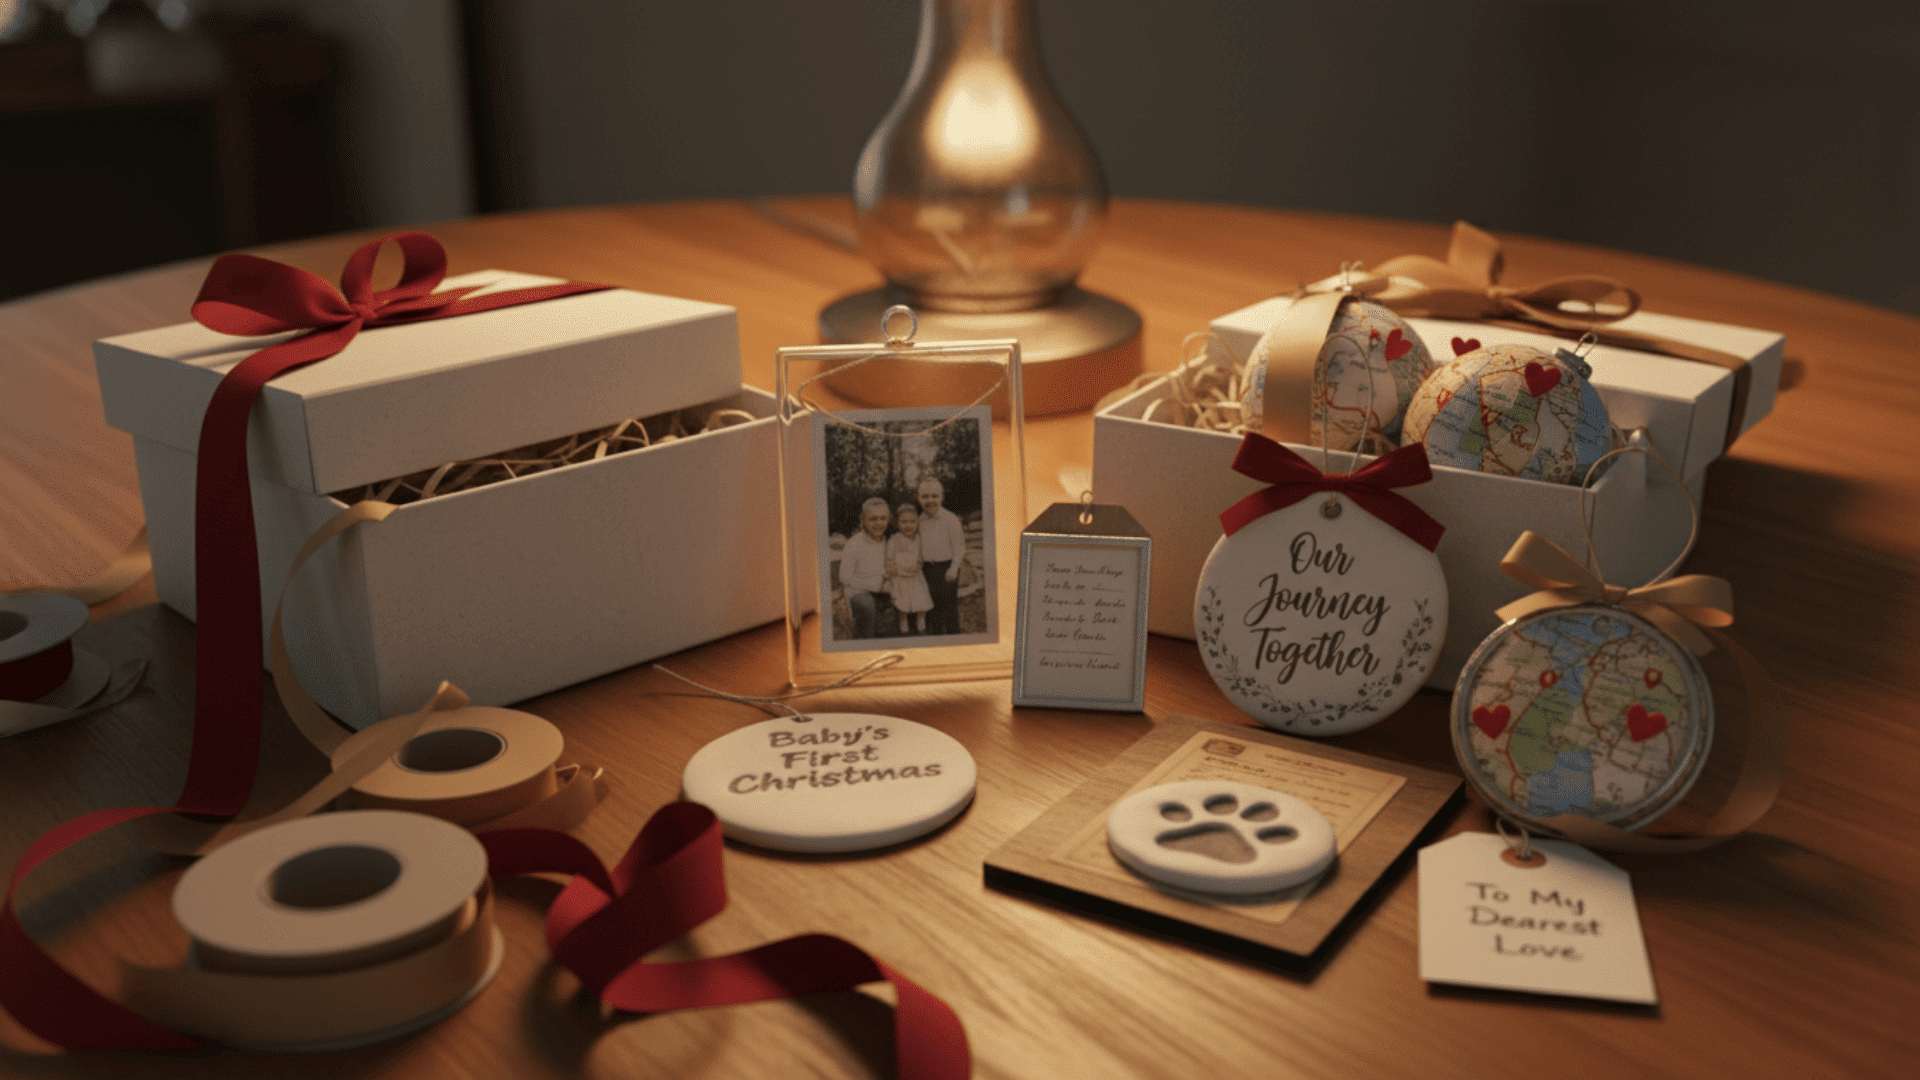
- Photo memory ornaments: Insert favorite photos into clear frames or lockets to hang on the tree. Choose pictures from special moments like vacations, weddings, or new babies.
- First Christmas ornaments: Mark a baby’s first holiday with their name and year stamped on dough or wood. Parents love having this keepsake to bring out every December.
- Newlywed ornaments: Create ornaments with the couple’s names and wedding date for newlyweds. Add their last name or “Our First Christmas” for a personal touch.
- Baby milestone ornaments: Document special moments like first steps or first words on keepsake ornaments. Write the milestone and date so parents remember precisely when it happened.
- Family name ornaments: Paint or write your family name on wooden shapes or clay pieces. These make great gifts for relatives or friends you visit during the holidays.
- Year-stamped ornaments: Add the current year to any ornament to mark that specific holiday season. Years later, you’ll remember exactly when you made or received it.
- Pet-themed ornaments: Include pet names, paw prints, or photos on ornaments for animal lovers. Paint your dog or cat’s portrait or press their paw into clay.
- Travel memory ornaments: Use maps, postcards, or stamps from trips to create location-based keepsakes. Mark places you’ve visited or dream destinations for future travels.
- Recipe card ornaments: Write favorite family recipes on small cards and laminate them for hanging. This preserves Grandma’s cookie recipe in a way that gets seen every year.
- Handwritten note ornaments: Preserve handwritten messages or drawings from loved ones in small frames. Children’s drawings become priceless as they grow up.
- Memory quote ornaments: Add meaningful quotes, song lyrics, or inside jokes to personalized pieces. Choose words that remind you of specific people or happy times together.
Salt Dough and Clay Homemade Christmas Ornaments

Salt dough and clay give you lasting ornaments that feel more permanent. These are perfect for capturing handprints and special messages.
Natural Material DIY Christmas Ornaments
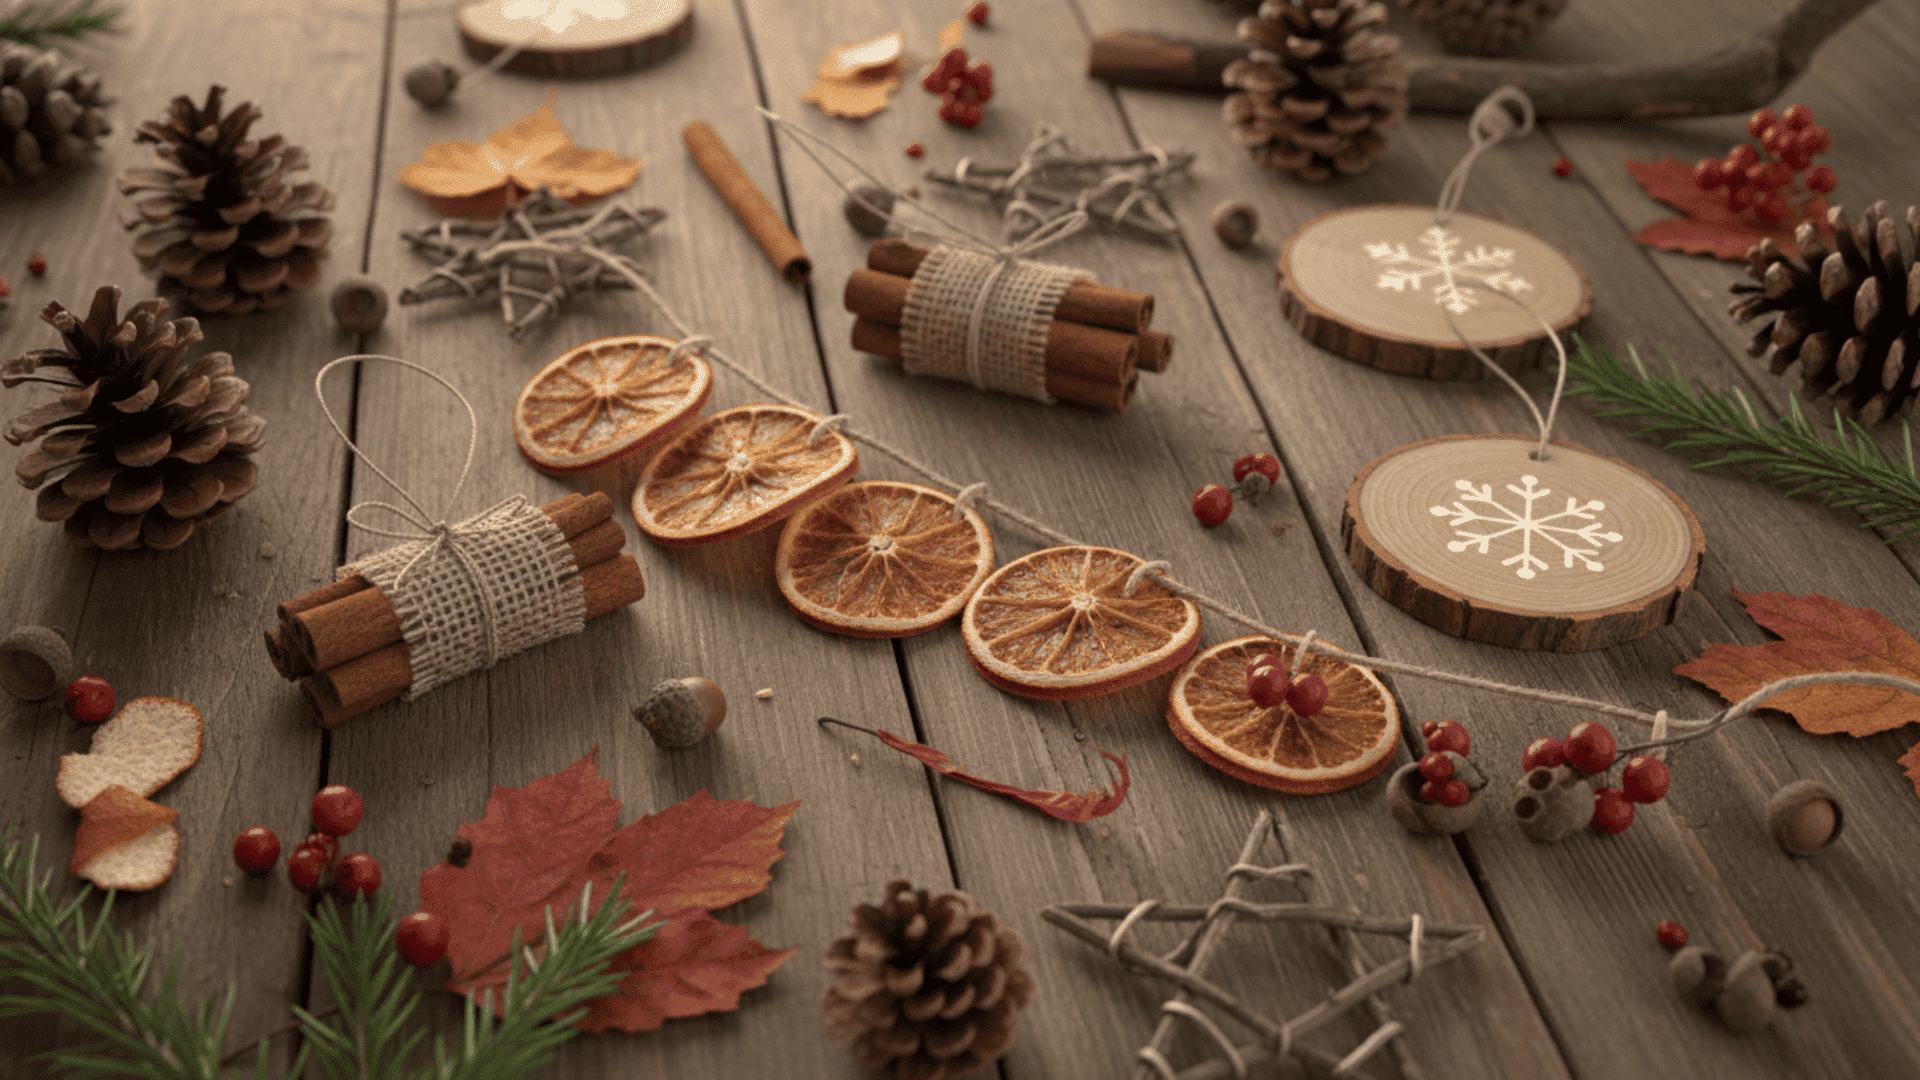
Bring the outdoors inside with natural materials. These ornaments smell wonderful and add a rustic feel to your tree.
DIY Christmas Ornaments for Kids
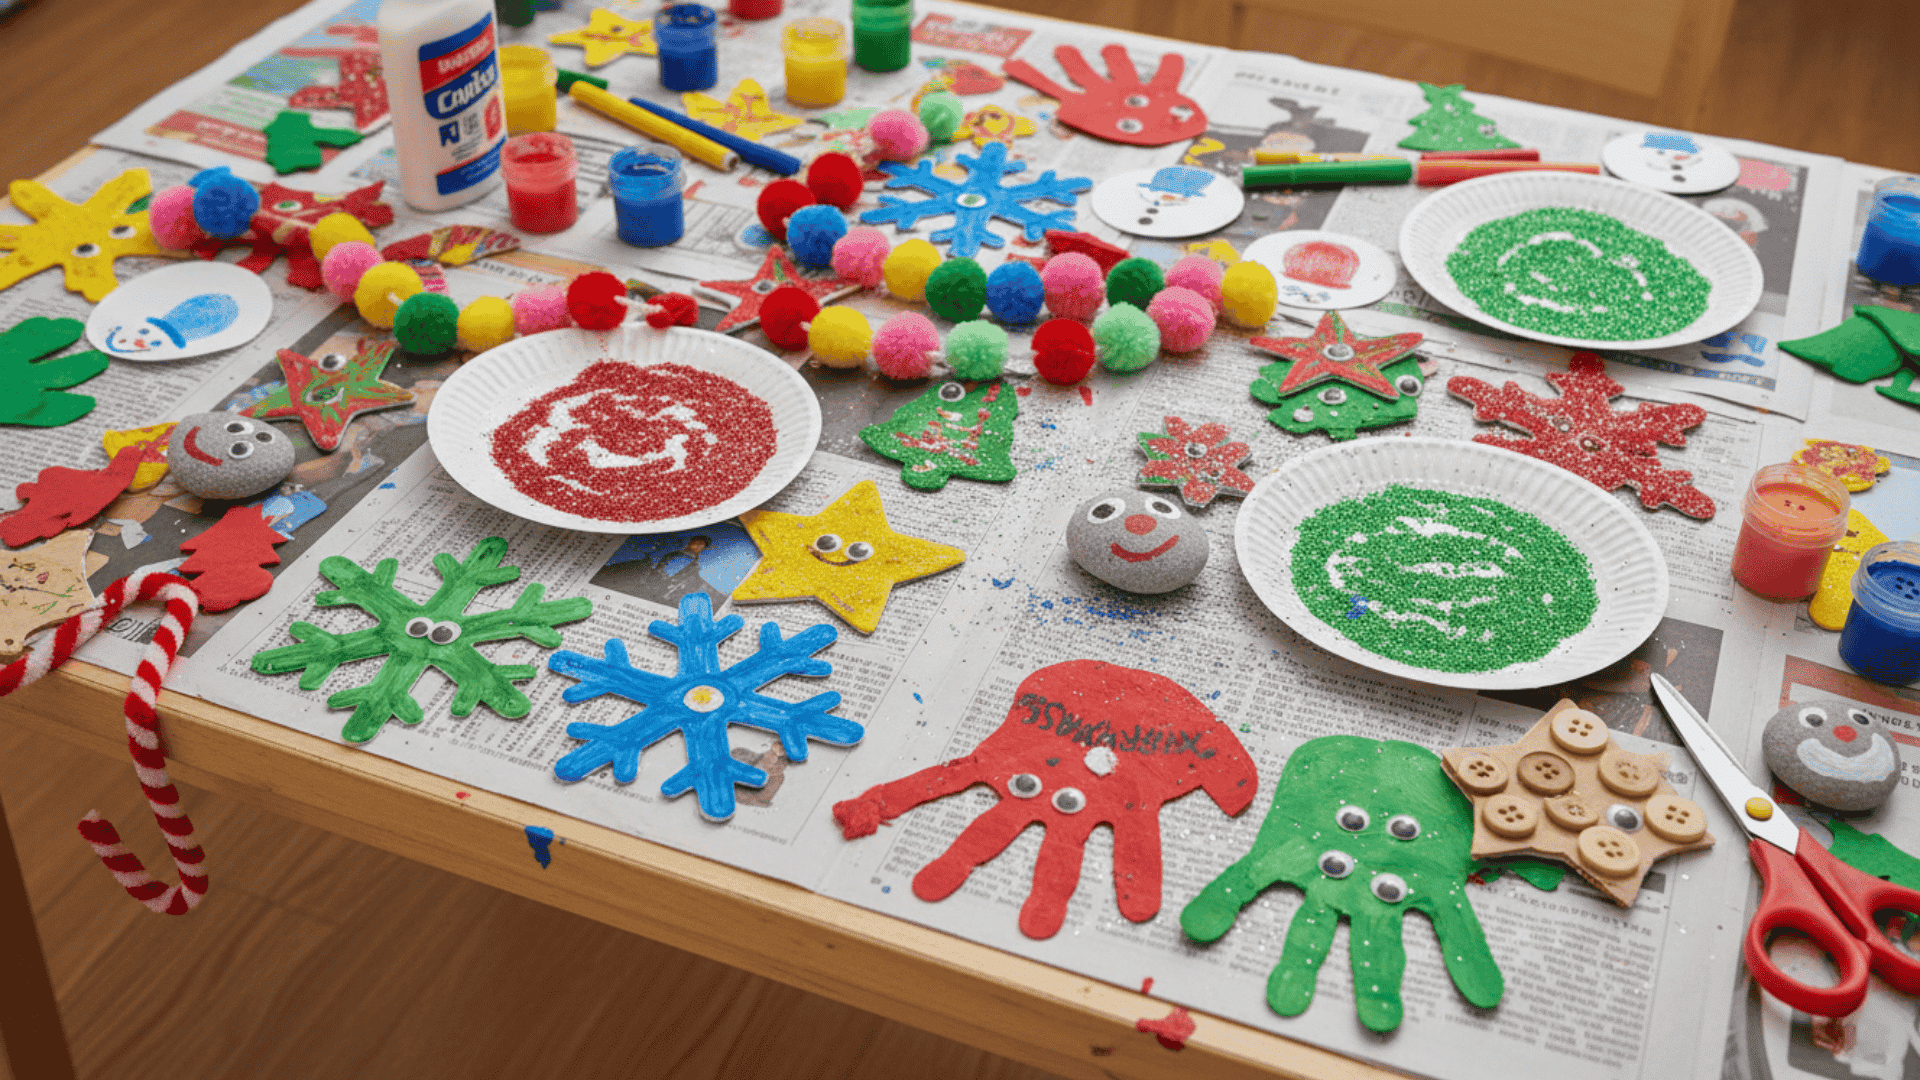
Kids love making things they can hang on the tree themselves. These ideas are safe, fun, and easy for small hands.
Recycled and Upcycled Homemade Christmas Ornaments
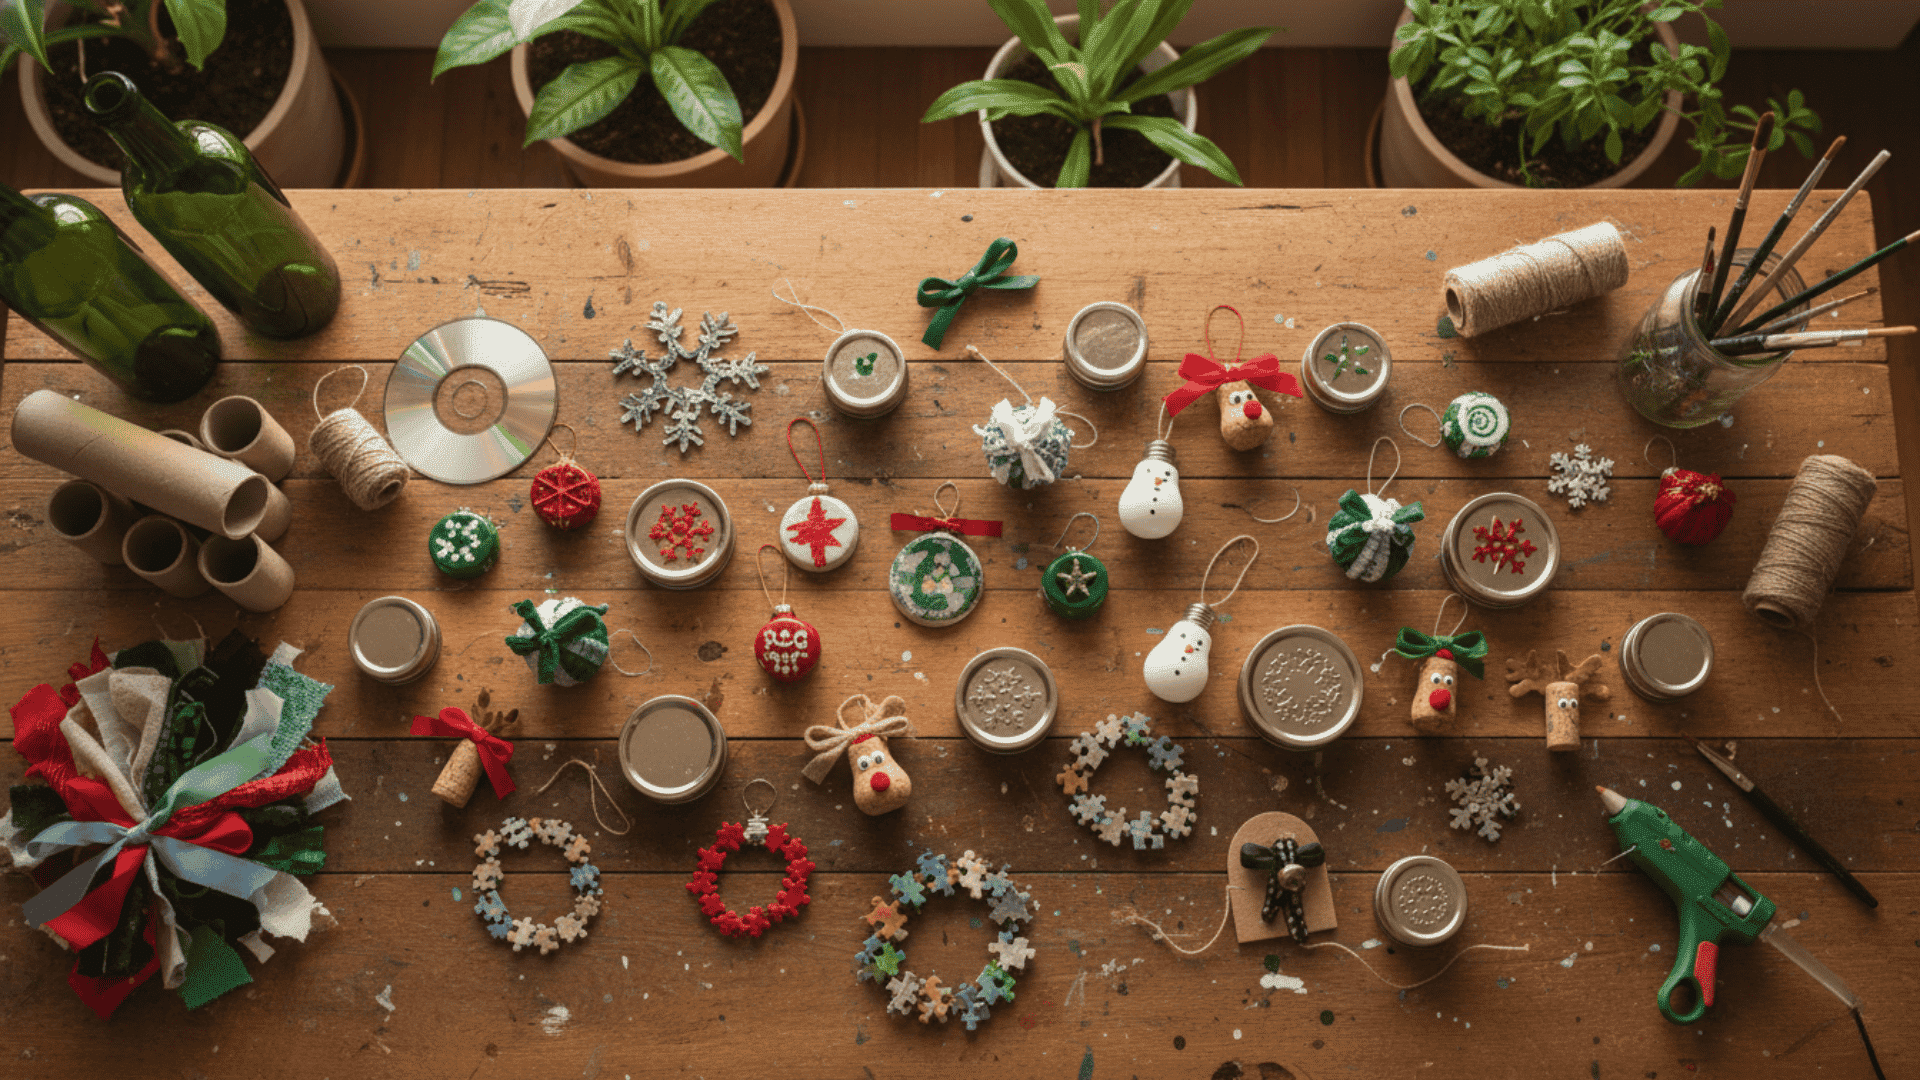
Don’t throw away those old items. Turn them into unique ornaments that help the planet and your wallet.
Luxury and Stylish DIY Christmas Ornaments
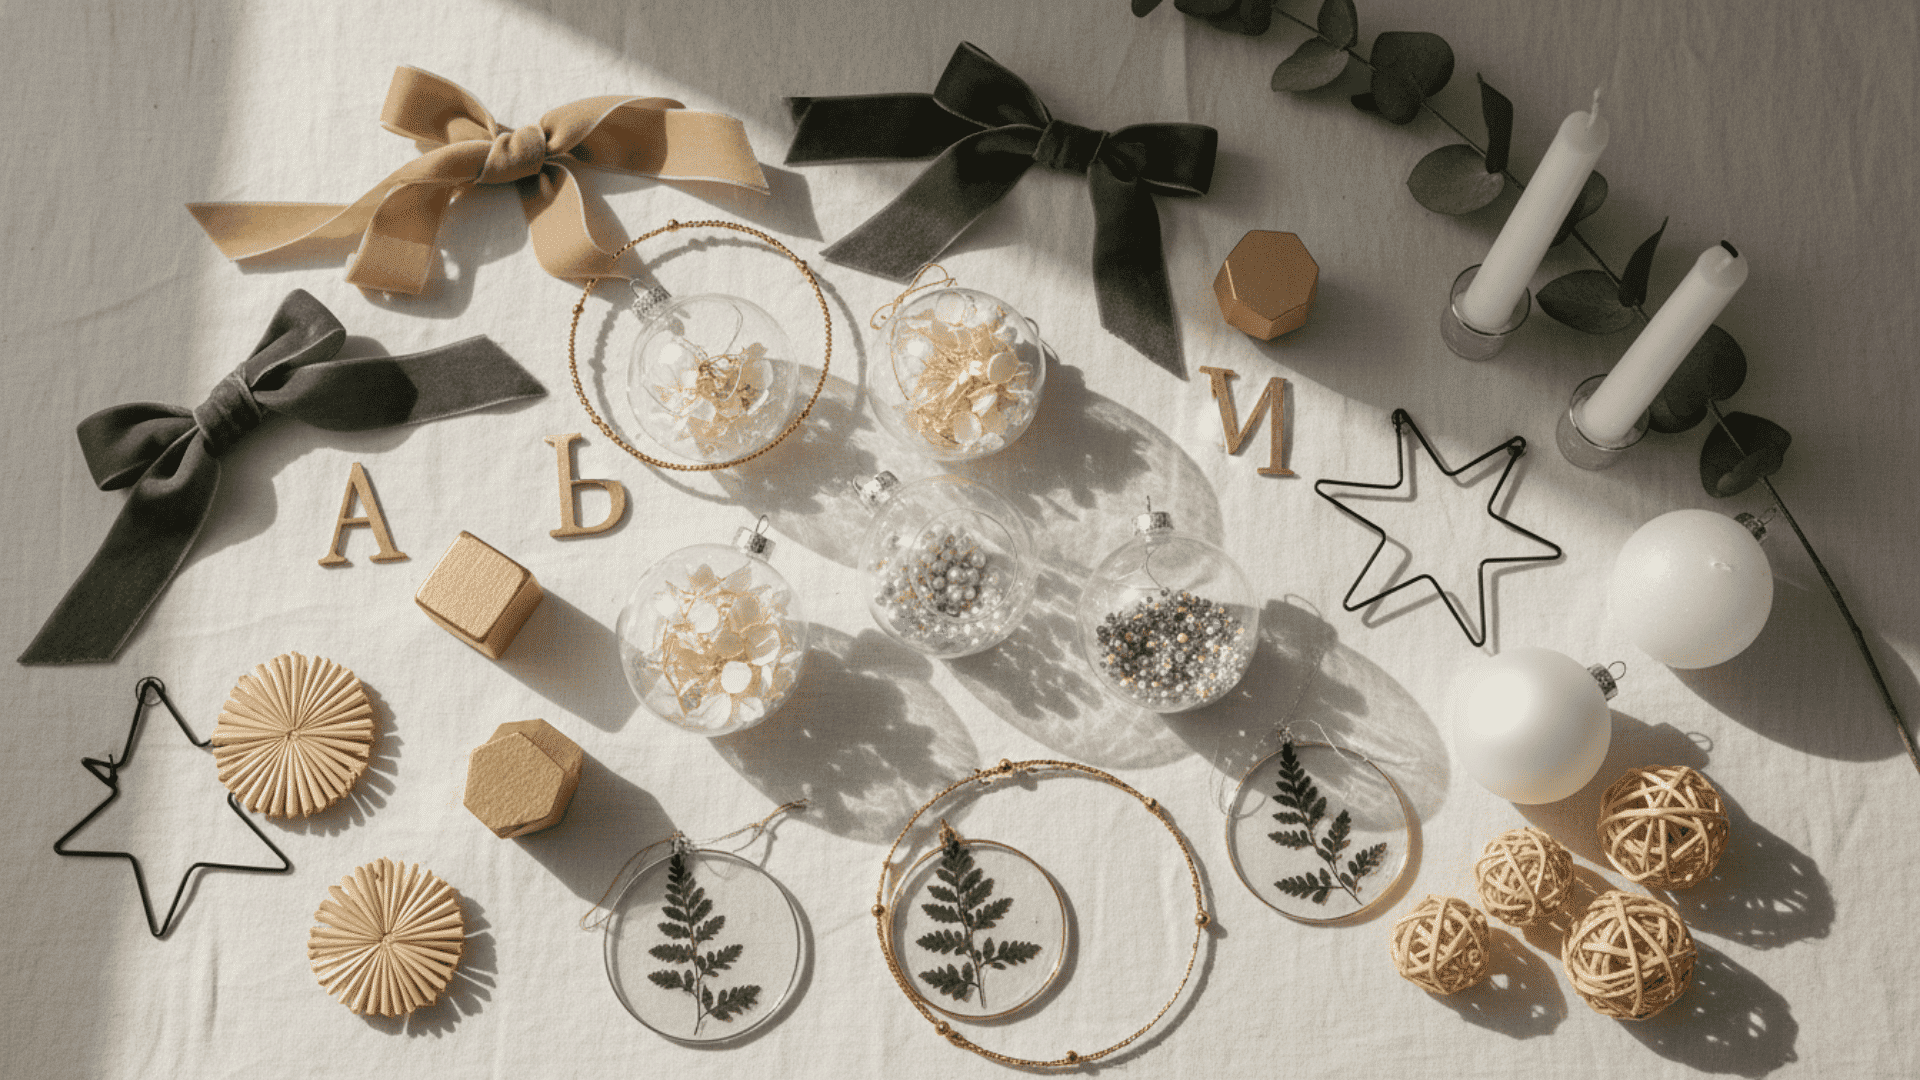
Want a more grown-up look for your tree? These ornaments feel polished and chic without losing the handmade charm.
Personalized DIY Christmas Ornaments for Gifting
Handmade ornaments make thoughtful gifts that people will treasure for years. Add names, dates, or photos to make them extra special.
How to Store Homemade Christmas Ornaments Safely?
Store your ornaments carefully so they last for many holidays to come. Wrap fragile pieces in tissue paper or bubble wrap to prevent cracks and chips.
Place heavier ornaments on the bottom of your storage box and lighter ones on top. Make sure paint and glue are completely dry before packing them away.
Keep boxes in a cool, dry spot away from heat or moisture. Label each box with what’s inside so you know which ornaments go where next year.
You can also sort them by type, like paper ornaments in one box and clay ones in another. Taking a few extra minutes now saves you from heartbreak when you open the boxes later.
Final Thoughts
Making diy christmas ornaments is about more than decorating a tree. It’s about creating memories, saving money, and building traditions your family will remember.
Each homemade christmas ornament you hang tells a story that store-bought decorations never could.
You don’t need to be crafty or spend a fortune. Start with one or two simple ideas from this list. Get the kids involved. Use what you already have at home.
Your tree will look different this year. It’ll look like you.
Ready to get started? Pick your favorite idea and make your first ornament today. Then share a photo in the comments below. We’d love to see what you create!