The holidays bring pure joy, but keeping kids busy during winter break?
That’s a real challenge. When screen time gets too much and boredom kicks in, parents need fresh ideas fast.
Simple xmas crafts for kids can turn those restless hours into magical memories your family will treasure forever.
This blog shares fun, easy craft projects that require basic supplies you likely have at home. Each idea comes with step-by-step instructions, safety tips, and creative twists to keep little hands happy and engaged all season long.
Why Are Xmas Crafts Important for Kids?
Xmas crafts for kids offer more than just festive fun; they nurture creativity, boost confidence, and support emotional growth.
These hands-on projects build fine motor skills, encourage patience, and create cherished family memories, all while providing a healthy, screen-free break
1. Emotional, Educational, and Developmental Benefits
Crafting helps children express feelings while learning new skills. Kids build confidence when they create something special with their own hands. These activities also teach problem-solving and boost creativity naturally.
2. Building Patience, Focus, and Fine Motor Skills
Christmas crafts require kids to slow down and concentrate on details. Cutting, gluing, and decorating strengthen small hand muscles. These skills help with writing and other classroom tasks later.
3. Strengthening Family Bonding and Holiday Traditions
Working together on festive projects creates lasting memories between parents and children. Families start new traditions while sharing stories and laughter. These moments become treasured parts of holiday celebrations for years.
4. Creating Screen-Free Entertainment
Hands-on crafting gives kids a healthy break from tablets and phones. Children learn to entertain themselves without digital devices. This quiet time helps them develop independent thinking and imagination skills effectively.
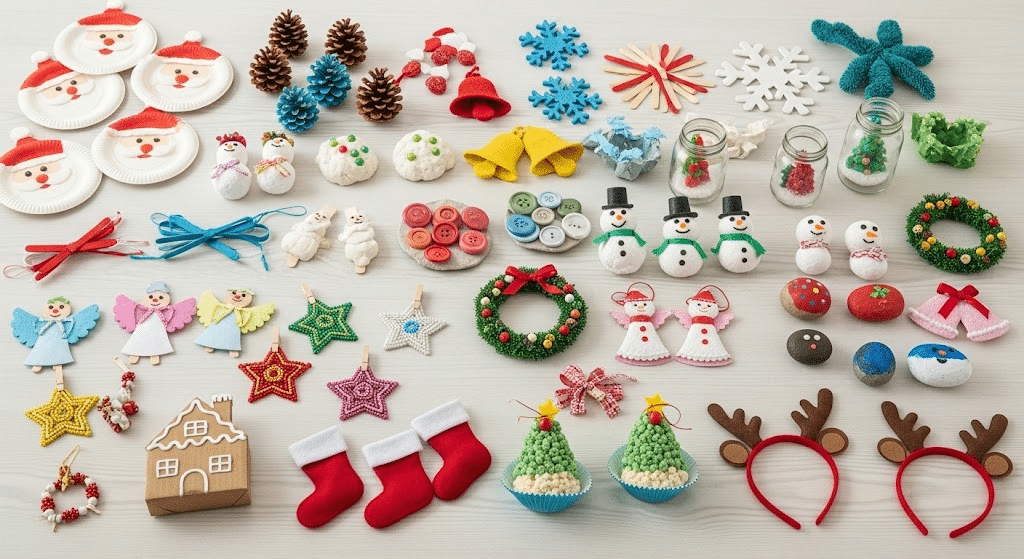
List of Xmas Crafts for Kids
Get ready for festive fun with these creative Christmas crafts for kids! Each project uses simple materials and encourages imagination, hands-on learning, and joyful holiday memories for the whole family.
1. Paper Plate Santa Faces

This classic craft brings Santa to life with simple materials. Kids love creating their own version of Jolly Old St. Nick using everyday items.
Appropriate age group: Suitable for children aged 3-8. Younger children may need help with cutting, while older kids can add creative details independently.
How to make it:
- Cut a paper plate in half.
- Paint the curved edge red for Santa’s hat.
- Glue cotton balls along the hat trim and bottom for the beard.
- Add googly eyes, a red pom-pom nose, and draw a smile.
- Let it dry before hanging up your Santa creation
2. Handprint Reindeer Cards
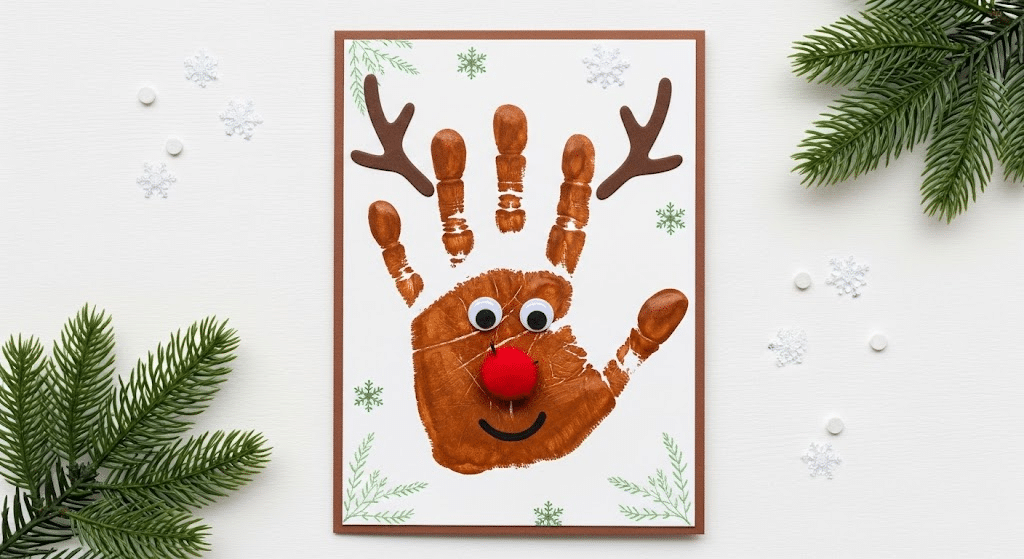
Turn tiny handprints into festive reindeer cards that grandparents will treasure. This personal touch makes each card special and unique.
Appropriate age group: Great for ages 2-6. Toddlers enjoy the messy paint process, while preschoolers can help with decorating details.
How to make it:
- Dip your child’s hand in brown paint and press onto cardstock.
- Let the handprint dry completely.
- Glue googly eyes onto the thumb.
- Draw antlers above the fingers, then add a red nose and a smile.
- Write a holiday message inside the card
3. Pine Cone Christmas Trees
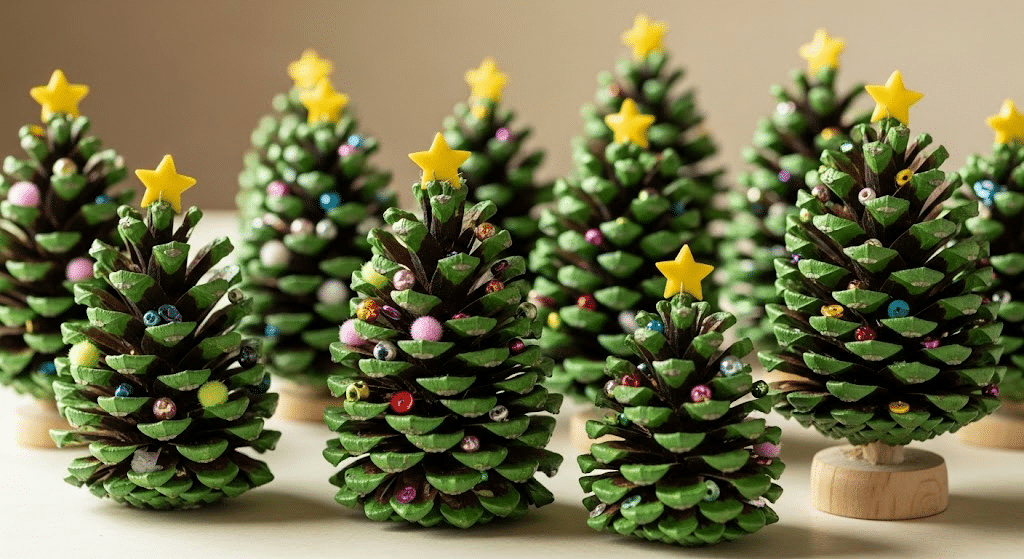
Natural pine cones transform into miniature Christmas trees with simple decorating. Kids love hunting for the perfect cone shape outdoors.
Appropriate age group: Suitable for ages 4-10. Younger kids need supervision with small decorating pieces and older children can create elaborate designs.
How to make it:
- Clean pine cones and let them dry completely.
- Paint with green acrylic paint or leave them natural.
- Once dry, glue tiny beads, sequins, or mini pom-poms between the scales for ornaments.
- Add a yellow star on top using glue.
- Place your decorated pine cone on a small wooden base to display your mini tree
4. Salt Dough Ornaments

Homemade salt dough creates lasting keepsakes that families can make together. These ornaments become treasured memories hanging on the tree each year.
Appropriate age group: Best for ages 5-12. Adult help is needed for oven use. Younger children focus on shaping, older kids handle detailed decorating.
How to make it:
- Mix 2 cups of flour, 1 cup of salt, and 1 cup of water to form dough.
- Roll flat and cut shapes with cookie cutters.
- Make holes for hanging.
- Bake at 200°F for 2–3 hours; let cool completely.
- Paint and decorate your ornaments once dry
5. Popsicle Stick Snowflakes
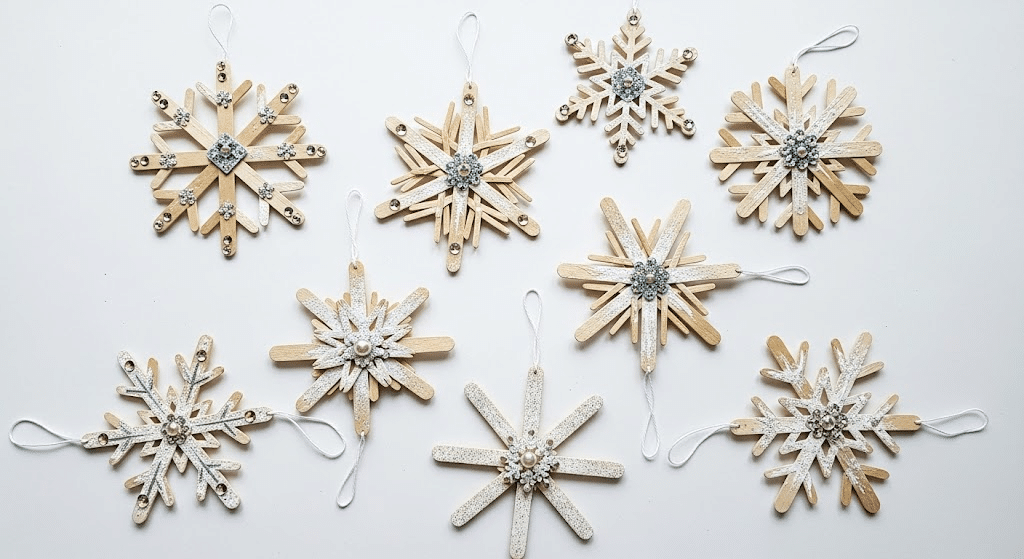
Wooden craft sticks become beautiful snowflakes with a creative arrangement. Each child can design their own unique winter masterpiece.
Age-appropriate notes: Perfect for ages 6-12. Requires patience and fine motor skills. Adult help may be needed with hot glue gun.
How to make it:
- Arrange 6–8 popsicle sticks in a snowflake pattern and glue the intersections securely.
- Let the glue dry completely before decorating.
- Add glitter, small beads, or paint white details for sparkle and texture.
- Attach a string or ribbon for hanging.
- Allow everything to set before handling or displaying your snowflake ornament
6. Felt Christmas Tree Garland
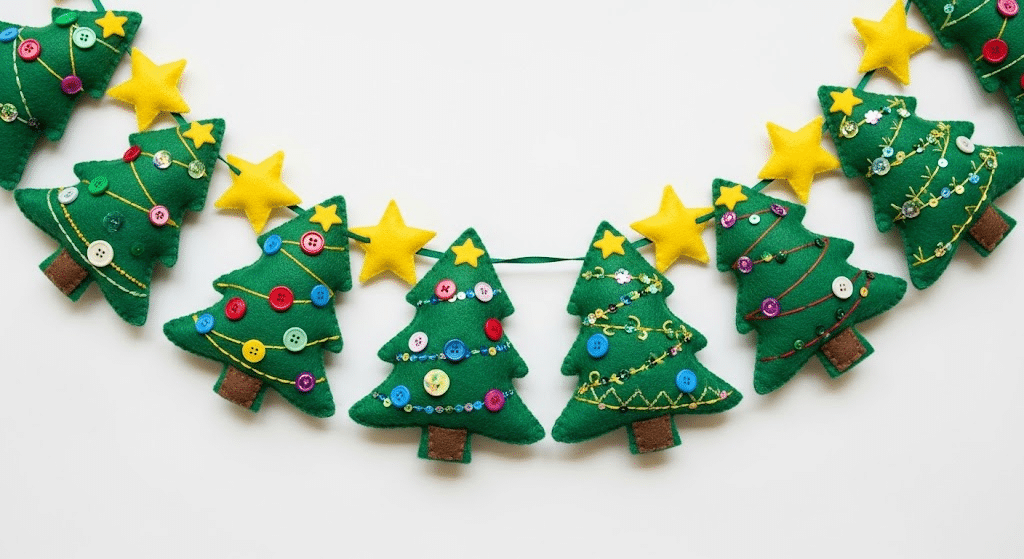
Soft felt trees create colorful garland that’s safe for little hands. This xmas crafts for kids teaches basic sewing skills while creating beautiful decorations.
Age-appropriate notes: Suitable for ages 7-14. Younger children can help with cutting, older kids can learn basic stitching techniques.
How to make it:
- Cut triangle tree shapes from green felt.
- Decorate each tree with small buttons, sequins, or embroidery for festive flair.
- Sew or glue the decorated trees onto a long ribbon, spacing them evenly.
- Add star shapes between the trees for extra sparkle.
- Hang your felt tree garland to brighten up your holiday space.
7. Egg Carton Bells
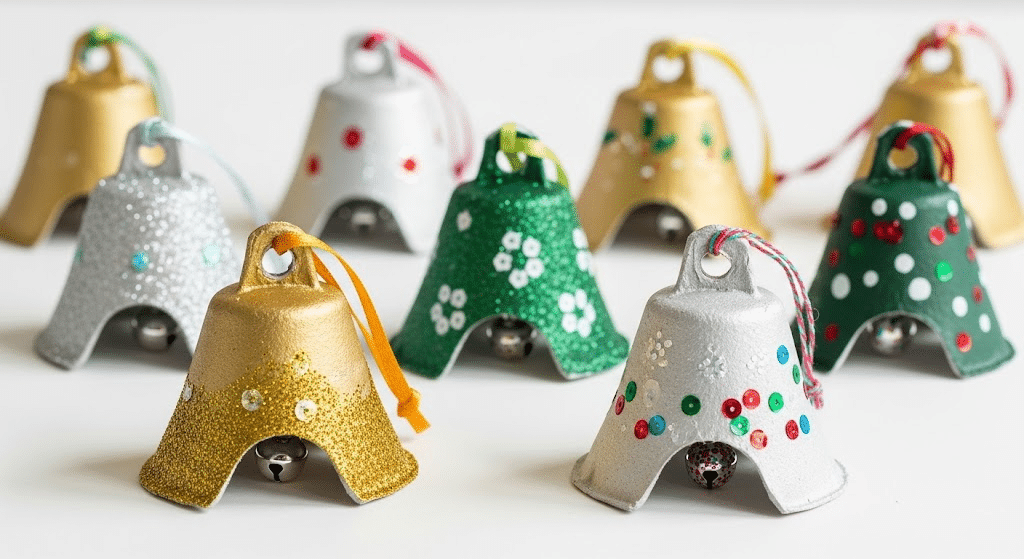
Recycled egg cartons become festive bells with paint and creativity. This eco-friendly craft teaches kids about reusing materials.
Appropriate age group: Great for ages 4-9. Adult help is needed for cutting egg cartons. Kids can handle all the painting and decorating steps.
How to make it:
- Cut individual cups from an egg carton.
- Paint them gold, silver, or bright colors and let them dry completely.
- Poke a hole at the top of each cup.
- Thread ribbon or yarn through the hole for hanging.
- Add a small jingle bell inside for a festive sound.
8. Cotton Ball Snowmen
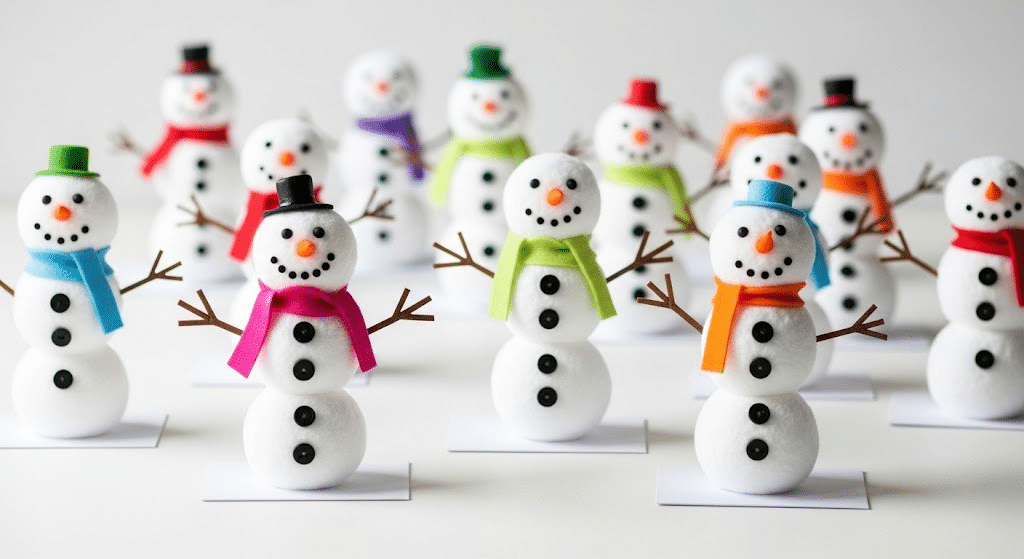
Fluffy cotton balls stack into adorable snowmen figures. Kids love the soft texture and simple assembly process.
Appropriate age group: Perfect for ages 3-8. Very safe craft with no sharp tools needed. Great for developing fine motor skills.
How to make it:
- Glue three cotton balls vertically onto paper or cardstock to form the snowman’s body.
- Add small black buttons, a cut-out orange triangle nose, and stick arms.
- Glue on googly eyes and use a marker to draw a smile.
- Create a winter scene background around your snowman.
- Let everything dry before displaying your cotton ball snowman craft
9. Button Wreath Ornaments
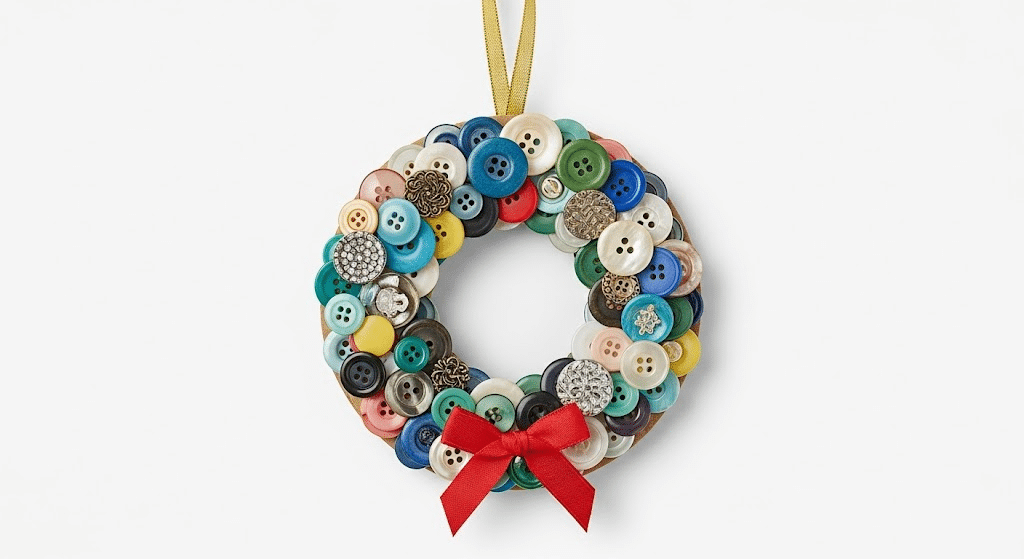
Colorful buttons arranged in wreath shapes create unique ornaments. This craft uses materials that many families already have at home.
Appropriate age group: Best for ages 6-12. Adult supervision is needed with small buttons for younger children. Older kids can create complex patterns.
How to make it:
- Arrange buttons in a circle on a cardboard base, overlapping them slightly as you glue each one down.
- Glue a small bow at the bottom of the circle for decoration.
- Attach a loop of string or ribbon at the top for hanging.
- Let the wreath dry completely before handling or displaying.
10. Paper Chain Garlands

Classic paper chains get festive updates with holiday colors and patterns. Kids can make these independently with minimal supplies.
Appropriate age group: Suitable for all ages 4+. Younger children may need help with stapling. Great group activity for classrooms.
How to make it:
- Cut paper strips in red, green, and white.
- Loop the first strip into a circle and staple the ends together.
- Thread the next strip through the previous loop and staple.
- Continue adding and stapling strips until your paper chain reaches the desired length.
- Hang your festive garland around the room or on the tree.
11. Mason Jar Snow Globes

Clear jars become magical snow globes with water and glitter. Kids love shaking their creations and watching the snow fall.
Appropriate age group: Perfect for ages 5-12. Adult help is needed with waterproofing. Great science lesson about density and liquids.
How to make it:
- Glue small figurines or decorations to the inside of a clean jar lid and let them dry completely.
- Fill the jar with water and a spoonful of glycerin to help the glitter float slowly.
- Add glitter or fake snow for a magical effect.
- Screw the lid on tightly, sealing with waterproof glue to prevent leaks.
- Shake gently to test your snow globe and enjoy your festive creation.
12. Pom-Pom Christmas Tree Ornaments

Soft pom-poms stack into cute tree shapes for hanging. Kids enjoy the tactile experience of working with fuzzy materials.
Appropriate age group: Great for ages 4-10. Safe materials with no cutting required. Develops hand-eye coordination and planning skills.
How to make it:
- Glue green pom-poms in a triangle shape, starting with the largest at the bottom and working up to the smallest at the top for the tree.
- Use a yellow pom-pom at the top as the star.
- Decorate the tree by gluing on tiny beads for ornaments.
- Attach a string at the top for hanging.
13. Toilet Paper Roll Elves
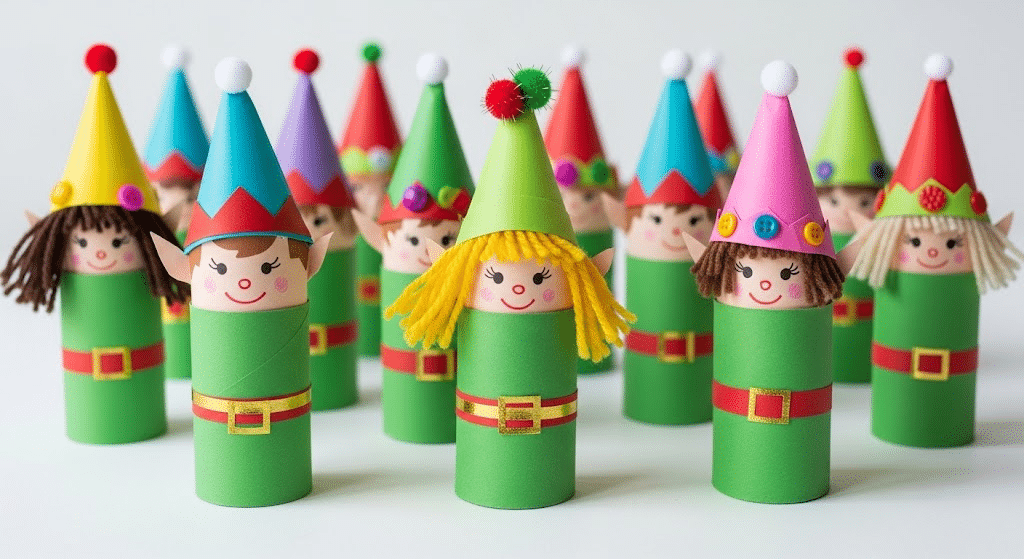
Empty toilet paper rolls transform into helpful workshop elves. These recycled Xmas crafts for kids teach creativity while reducing waste.
Appropriate age group: Suitable for ages 5-11. Adult help may be needed for detailed cutting. Kids can personalize each elf character.
How to make it:
- Cover a toilet paper roll with green paper for the elf’s body.
- Add a triangle hat at the top, a small face below the hat, and a tiny belt around the middle.
- Draw details like eyes, a smile, and a belt buckle with markers.
- Use yarn to create hair and glue it under the hat.
- Stand your finished elves around holiday displays for festive decor.
14. Fingerprint Christmas Lights Art
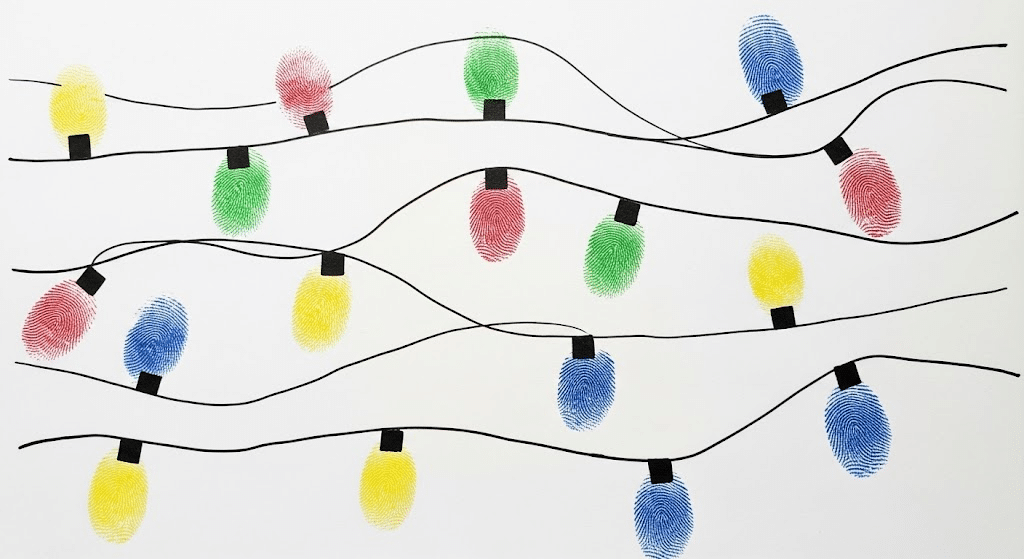
Tiny fingerprints become colorful Christmas lights on paper. This personal art project makes wonderful gifts for family members.
Appropriate age group: Perfect for ages 2-7. Very safe activity with washable materials. Great for developing color recognition and patterns.
How to make it:
- Draw curvy lines across a sheet of paper to represent light strings.
- Dip your fingertips in different colored paints and press them along the lines to create bulbs.
- Use a variety of colors for a festive look.
- Once dry, add small details to each bulb with markers.
15. Yarn-Wrapped Candy Canes
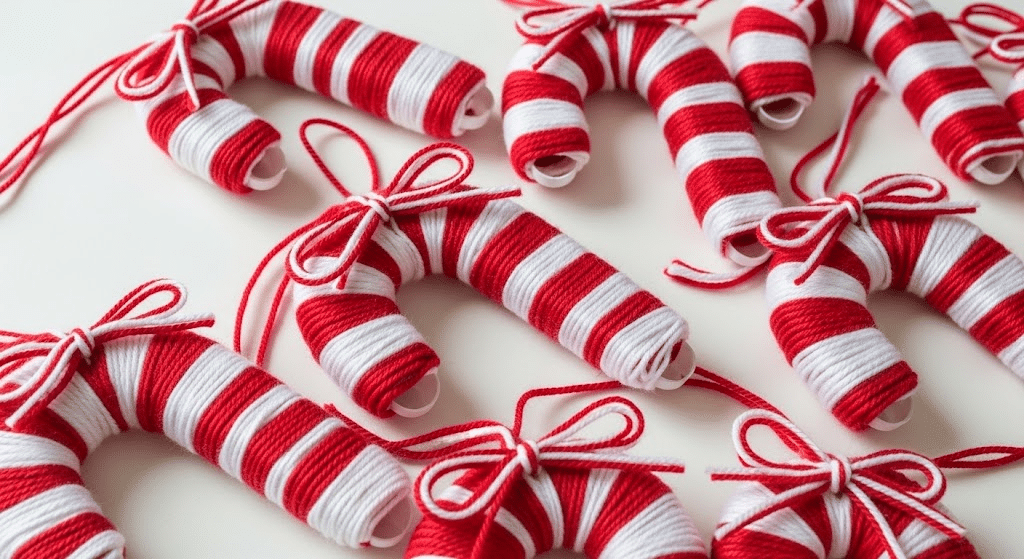
Plastic candy canes get cozy yarn wrapping for texture and warmth. Kids practice wrapping skills while creating soft decorations.
Appropriate age group: Best for ages 6-12. Requires patience and fine motor control. Adult help may be needed to start wrapping.
How to make it:
- Start wrapping yarn at the bottom of the candy cane, keeping it tight and overlapping slightly as you go up.
- Change yarn colors as desired for a striped effect.
- Secure the end of the yarn with a small dot of glue.
- Add a bow at the top for decoration.
16. Stained Glass Tissue Paper Ornaments

Colorful tissue paper creates beautiful light-catching ornaments. Kids learn about color mixing while making art.
Appropriate age group: Suitable for ages 5-12. Adult help is needed with cutting plastic sheets. Great lesson about light and transparency.
How to make it:
- Cut shapes (like stars, trees, or circles) from clear plastic sheets.
- Glue small pieces of colored tissue paper inside the shapes, overlapping them to create new shades and a stained glass effect.
- Add a ribbon or string at the top for hanging.
- Display your finished ornaments in windows for the best effect, letting the light shine through the colors
17. DIY Christmas Crackers
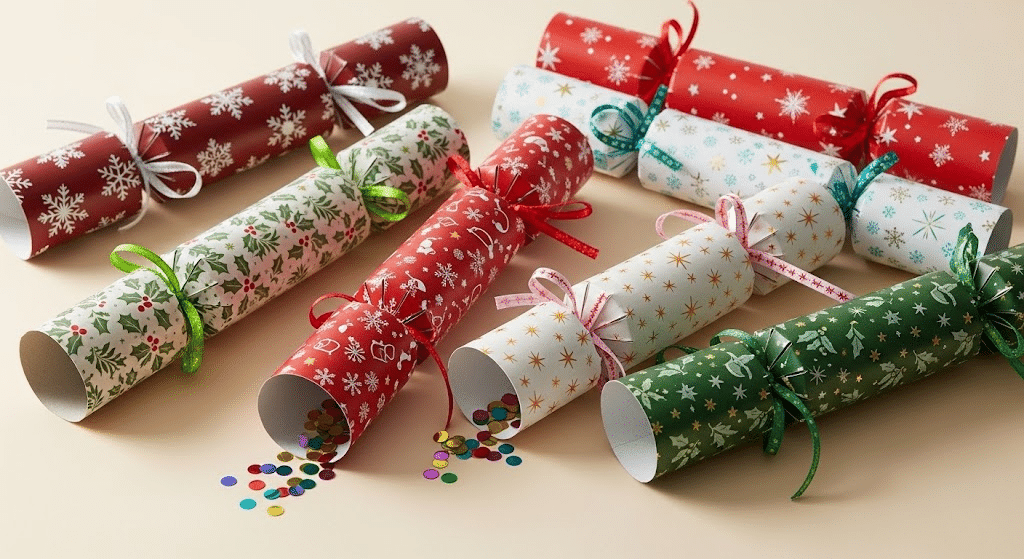
Homemade crackers filled with surprises bring British tradition home. Kids love both making and pulling these festive treats.
Appropriate age group: Best for ages 7-14. Adult help needed for rolling technique. Great cultural learning activity.
How to make it:
- Wrap small gifts in tissue paper and place them inside a toilet paper tube.
- Wrap the entire tube in decorative paper, covering both ends.
- Tie each end with ribbon to create a festive cracker shape.
- Add jokes or small toys inside before sealing.
- Your DIY Christmas cracker is ready to hang or gift.
18. Clothespin Angel Ornaments

Wooden clothespins become heavenly angels with simple additions. Kids can create entire angel choirs for the Christmas tree.
Appropriate age group: Suitable for ages 5-11. Adult help may be needed for detailed painting. Great fine motor skill practice.
How to make it:
- Paint a wooden clothespin for the angel’s body and let it dry.
- Glue a small bead or wooden ball on top for the head.
- Attach paper wings to the back with glue.
- Draw face details with markers or paint.
- Add yarn for hair and create a tiny halo from a pipe cleaner or gold paper, then glue on top.
19. Snowflake Window Clings
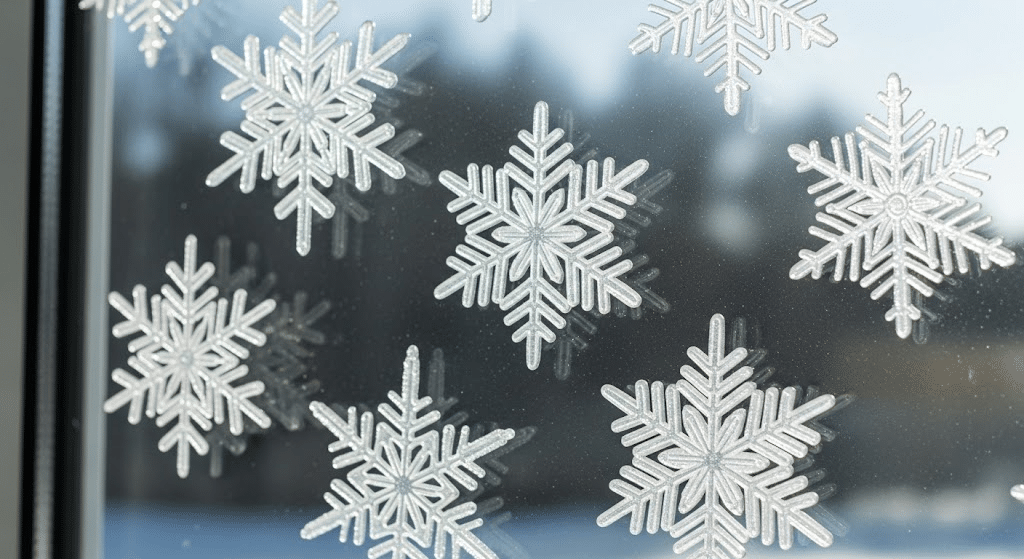
Gel-based window clings create removable snowflake decorations. Kids can rearrange these on windows throughout the season.
Appropriate age group: Perfect for ages 6-12. Adult supervision is needed with gel application. Teaches symmetry and pattern concepts.
How to make it:
- Draw snowflake patterns on clear plastic sheets.
- Trace over the designs with white gel paint.
- Let the paint dry completely.
- Carefully peel the dried snowflakes from the plastic.
- Apply to windows and reposition as needed for a festive look.
20. Beaded Star Ornaments
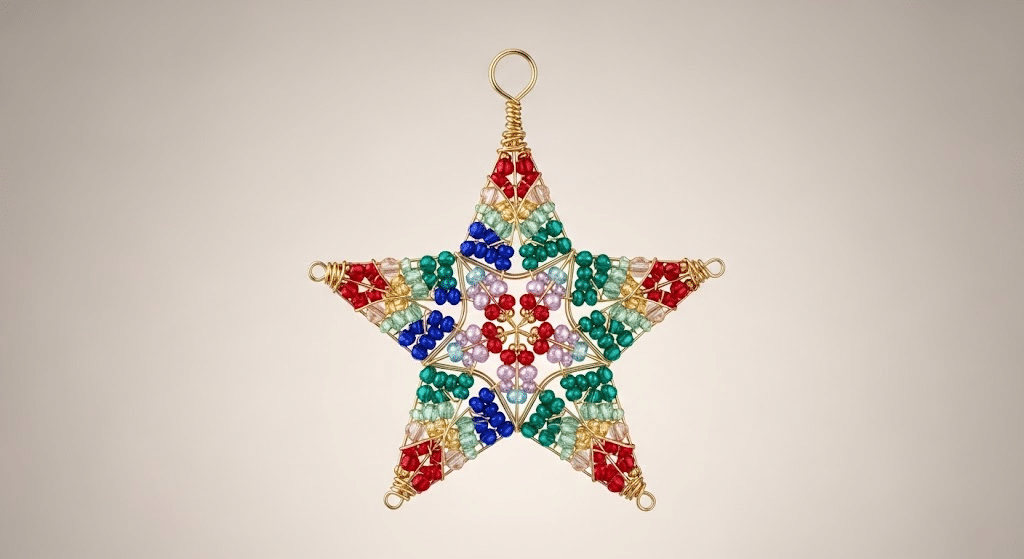
Colorful beads are threaded onto wire to create sparkling star shapes. Kids practice patterns while making beautiful ornaments.
Appropriate age group: Best for ages 8-14. Adult help is needed with wire cutting. Small beads require careful supervision.
How to make it:
- Bend the wire into a star shape.
- Thread beads onto each point of the star.
- Twist the wire ends together to secure the shape.
- Add a loop at the top for hanging.
- Use different colored beads for variety and let it dry or set before hanging.
21. Mini Stocking Sewing Project

Felt stockings teach basic sewing skills while creating tiny decorations. These Xmas crafts for kids make them learn practical skills while making festive crafts.
Appropriate age group: Suitable for ages 8-15. Adult help is needed for teaching stitches. Great introduction to sewing skills.
How to make it:
- Cut two identical stocking shapes from felt.
- Sew the edges together, leaving the top open.
- Decorate with small items like buttons or sequins.
- Attach a loop of ribbon at the top for hanging.
22. Cardboard Gingerbread Houses
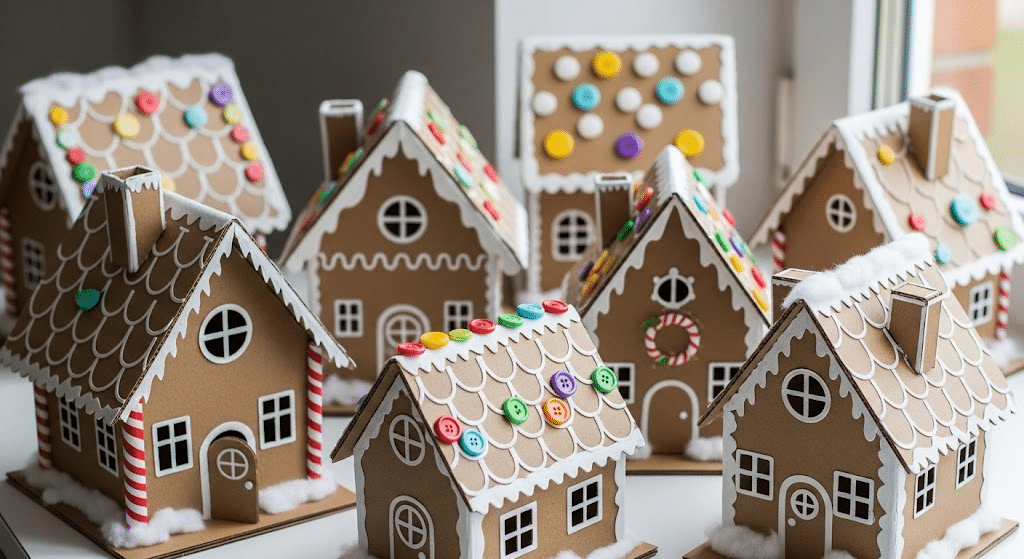
Recycled cardboard becomes architectural gingerbread houses without the mess. Kids can design elaborate structures that last all season.
Appropriate age group: Perfect for ages 6-12. Adult help is needed for cutting cardboard. Great engineering and design practice.
How to make it:
- Cut house shapes from cardboard boxes.
- Paint the cardboard brown for a gingerbread look and add white paint details for icing.
- Glue on paper windows and doors.
- Use cotton to create snow effects on the roof and around the house.
23. Painted Rock Snowmen
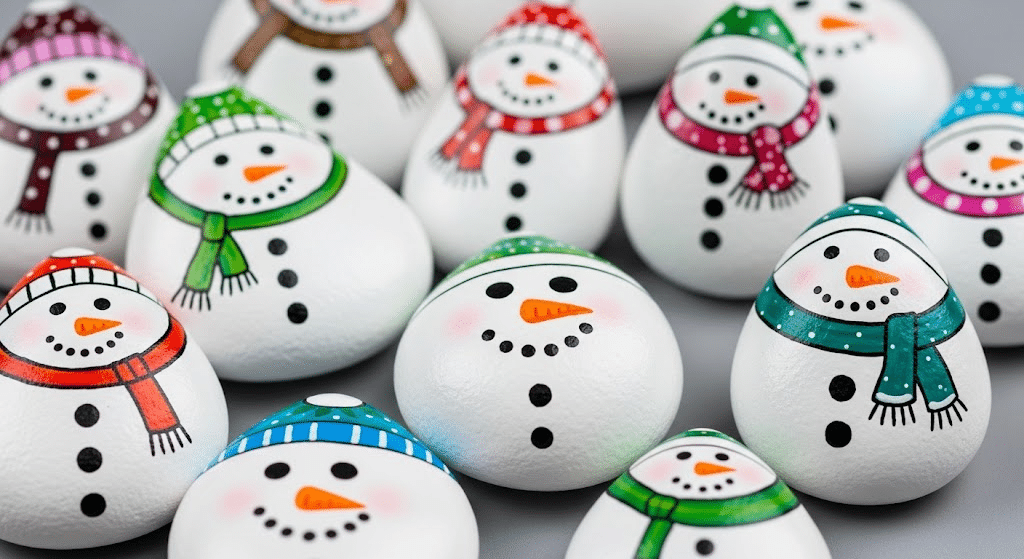
Smooth rocks become permanent snowman decorations with paint. Kids can hunt for perfect rocks, then convert them into winter friends.
Appropriate age group: Great for ages 4-10. Adult help is needed for finding appropriate rocks. Weather-resistant for outdoor display.
How to make it:
- Clean rocks and let them dry.
- Paint them white for the snowman body; let them dry.
- Add black dots for buttons and eyes, and an orange carrot nose.
- Seal with a clear coat for durability.
24. Santa Hat Party Blowers

Red paper cones become festive noise makers for holiday parties. Kids can make these for New Year’s celebrations too.
Appropriate age group: Suitable for ages 5-11. Adult help is needed for cutting paper properly. Great for holiday parties and celebrations.
How to make it:
- Roll red paper into a cone shape and glue the seam securely.
- Add white cotton trim around the bottom edge.
- Attach a noise maker inside the cone and secure it with extra glue.
- Let everything dry before using or displaying.
25. Cupcake Liner Christmas Trees
Colorful cupcake liners fold into dimensional Christmas trees. Kids can make forests of trees in different sizes and colors.
Appropriate age group: Perfect for ages 4-9. Very safe materials with no cutting required. Great for developing folding skills.
How to make it:
- Fold a cupcake liner in half, then in half again to make a triangle shape.
- Glue the pointed end to the paper for the tree trunk.
- Layer more folded liners above, overlapping slightly, to create a fuller tree.
- Add a star to the top as a finishing touch.
26. Rice Krispies Treat Ornaments
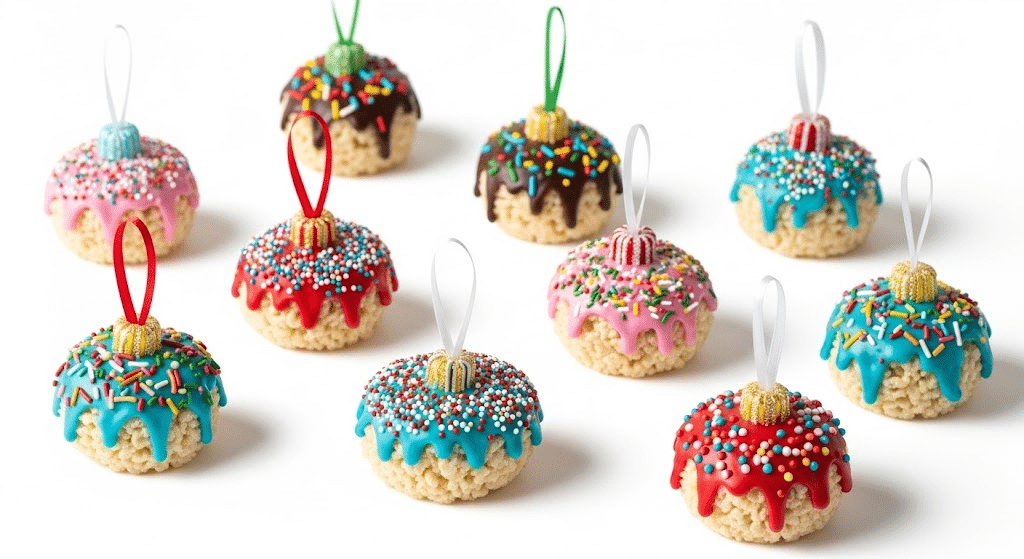
Edible ornaments combine crafting with cooking fun. Kids can eat their creations or hang them temporarily on trees.
Appropriate age group: Best for ages 6-12. Adult help is needed for melting marshmallows. Great kitchen science lesson.
How to make it:
- Make Rice Krispies following the package directions.
- While still warm, press the mixture into ornament molds or shape into balls by hand.
- Insert hanging loops (like ribbon or pipe cleaners) before the treats cool completely.
- Once cool, decorate with icing or candies as desired.
27. Christmas Suncatchers
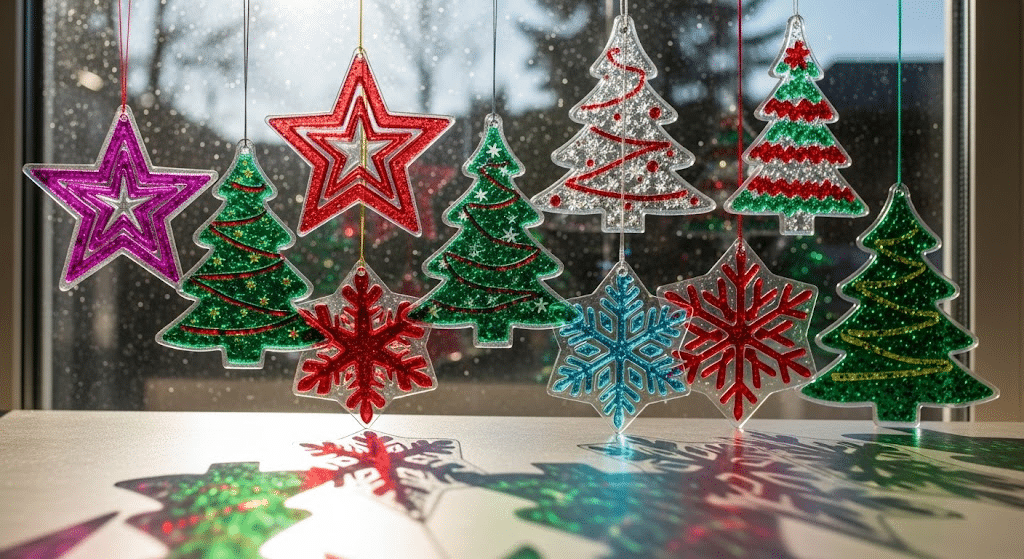
Transparent materials create beautiful light-catching decorations for windows. Kids learn about light and color while making art.
Appropriate age group: Suitable for ages 5-12. Adult help is needed with cutting plastic materials. Best displayed in sunny windows.
How to make it:
- Cut Christmas shapes from clear plastic sheets.
- Decorate with transparent paints or markers; add glitter while the paint is still wet.
- Let dry, then add a ribbon or string for hanging.
- Hang in windows for the best light effects.
28. Reindeer Headbands

Brown headbands become reindeer antlers for holiday dress-up. Kids can wear their creations during holiday performances.
Appropriate age group: Great for ages 4-10. Adult help may be needed for securing antlers. Perfect for holiday plays and parties.
How to make it:
- Attach brown pipe cleaner antlers to a plain headband.
- Add small jingle bells to the antler tips.
- Glue a red pom-pom to the center for the nose.
- Adjust for a comfortable fit before wearing
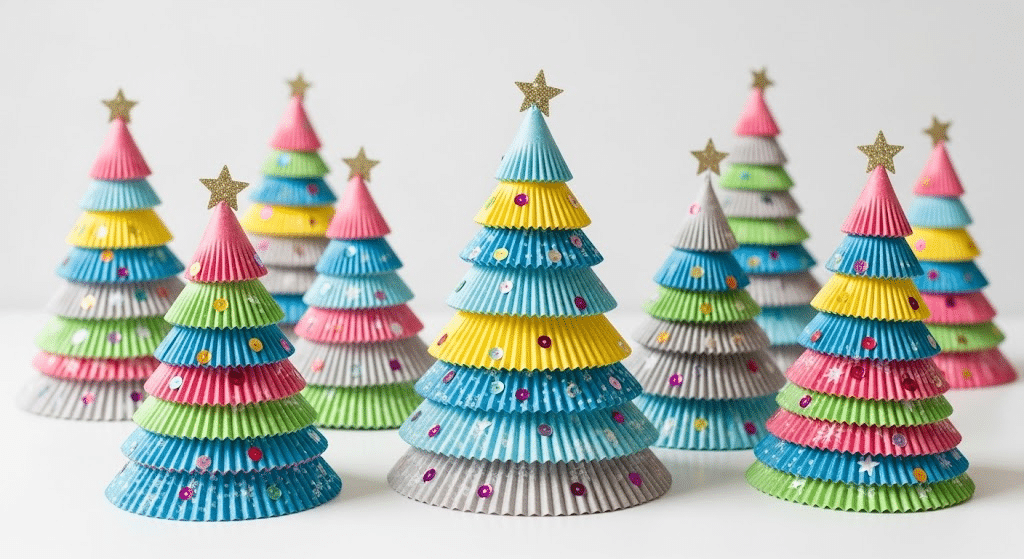
29. Christmas Tree Cones
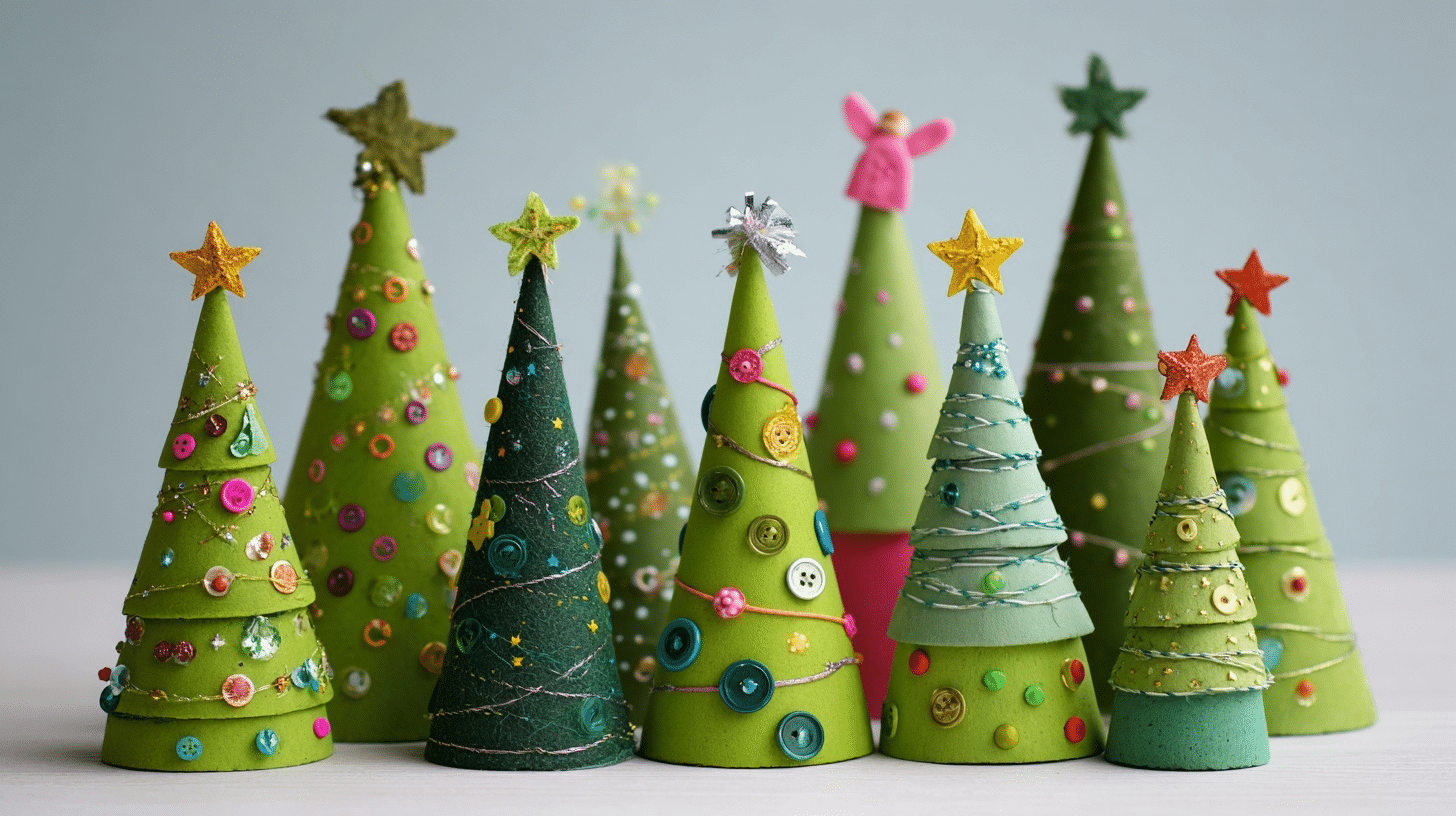
Foam or paper cones become three-dimensional Christmas trees. Kids can create entire holiday forests with different decorating techniques.
Appropriate age group: Perfect for ages 5-12. Adult help is needed for cutting foam. Great for learning about geometric shapes.
How to make it:
- Cover a cone with green paper or paint.
- Decorate with small items like sequins, beads, or buttons.
- Wrap a thin ribbon around as a garland.
- Top with a star or angel and let dry before displaying
30. Snowman Bookmarks
Paper snowmen help kids keep their place in holiday books. These practical crafts encourage reading during winter break.
Appropriate age group: Suitable for ages 6-11. Great for developing cutting and gluing skills.
How to make it:
- Cut a snowman shape from white cardstock.
- Add face details with markers.
- Glue a ribbon to the back for the bookmark tail.
- Laminate for durability.
31. DIY Christmas Gift Tags
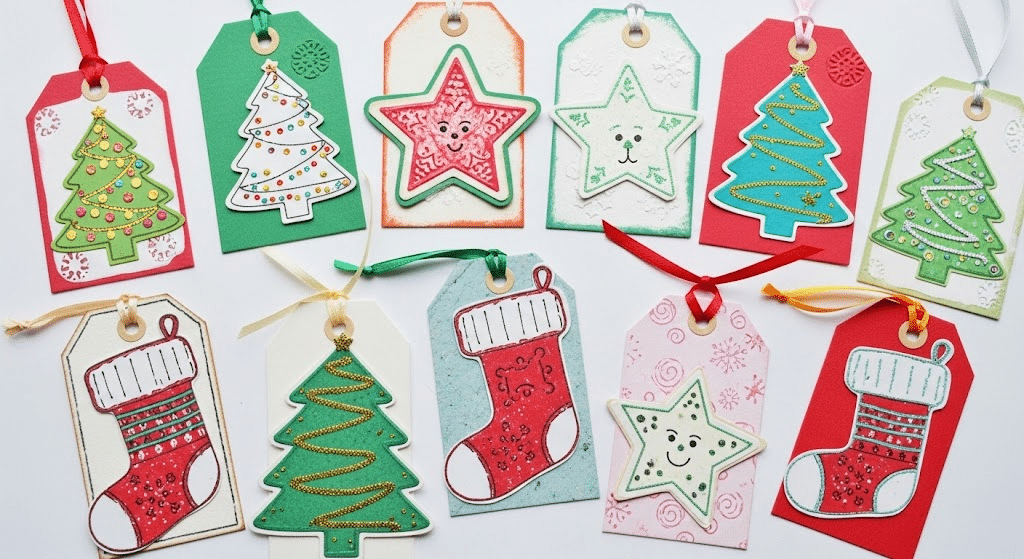
Handmade gift tags add personal touches to wrapped presents. Kids can make matching sets for all their holiday gifts.
Appropriate age group: Perfect for ages 5-12. Safe materials with creative freedom. Great for practicing writing names.
How to make it:
- Cut tag shapes from cardstock.
- Decorate with stamps, stickers, or drawings as you like.
- Punch a hole at the top and add a ribbon.
- Write recipient names with festive markers.
32. Sock Snowman
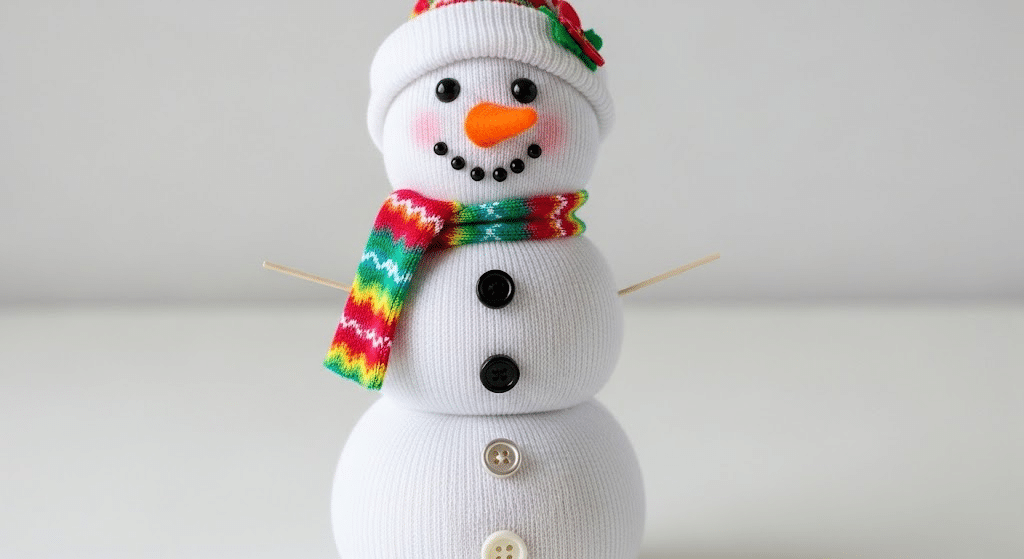
Old white socks transform into cuddly snowman decorations. Kids learn about recycling while creating soft holiday friends.
Appropriate age group: Best for ages 7-14. Adult help needed for tying and rice filling. Great lesson about reusing materials.
How to make it:
- Fill a white sock with rice, leaving some space at the top.
- Tie off sections with rubber bands to form the head and body.
- Glue on button eyes, an orange felt nose, and add a scarf.
- Secure everything with rubber bands.
Conclusion
These xmas crafts for kids prove that holiday magic happens when little hands get creative. Parents don’t need expensive supplies or perfect results; just time spent together matters most.
Teachers can use these ideas for classroom parties, while families can start new traditions at home.
The best part? Kids remember these crafting moments for years to come. So gather some basic supplies, pick a few favorite projects, and watch children’s faces light up.
This holiday season, let creativity be your family’s greatest gift to each other.