Refinishing hardwood floors can greatly enhance the beauty and longevity of your home’s flooring, but the process can seem daunting, especially if you want to avoid removing baseboards. Fortunately, with the right approach, you can achieve a professional finish while keeping your baseboards intact. This article will guide you step by step through the process of refinishing your hardwood floors without removing baseboards, ensuring a seamless and effective renovation.
Preparing Your Room for Floor Refinishing
Proper preparation is crucial to the success of refinishing hardwood floors. Begin by clearing the room of all furniture and decor items. This ensures that you have a clean and unobstructed space to work in, allowing you to focus on the task at hand without distractions or obstacles. Next, inspect the floor for any signs of damage or wear that need to be addressed before refinishing.
Look for loose boards, nails that need to be hammered down, and any significant scratches or gouges that may require additional attention. Addressing these issues early on will ensure a smooth and even finish.
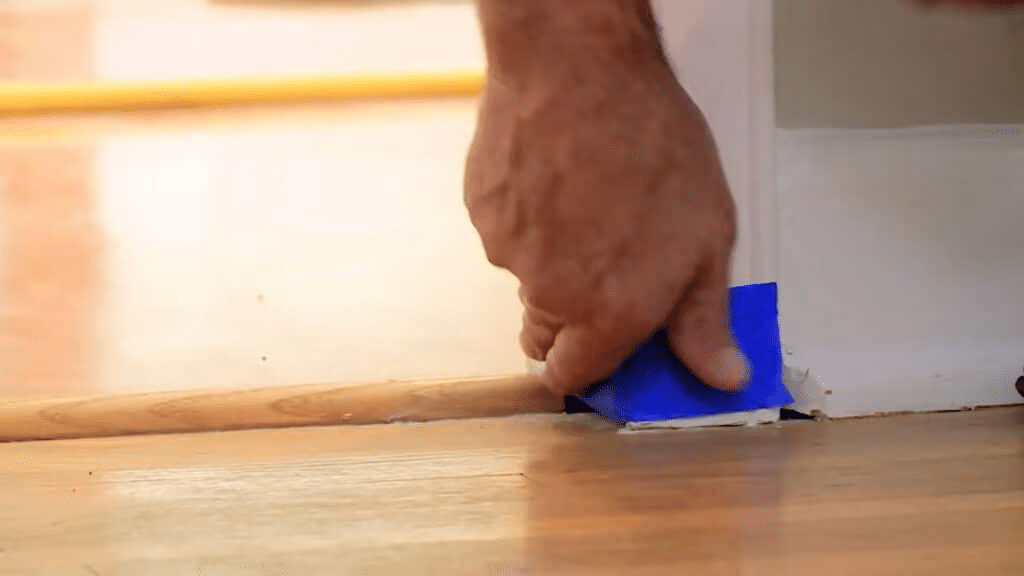
If you’re aiming for a fast and professional update, a 1 DAY Refinishing in San Francisco service can save you time while still delivering high-quality results. To protect your baseboards during the refinishing process, use painter’s tape to cover the lower edges. This simple step will shield them from accidental scratches or stains, allowing you to work confidently around the edges of the room. Additionally, cover any doorways and vents to prevent dust from spreading throughout your home.
Choosing the Right Tools for the Job
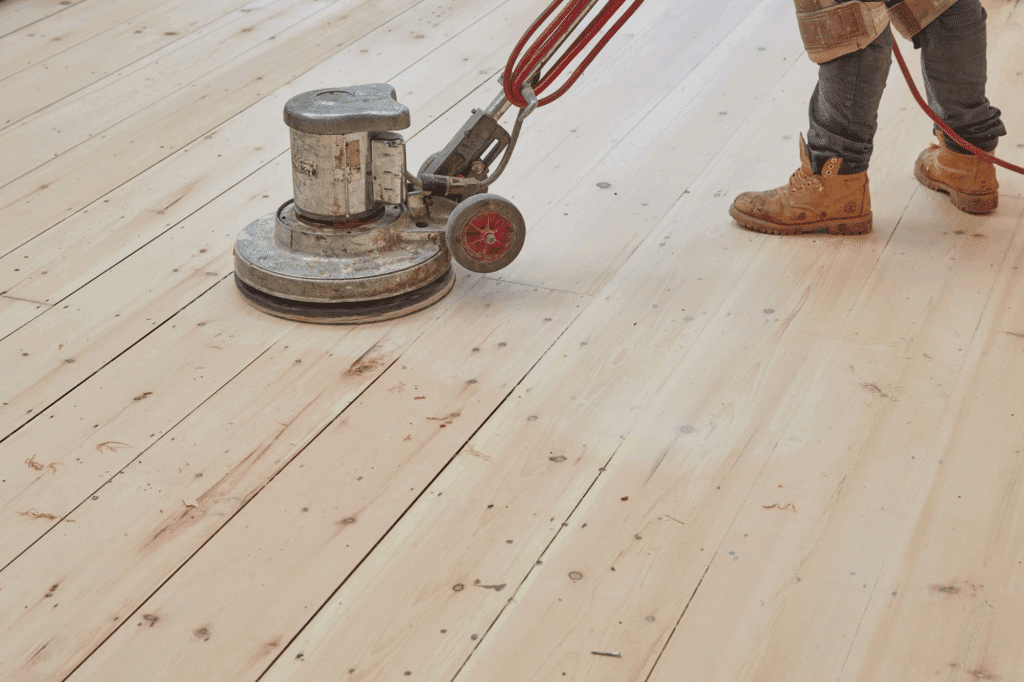
Selecting the appropriate tools is vital for a successful refinishing project. A drum sander or orbital sander is typically used for large, open areas of the floor, while an edge sander is ideal for getting close to the walls and baseboards without causing damage. Ensure that your sanders are equipped with dust bags to minimize mess and cleanup time.
For hand-sanding tight corners and edges, consider using a detail sander or sanding block. These tools allow for precision and control in areas where larger machines cannot reach. It’s also important to have a variety of sandpaper grits on hand, ranging from coarse to fine, to achieve a smooth and even finish.
In addition to sanding equipment, you’ll need a high-quality wood finish to seal and protect your floors. Choose a finish that complements your home’s style and meets your durability needs, whether it’s a water-based polyurethane for quick drying or an oil-based finish for a rich, deep sheen. Ensure you have brushes, rollers, and applicators suitable for applying the finish evenly.
How to Protect Baseboards During Sanding
Protecting your baseboards is a critical step in refinishing hardwood floors without removing them. Begin by firmly applying painter’s tape along the top edge of the baseboards where they meet the floor. This will act as a barrier against accidental sanding or staining.
Consider using a dust barrier or plastic sheeting to cover the entire baseboard area. This provides an extra layer of protection and prevents dust and debris from settling on the surfaces. Remember to secure the sheeting with tape to ensure it remains in place throughout the sanding process.
When sanding near the edges, use caution and precision. Opt for an edge sander with a shielded design that minimizes the risk of accidental contact with baseboards. For intricate areas, switch to a hand-sanding tool to maintain control and avoid damage. By taking these precautions, you can confidently sand your floors without compromising the condition of your baseboards.
Sanding Floors Safely Near the Edges
Sanding near the edges of your hardwood floors requires careful attention to detail to avoid damaging the baseboards. Start by using an edge sander, which is specifically designed for reaching close to walls and baseboards without causing harm. Move the sander in smooth, even strokes along the perimeter of the room.
For corners and tight spaces, switch to a detail sander or sanding block. These tools allow for precise control in areas where larger machines cannot reach. Be patient and thorough, ensuring that you achieve a consistent finish throughout the entire room.
As you sand near the edges, periodically check the condition of your baseboards to ensure they remain protected. If necessary, adjust the placement of painter’s tape or plastic sheeting to maintain a secure barrier. By maintaining a steady hand and focusing on precision, you can achieve a professional result without risking damage to your baseboards.
Cleaning Up Dust Before Finishing
Once the sanding process is complete, it’s essential to thoroughly clean the room before applying any finish. Start by vacuuming the entire floor to remove dust and debris, paying particular attention to the edges and corners where particles may have settled. The EPA recommends using a High-Efficiency Particulate Air (HEPA) vacuum cleaner to effectively remove fine dust particles.
Next, use a microfiber cloth or tack cloth to wipe down the floor, ensuring that all remaining dust is captured and removed. This step is crucial for achieving a smooth and even finish, as any leftover particles can interfere with the application of the wood finish.
Ensure that the room is well-ventilated before proceeding to the next step. Open windows and use fans to circulate air and remove any lingering dust from the environment. By taking the time to clean thoroughly, you set the stage for a flawless finish that enhances the natural beauty of your hardwood floors.
Applying Finish to Your Hardwood Floors
With the room clean and free of dust, it’s time to apply the finish to your hardwood floors. Begin by stirring the finish thoroughly to ensure an even consistency. Avoid shaking the container, as this can introduce bubbles that may affect the final result.
Using a high-quality brush or roller, apply the finish in thin, even coats, following the direction of the wood grain. Start at the farthest corner of the room and work your way toward the exit to avoid stepping on wet areas. Take your time to ensure that each coat is applied smoothly and evenly.
Allow each coat to dry completely before applying additional layers. Depending on the type of finish you use, you may need to lightly sand the floor between coats to ensure optimal adhesion. Follow the manufacturer’s instructions for drying times and application techniques to achieve the best possible result.
Drying, Curing, and Maintaining Your Floors
After applying the final coat of finish, it’s important to allow sufficient time for drying and curing. This process ensures that the finish hardens properly, providing maximum protection and durability. Follow the manufacturer’s guidelines for curing times, which can vary depending on the type of finish used.
Once the finish has cured, take steps to maintain your newly refinished hardwood floors. Place felt pads under furniture legs to prevent scratches, and use area rugs in high-traffic areas to protect the surface. Regular cleaning with a damp mop and wood-safe cleaner will help preserve the beauty and longevity of your floors.
To keep your floors looking their best, establish a routine maintenance schedule. Regularly inspect the floors for signs of wear or damage and address issues promptly to prevent further deterioration. By taking these proactive measures, you can enjoy the beauty of your refinished hardwood floors for years to come.
Summary
Refinishing hardwood floors without removing baseboards is a practical and effective way to enhance your home’s interior. From careful preparation to precise sanding and finishing, each stage plays a crucial role in the success of your project.
Remember to choose the right tools and materials for the job, and take the time to protect your baseboards and surrounding areas throughout the process. With patience and attention to detail, you can transform your hardwood floors and create a stunning, long-lasting result.