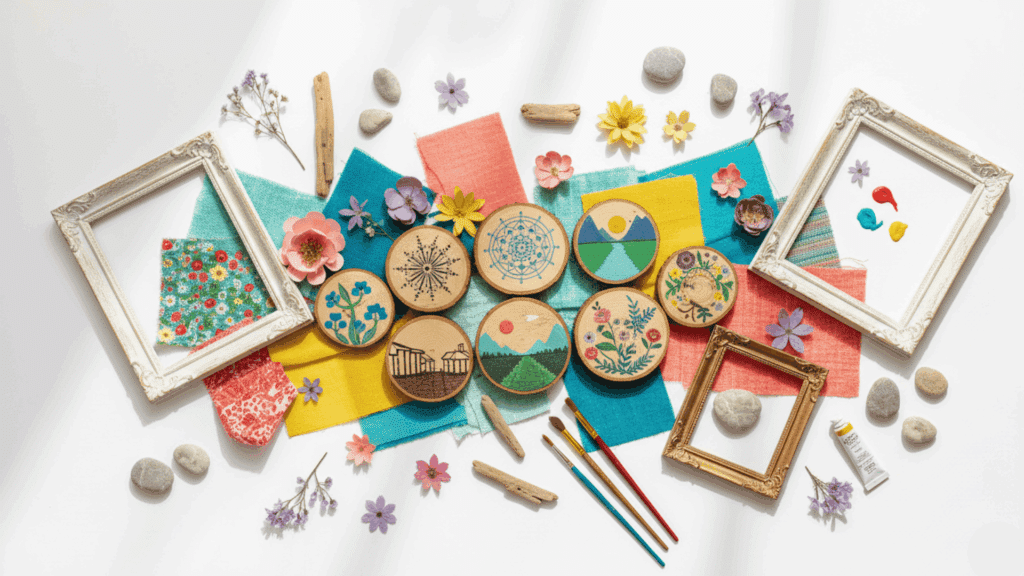
Blank walls staring back at you? Store-bought art draining your wallet? Your walls deserve better than mass-produced prints that cost a fortune.
Making your own wall decor is easier than you think. You don’t need fancy art skills or expensive supplies. Most projects use materials you already have at home.
Old wood, fabric scraps, paper, and even bottle caps can become beautiful art.
This guide walks you through budget-friendly wall art ideas for every room. You’ll learn how to use reclaimed wood, fabric, paint, paper, natural materials, and household items.
We’ll cover simple techniques that give professional results. Plus, you’ll get practical tips to make your DIY pieces look polished and intentional.
Why DIY Wall Decor is a Great Option
Creating your own wall decor offers real benefits that go beyond just saving money. You get full control over how your space looks and feels. Plus, you can reuse materials you already have at home. The result? A space that truly represents who you are without breaking the bank.
- Cost-Effective: DIY wall art costs far less than buying ready-made pieces from stores.
- Personalization: You can customize every detail to match your unique style and taste.
- Satisfaction: Making something with your own hands brings genuine happiness and a sense of accomplishment.
- Eco-Friendly: You can repurpose old items and reduce waste while creating beautiful decor.
Materials You Can Use for DIY Wall Decor
You don’t need expensive supplies to create beautiful wall art. Look around your home first. Many everyday items work perfectly for DIY projects. Here’s what you can use:
| Material Type | What You Can Use |
|---|---|
| Upcycled Materials | Old wood planks, cardboard boxes, fabric scraps, bottle caps, wine corks, newspaper, magazines |
| Craft Supplies | Acrylic paint, watercolors, canvas boards, paintbrushes, glue guns, nails, hooks, twine |
| Repurposed Objects | Old mirrors, vintage window frames, empty picture frames, tin cans, glass jars, broken tiles |
| Natural Materials | River stones, driftwood, dried flowers, pressed leaves, seashells, tree branches, pinecones |
The best part? Most of these materials are either free or very cheap. Check your garage, attic, or recycling bin. You’ll be surprised by what you can turn into art.
Reclaimed Wood Wall Art Ideas
Wood brings warmth and character to any room. Old wood pieces can become beautiful art with just a little creativity.
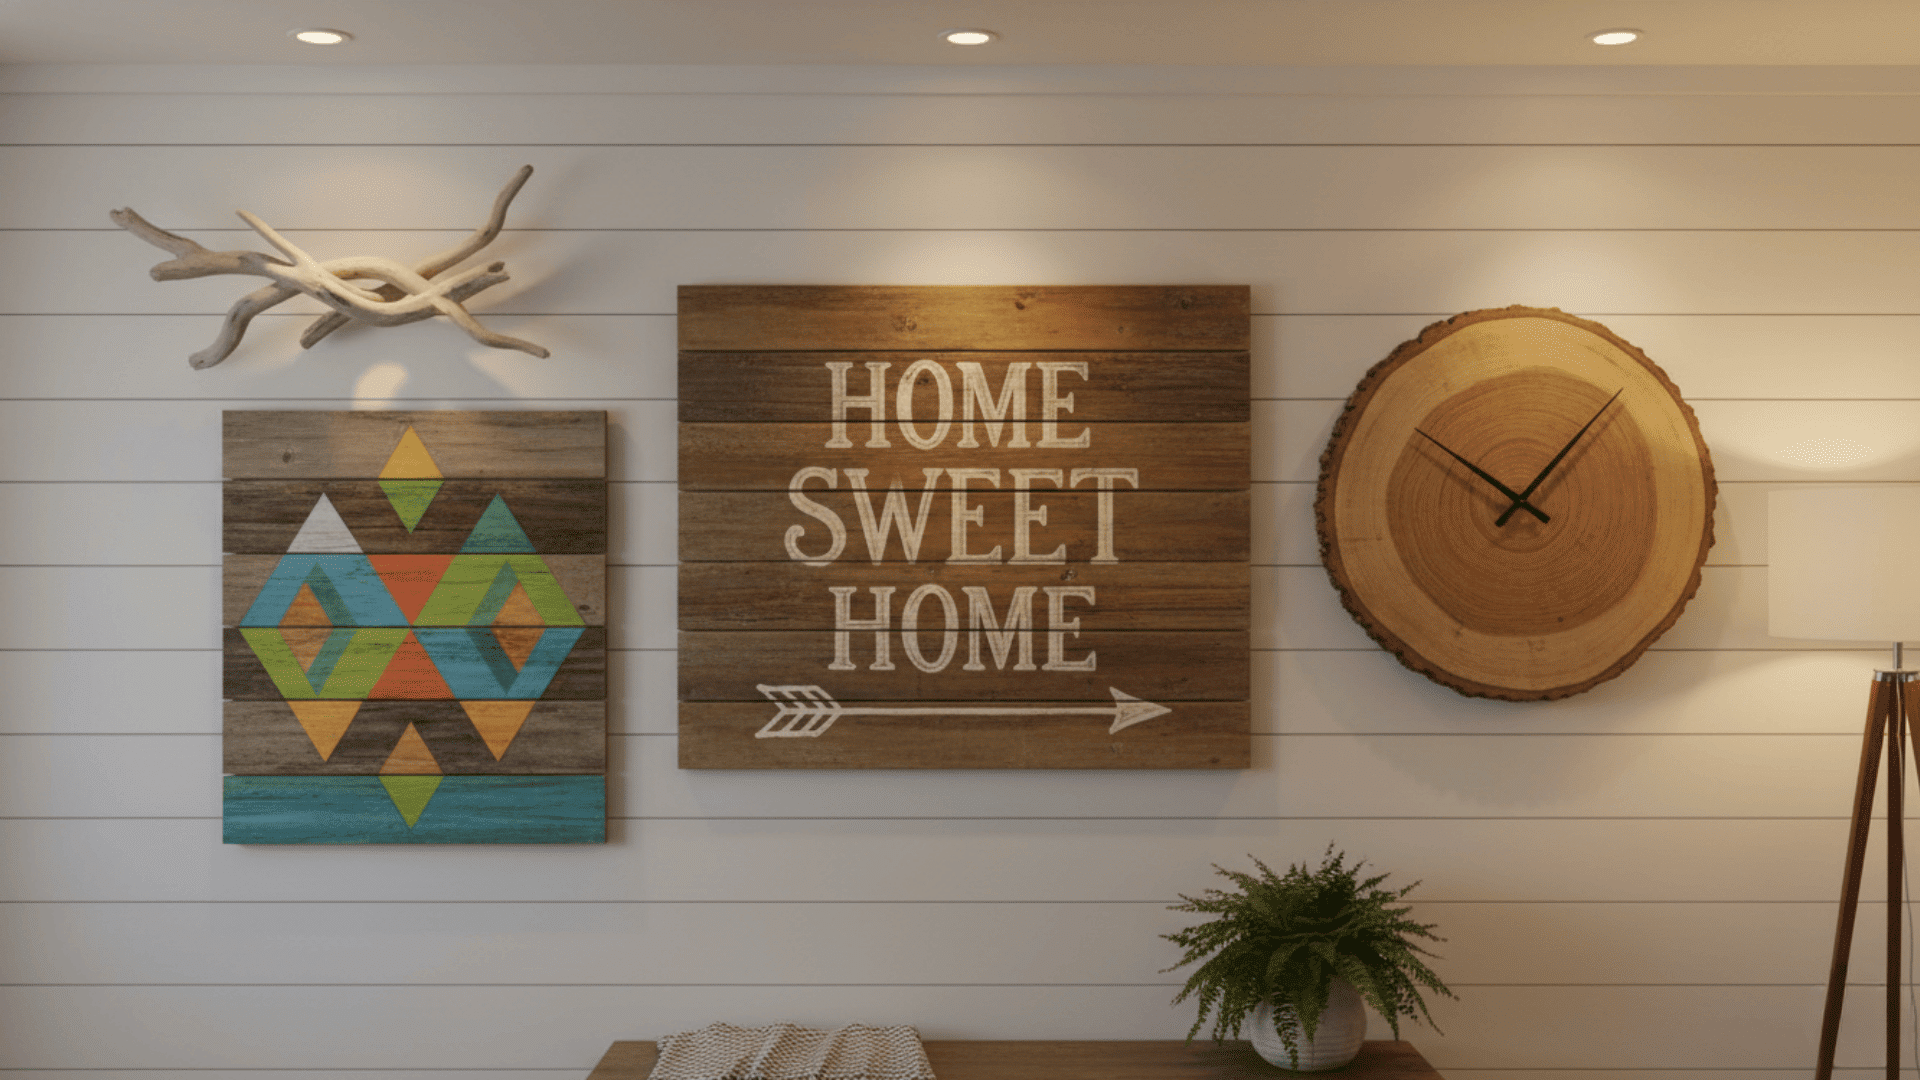
1. Rustic Wood Signs with Inspirational Quotes
Turn old wooden boards into personalized signs with your favorite sayings. Sand the wood lightly to keep its natural texture and aged look. These signs add a personal touch that store-bought decor can’t match.
How to Make It:
- Sand an old wooden plank and paint or stain the background
- Use stencils or freehand your chosen quote with paint or marker
- Seal with clear varnish and hang on your wall
2. Painted Pallet Art
Shipping pallets make great canvases for colorful designs. The wood slats create interesting lines and texture in your final piece. This free material turns trash into treasure.
How to Make It:
- Take apart a clean wooden pallet and sand down rough edges
- Paint your design directly on the wood slats
- Hang using strong wall hooks or brackets
3. Driftwood Sculptures
Weathered driftwood pieces create organic, coastal-style art. Each piece has unique shapes and colors from time spent in water. These sculptures bring beachy vibes to any space.
How to Make It:
- Collect and clean driftwood pieces thoroughly
- Arrange pieces into your desired shape and connect with wood glue or wire
- Mount on a wooden backing board with hanging wire
4. Wood Slice Clock Art
Large wood slices become functional art when you add clock mechanics. The natural rings and grain patterns make each one unique. Plus, you get both decor and a working timepiece.
How to Make It:
- Sand a large wood slice smooth and drill a center hole for clock mechanics
- Insert a battery-operated clock kit through the hole
- Add numbers with paint or markers and hang them on the wall
5. Geometric Wood Designs
Angular wood pieces arranged in patterns create modern, eye-catching art. This style works well in contemporary spaces. The clean lines and shapes make a bold statement.
How to Make It:
- Cut wood into triangles, squares, or hexagons, and sand them smooth
- Paint each piece in different colors
- Arrange on a backing board in geometric patterns and glue down
6. Wood Panel Abstract Art
Multiple wood panels lined up create depth and interest. Different stain colors add visual variety without paint. This technique highlights the natural beauty of wood grain.
How to Make It:
- Cut several wooden boards to the same size and sand completely
- Apply different wood stains to each board and let them dry
- Arrange boards side by side and attach them to the wall individually
7. Layered Wood Art with Contrasting Stains
Stacking wood pieces at different heights creates dimension. Varying stain colors add depth and visual interest. This 3D effect catches the eye from every angle.
How to Make It:
- Cut wood into various rectangular sizes and sand them smooth
- Apply a light stain to some pieces and a dark stain to others
- Stack and glue pieces in layers, then mount on the wall
Fabric and Textile-Based Wall Art Ideas
Fabric offers endless color and texture options for wall decor. Old clothes and scraps can get new life as beautiful art.
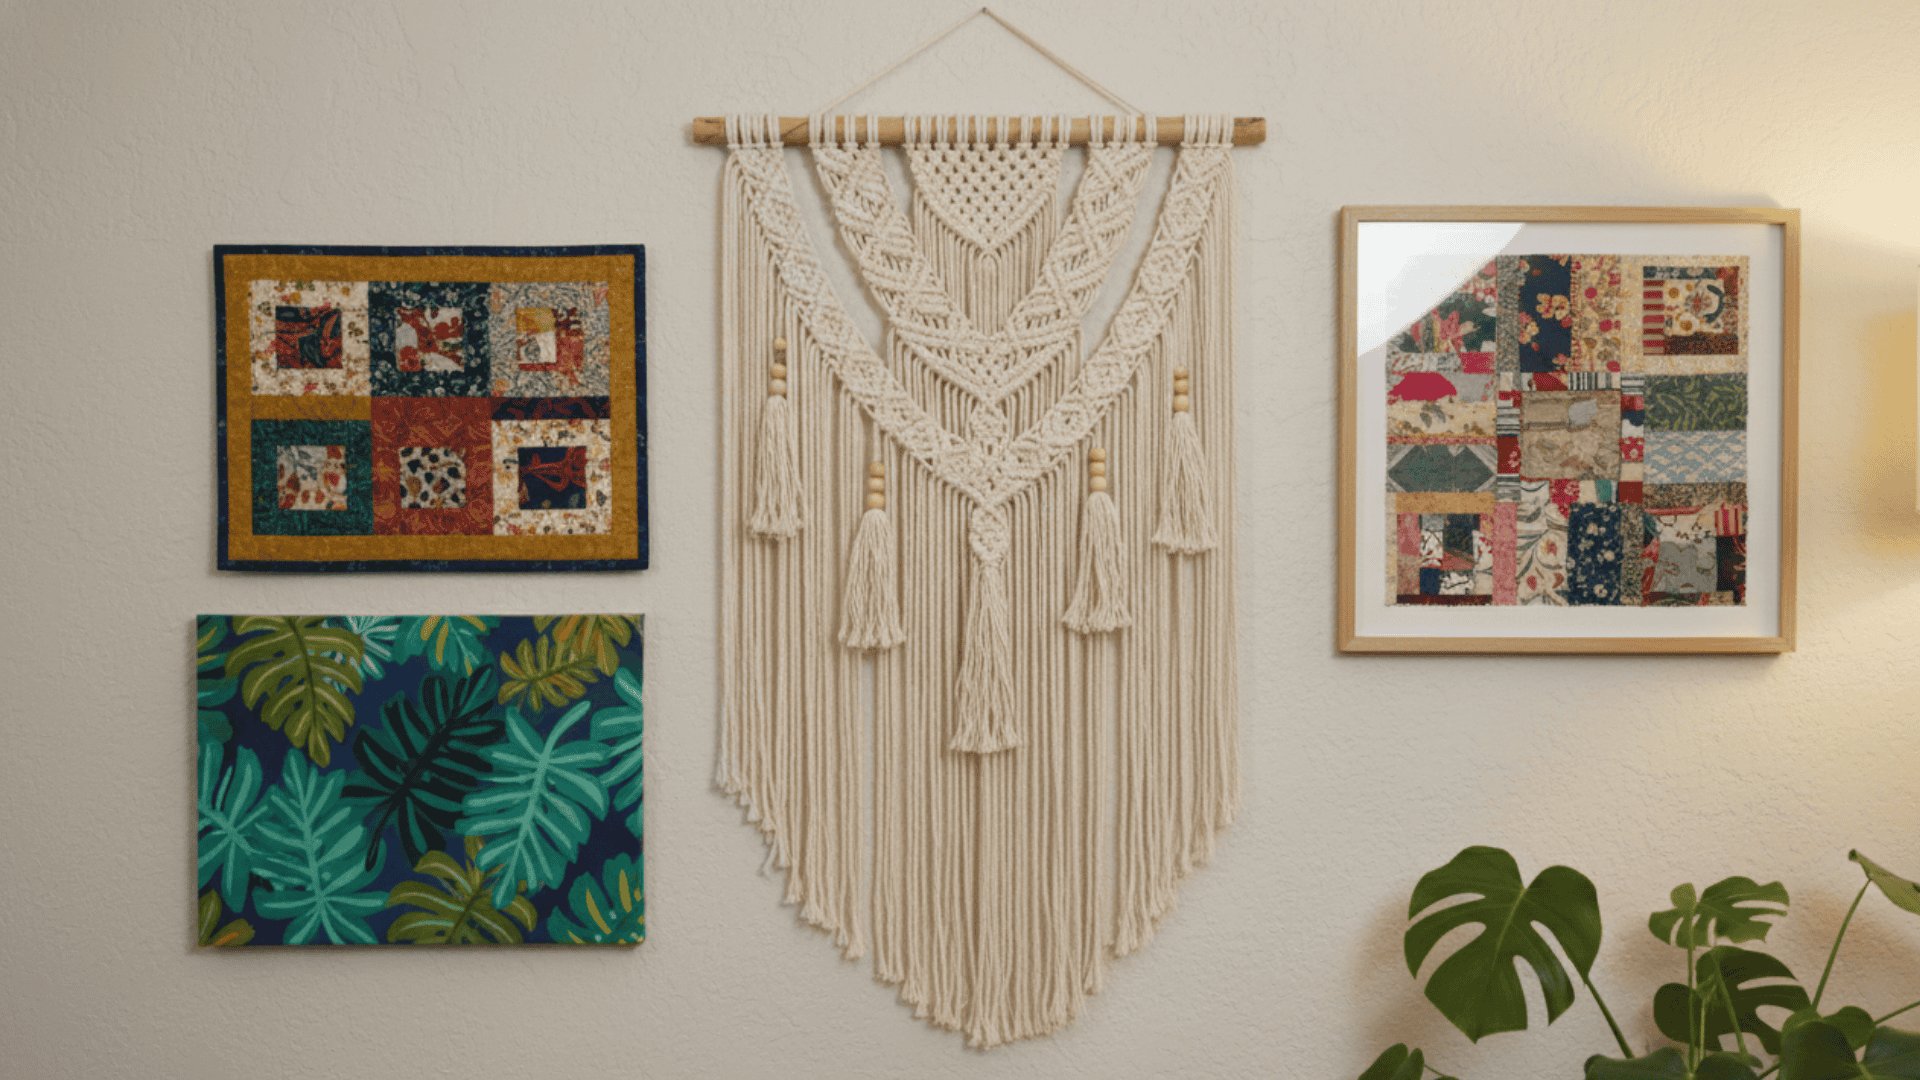
8. Framed Fabric Scraps in a Pattern
Colorful fabric pieces arranged in frames become instant art. Mix patterns and textures for visual interest. This is perfect for using up leftover fabric from sewing projects.
How to Make It:
- Cut fabric scraps and stretch them over a cardboard backing
- Secure with fabric glue or staples
- Place in frame and hang on the wall in single or gallery style
9. Tapestry Art with Paint or Embroidery
Plain fabric becomes art when you add painted designs or stitching. This method lets you create truly custom pieces. Your creativity is the only limit here.
How to Make It:
- Sketch your design on a plain canvas or heavy fabric
- Paint the design with fabric paint or embroider with colorful thread
- Hang using a dowel rod or frame
10. Quilted Wall Hanging
Small quilted pieces make cozy, textured wall art. You don’t need quilting skills to create simple patchwork designs. The handmade quality adds warmth to any room.
How to Make It:
- Cut and arrange fabric squares in coordinating colors
- Sew squares together in rows, then sew rows together
- Attach a hanging sleeve to the back edge
11. DIY Fabric Wall Mural
Large fabric pieces can cover entire walls with color and pattern. This temporary option works great for renters. You can change it out whenever you want a new look.
How to Make It:
- Measure your wall and cut lightweight fabric to fit
- Apply fabric starch to the wall surface
- Press fabric onto the starched wall smoothly and trim excess
12. Boho Macramé Wall Hanging
Knotted rope creates beautiful bohemian-style hangings. Basic knots are easy to learn and repeat. These add texture and a handcrafted feel to your space.
How to Make It:
- Cut cotton rope into multiple pieces and attach to a dowel rod
- Learn basic macramé knots from online tutorials
- Create your pattern by knotting cords together and trimming the ends
13. Recycled Denim Wall Art
Old jeans can become unique, textured art pieces. The different shades of blue create natural variation. This gives worn denim a second life instead of tossing it.
How to Make It:
- Cut denim from old jeans into desired shapes
- Arrange shapes on canvas or backing board
- Glue pieces down with fabric glue and layer for dimension
14. Fabric-Stretch Canvas Art
Wrapping pretty fabric around canvas creates instant art. This no-sew method is quick and easy. Choose bold prints for maximum impact.
How to Make It:
- Cut fabric larger than your blank canvas on all sides
- Wrap the fabric around to back of the canvas
- Staple or glue fabric to the back edges and hang
Paint and Canvas Art Ideas
Canvas and paint offer unlimited creative possibilities. You don’t need artistic training to make beautiful abstract pieces.
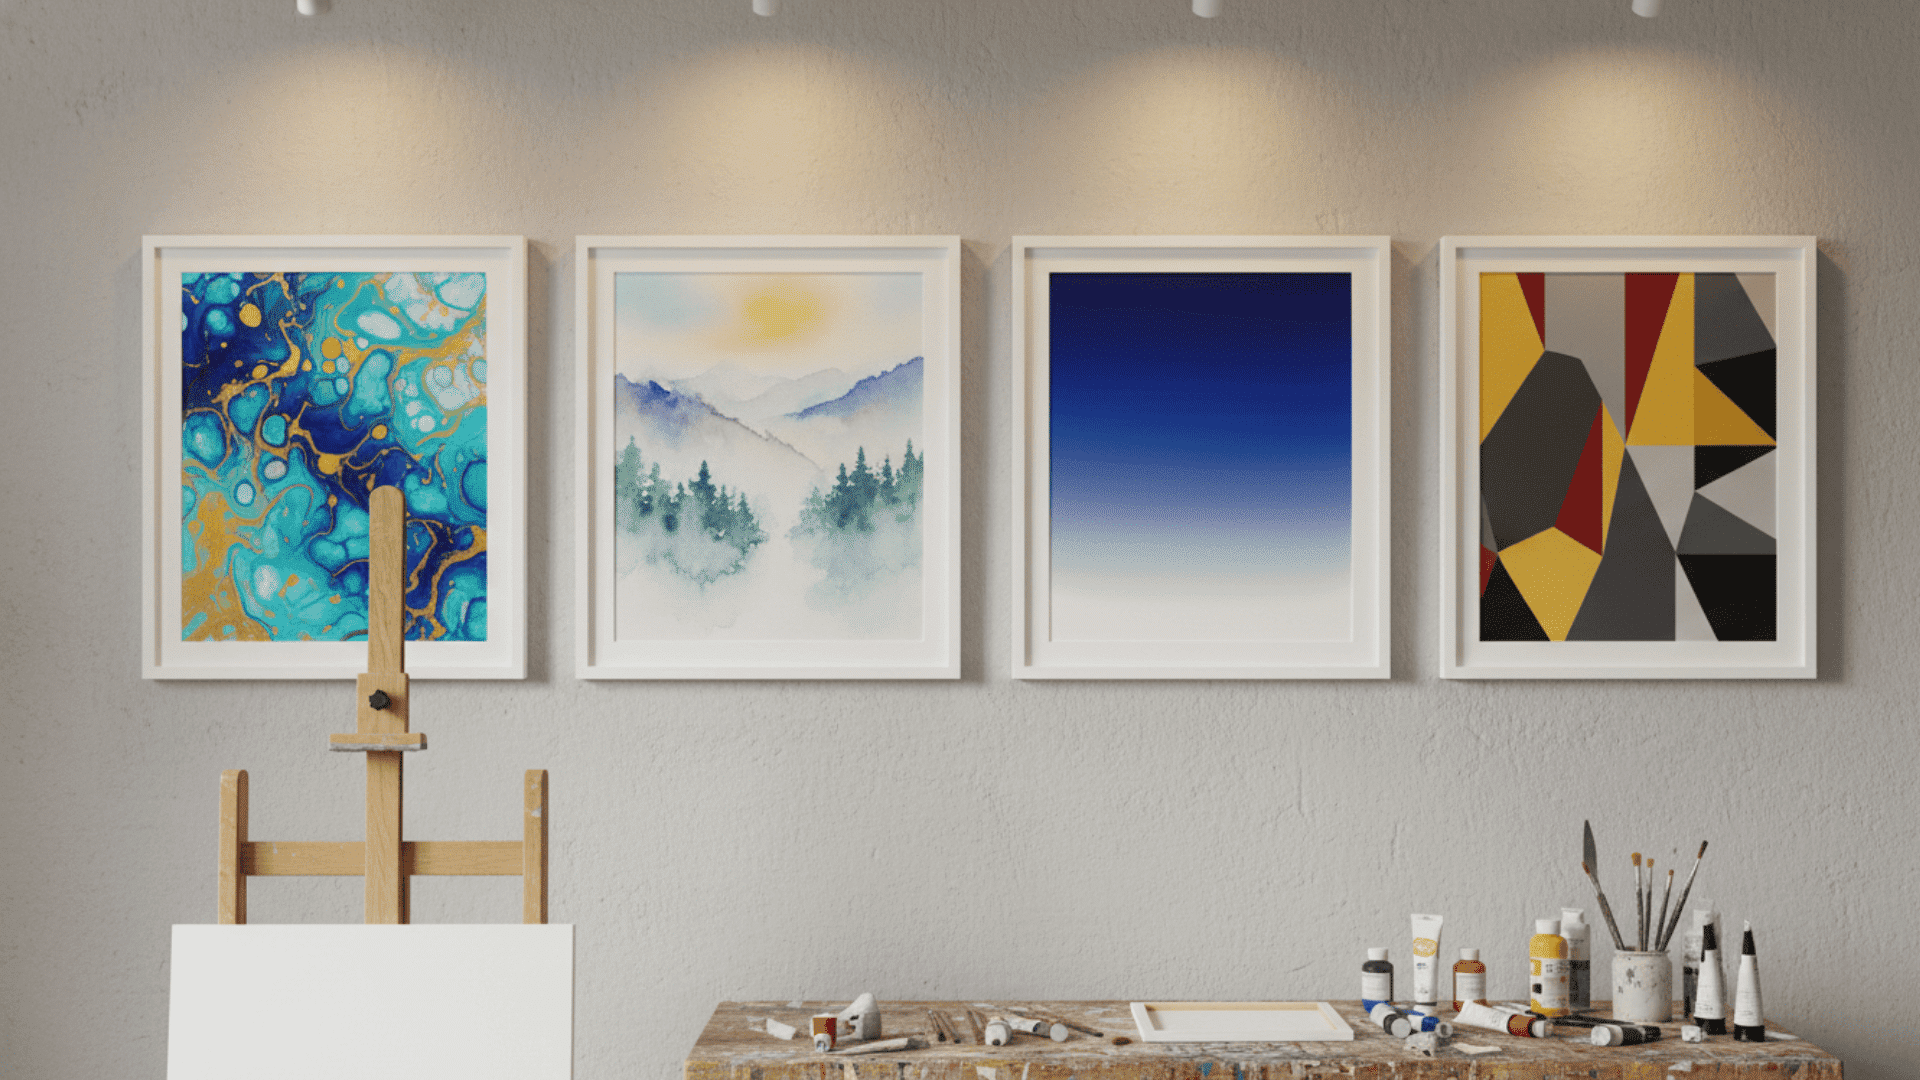
15. Abstract Acrylic Pour Painting
Pouring paint creates flowing, marbled effects that look professional. The paint does most of the work for you. Each piece turns out completely unique.
How to Make It:
- Mix acrylic paints with pouring medium
- Pour colors onto the canvas in layers and tilt to spread
- Let colors blend naturally and dry flat for 24 hours
16. Watercolor Landscapes
Simple watercolor scenes bring calm, natural beauty to walls. Soft colors and loose brushstrokes create peaceful vibes. These work beautifully in bedrooms and bathrooms.
How to Make It:
- Sketch basic landscape shapes on watercolor paper
- Wet paper with clean water and apply watercolor in light layers
- Let colors blend on wet paper, then frame when dry
17. Ombre Canvas Art
Gradual color transitions create soothing, modern art. This technique works with any color combination. The blended effect is easier to achieve than it looks.
How to Make It:
- Start with the darkest color at the bottom of the canvas
- Blend into lighter shades moving upward using a brush or a sponge
- Work quickly while the paint is wet
18. DIY Painted Wall Murals
Paint directly on walls for bold, permanent statements. Plan your design carefully before starting. Murals can make small rooms feel larger or add focal points.
How to Make It:
- Sketch the design on paper first, then mark the outline on the wall with a pencil
- Use painter’s tape for straight edges and paint background colors first
- Add details and smaller elements last
19. Geometric Painted Shapes
Clean lines and bold shapes create modern, graphic art. Painter’s tape makes this easy for anyone. The sharp edges look crisp and professional.
How to Make It:
- Plan your geometric pattern and mark lightly on the canvas
- Use painter’s tape to create clean edges
- Paint each section in different colors and remove the tape before fully dry
20. Abstract Brushstroke Painting
Bold, expressive brushstrokes create energy and movement. Let your instincts guide your brush. There’s no wrong way to do this style.
How to Make It:
- Choose 3 to 5 colors that work together
- Make confident strokes across the canvas, varying direction and pressure
- Layer different colors over each other until the composition feels balanced
21. Stenciled Floral Art
Stencils help create precise, repeating patterns. Floral designs add softness to any space. This method gives you professional results without artistic skills.
How to Make It:
- Position the floral stencil on the canvas and tape it down
- Apply paint with a sponge or stencil brush
- Lift stencil carefully and repeat pattern across surface
Paper and Cardboard Wall Art Ideas
Paper is cheap, versatile, and comes in endless colors. Cardboard from packaging works surprisingly well for art projects.
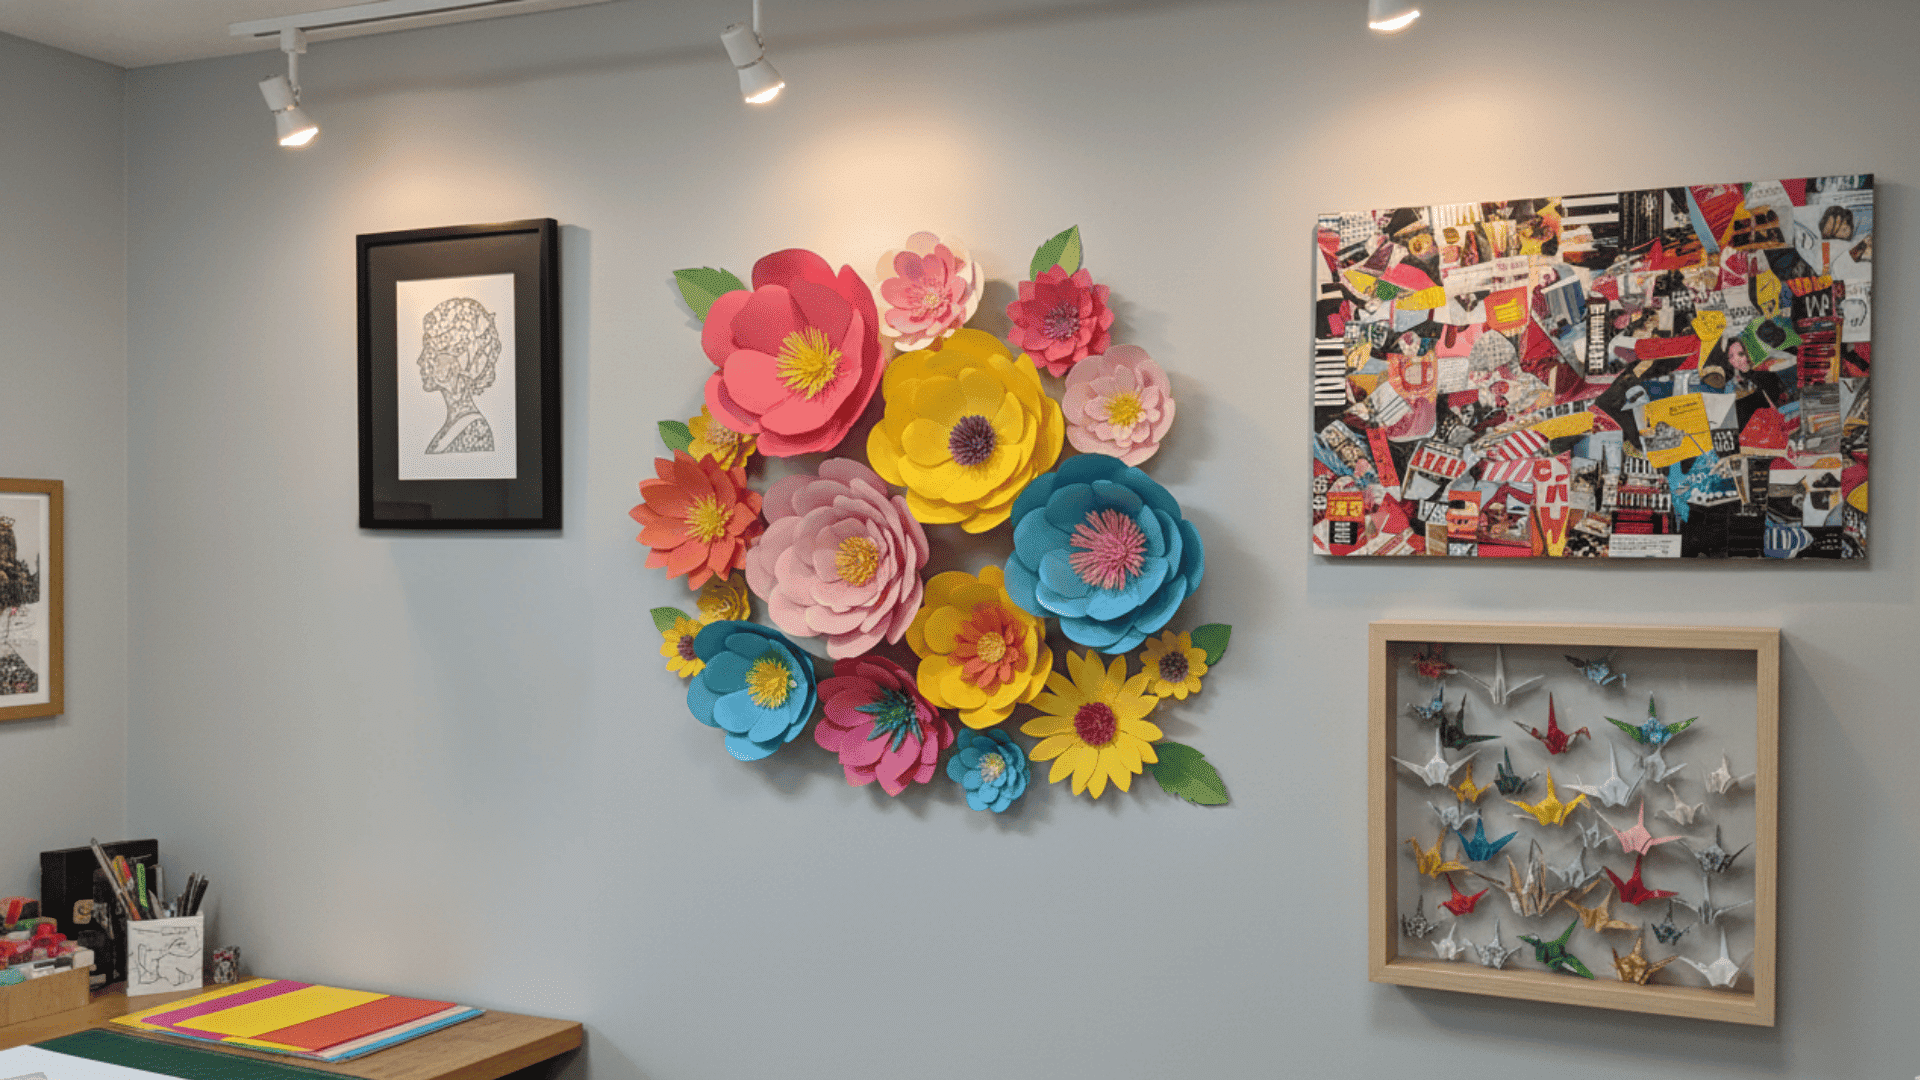
22. DIY Paper Flower Wall Decor
Paper flowers never wilt and look beautiful year-round. Make them as big or small as you want. These add color without the upkeep of real plants.
How to Make It:
- Cut petal shapes in various sizes from colored cardstock
- Layer petals from large to small and glue centers together
- Add the circle center in a contrasting color and attach it to the wall
23. Cut-Out Paper Silhouette Portraits
Black paper profiles create classic, timeless art. Side view photos make this easier than front views. These make thoughtful gifts for family members.
How to Make It:
- Take a side profile photo, print, and trace the outline
- Transfer the outline to black paper and cut it out carefully
- Mount on a white or contrasting background and frame
24. Newspaper or Magazine Collage Art
Old magazines and newspapers become colorful collage materials. Choose images and text that tell a story. This technique lets you express ideas visually.
How to Make It:
- Cut out interesting images and words from magazines
- Arrange pieces on canvas or board until satisfied with layout
- Glue down with Mod Podge and seal the entire surface
25. Paper Mache Sculptures
Layers of paper and glue create sturdy 3D art. This messy project yields impressive results. Kids love helping with this hands-on technique.
How to Make It:
- Create a base shape with wire or cardboard
- Dip the newspaper strips in the glue-water mixture and layer over the form
- Let dry completely before painting
26. Origami Art Displays
Folded paper creates intricate, dimensional art. Simple shapes repeated make a big impact. The precision of folded paper has its own beauty.
How to Make It:
- Learn basic origami folds from online tutorials
- Fold multiple pieces in coordinating colors
- Arrange in a shadow box or string together and display
27. Painted Cardboard Frames
Cereal boxes and shipping boxes become custom frames. Paint and embellishments hide the humble origin. This proves that art supplies don’t need to be expensive.
How to Make It:
- Cut the cardboard into a frame shape with an inner opening
- Paint the frame in desired colors and add texture with fabric or buttons
- Attach a photo or art from behind
28. DIY Wall Calendars from Paper
Handmade calendars are both functional and decorative. Personalize each month with photos or drawings. These make great gifts for family and friends.
How to Make It:
- Design or print 12 monthly calendar pages on cardstock
- Add photos or artwork to each page
- Punch holes at the top, bind with ribbon, and hang
Nature and Eco-Friendly Wall Art Ideas
Natural materials bring organic beauty indoors at no cost. Walks outside become art supply shopping trips.
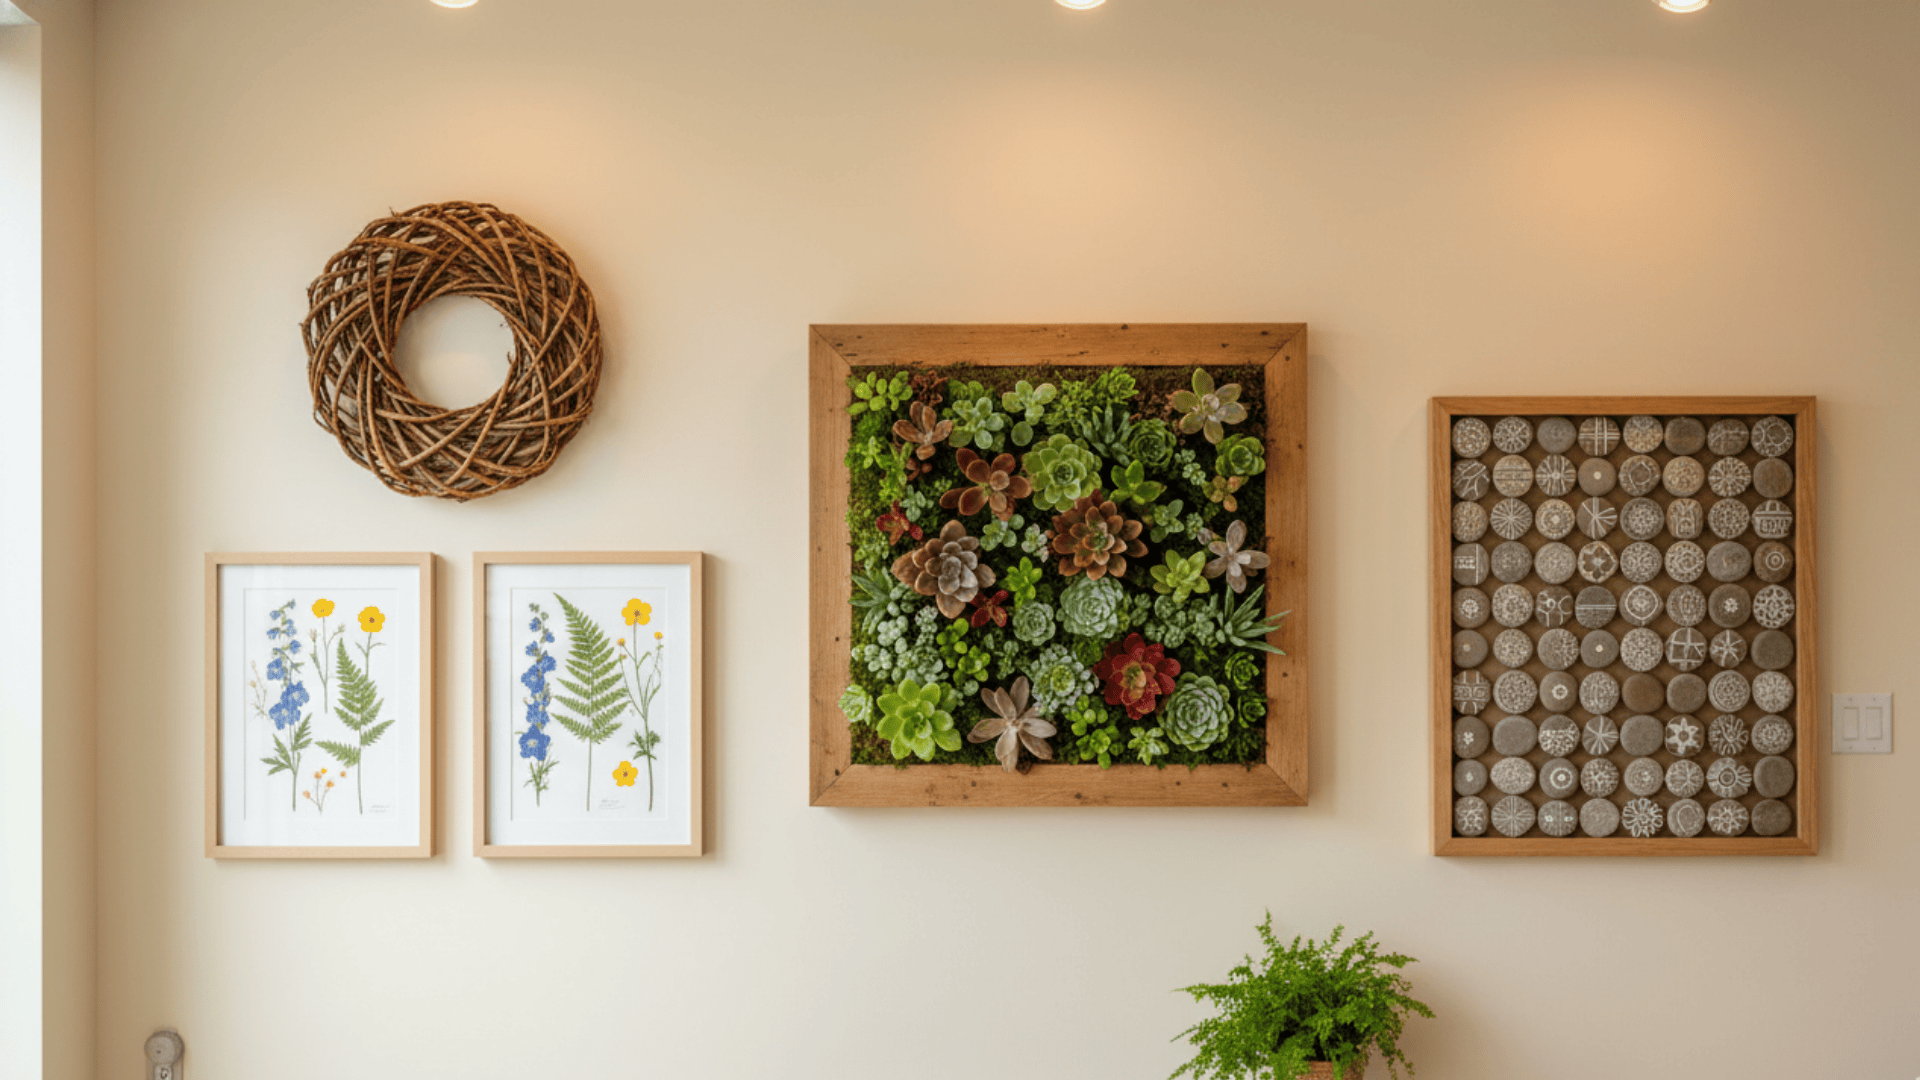
29. Pressed Flower Wall Frames
Preserved flowers maintain their beauty behind glass. This Victorian art form still looks fresh today. Each season offers new flowers to press and display.
How to Make It:
- Place flowers between heavy book pages for 2 to 3 weeks
- Carefully remove dried flowers and arrange on paper backing
- Frame under glass to protect
30. Plant Shadow Box Art
Dried plants and leaves create 3D botanical displays. Shadow boxes protect delicate natural materials. These bring a touch of nature to any wall.
How to Make It:
- Collect and completely dry leaves and small plants by hanging
- Arrange in a shallow shadow box and secure with pins or glue
- Close the shadow box and hang it on the wall
31. Painted Stone Art
Smooth river rocks become tiny canvases for painting. Stack or arrange painted rocks for larger displays. This meditative craft is fun for all ages.
How to Make It:
- Wash and dry smooth, flat stones completely
- Paint designs, patterns, animals, or words with acrylics
- Seal with clear spray and display in a bowl or glue to the backing
32. Twig Wall Art (Woven Branches)
Thin branches woven together create rustic, organic art. This free material has natural beauty. The irregular shapes add character to your walls.
How to Make It:
- Gather thin, flexible twigs and create a frame from thicker branches
- Weave thinner twigs through the frame and secure the ends
- Leave natural or spray paint, then hang with a wire
33. Leaf Print Canvas Art
Real leaves create detailed prints on fabric or paper. Fall leaves work especially well for this. The veins and edges print with beautiful detail.
How to Make It:
- Paint the back side of the leaves with acrylic paint
- Press painted leaves onto the canvas and lift carefully
- Repeat with different leaves and colors, then let them dry
34. Driftwood Wall Sculptures
Weathered wood pieces arranged artistically bring coastal vibes. Each piece is naturally unique. The smooth, sun-bleached wood has organic appeal.
How to Make It:
- Collect and clean driftwood pieces thoroughly
- Arrange pieces in a pleasing composition
- Attach to the backing board with screws or wire pieces together
35. Succulent Wall Planters
Living walls add life and air purification. Succulents need minimal care and look great. These vertical gardens work in small spaces.
How to Make It:
- Line vertical planter frame sections with landscape fabric
- Fill with succulent soil mix and plant small succulents
- Let plants establish for 2 weeks flat, then hang with anchors
Repurposed Household Items Wall Art Ideas
Items headed for the trash can become interesting art. Look at old objects with fresh eyes.
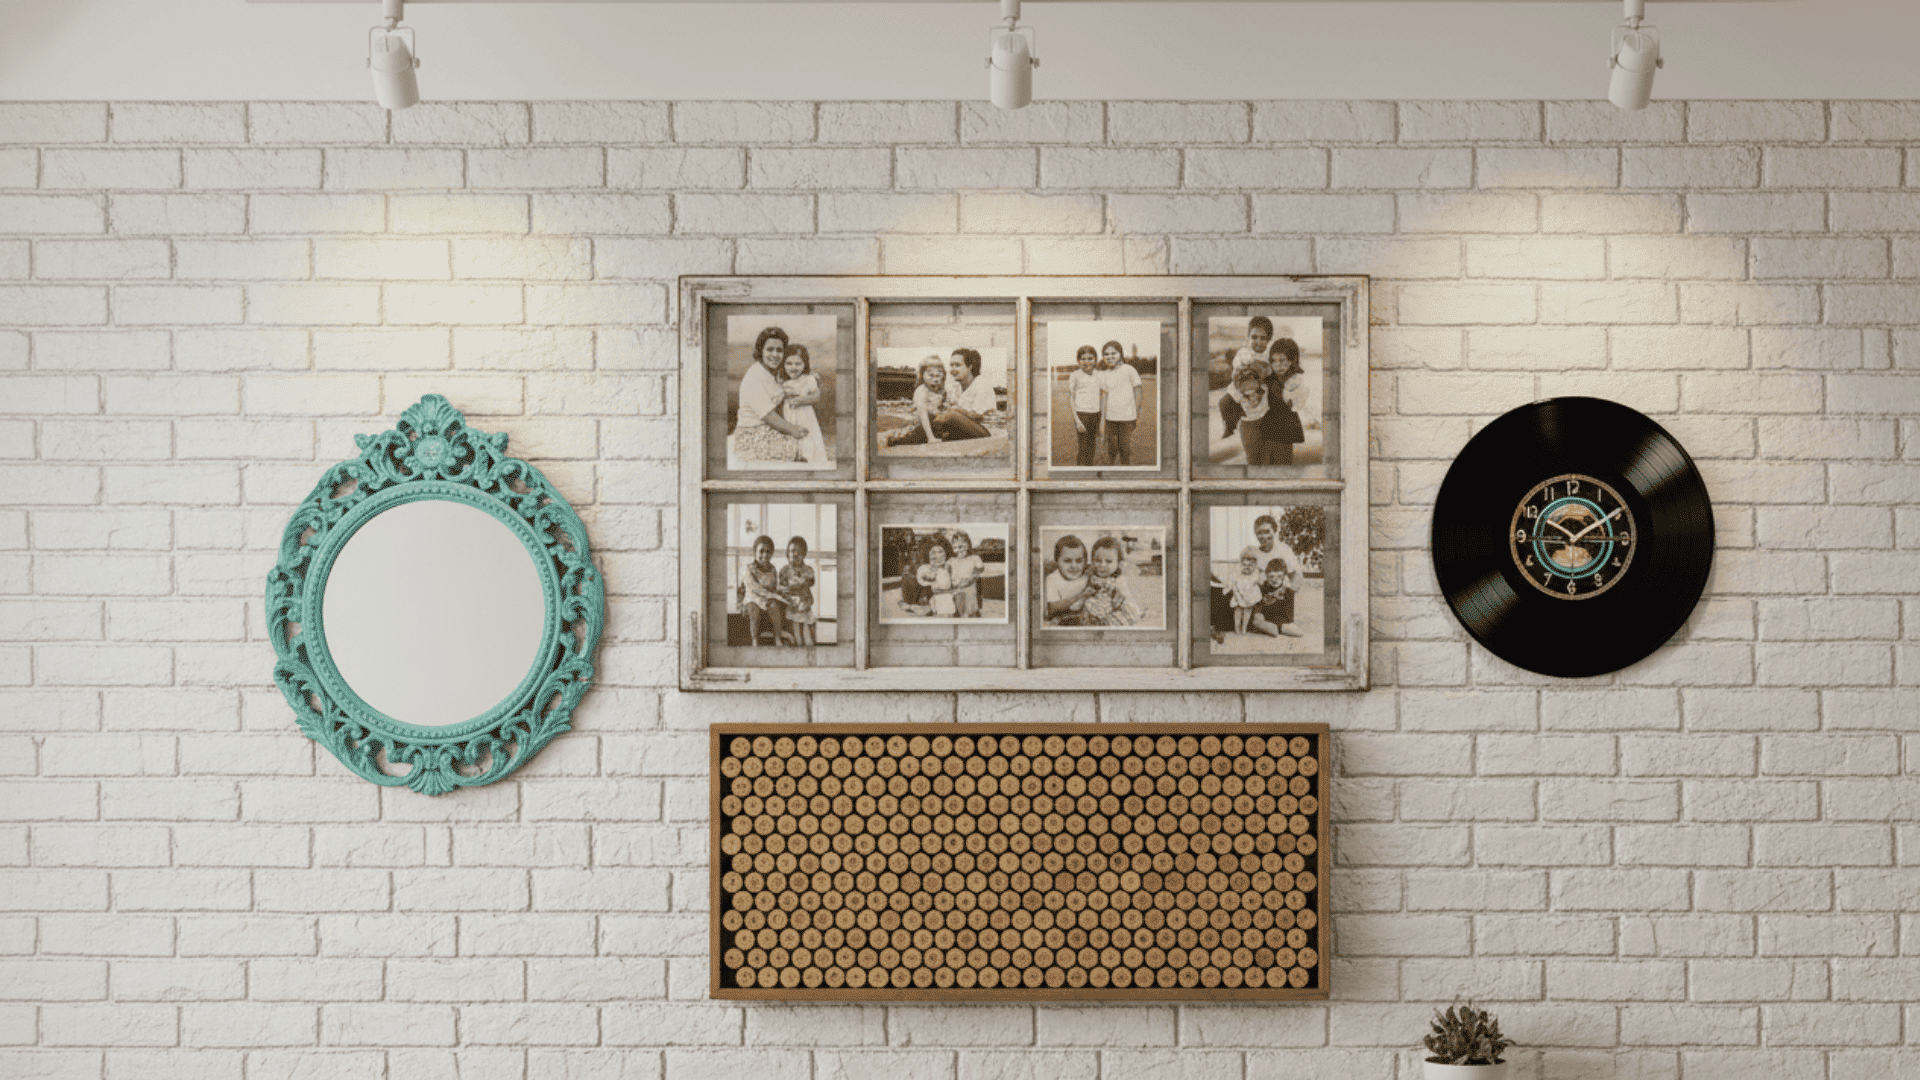
36. Upcycled Mirror Frame Art
Old mirrors get new life with painted or decorated frames. This updates their look completely. A fresh coat of paint works wonders on dated pieces.
How to Make It:
- Remove the mirror from the frame and sand the frame to prepare
- Paint or embellish the frame creatively
- Put the mirror back in the frame and hang it in a new spot
37. Vintage Window Pane Wall Art
Old windows become frames for photos or artwork. The divided panes create natural grid displays. Architectural salvage yards sell these cheaply.
How to Make It:
- Clean the old window thoroughly and sand or paint the frame
- Add photos behind each pane section
- Hang securely with proper wall anchors
38. Record or CD Wall Clock
Outdated music media becomes retro wall clocks. The circular shape is perfect for clock faces. This gives scratched records a new purpose.
How to Make It:
- Drill a hole in the center of the vinyl record or CD if needed
- Insert the clock mechanism through the hole and attach the clock hands
- Add a battery and hang it on the wall
39. Wine Cork Art Designs
Saved wine corks create textured, rustic displays. Arrange them in patterns or shapes. Start collecting corks now for future projects.
How to Make It:
- Collect corks and decide on a design or pattern
- Cut some corks in half if needed for variety
- Glue corks to the backing board in the chosen design
40. Old Book Page Art
Vintage book pages have beautiful aged paper quality. Text pages make interesting backgrounds. Use damaged books that can’t be saved.
How to Make It:
- Remove pages carefully from old, damaged books
- Arrange pages on canvas and glue down with Mod Podge
- Add drawings or other elements on top and seal
41. Bicycle Rim Wall Art
Old bike wheels make industrial, graphic wall pieces. The spokes create interesting patterns. This works great in garage spaces or man caves.
How to Make It:
- Clean the old bicycle wheel and remove the tire and tube
- Spray paint rim and spokes if desired
- Attach the hanging wire to the top and mount securely
42. Tin Can Wall Sculptures
Cleaned soup cans arranged together create modern art. Paint them to match your decor. This recycling project costs nothing but looks intentional.
How to Make It:
- Clean cans, remove labels, and punch a hole in the back of each
- Paint cans in coordinating colors and let them dry
- Arrange in a pattern on the wall and attach with nails
Interactive and 3D Wall Art Ideas
Functional art serves double duty in your space. These pieces look good and provide storage or activity.
43. DIY Wall-Mounted Shelf Art
Shelves arranged artistically become sculptural displays. They hold decor while creating visual interest. This combines form and function perfectly.
How to Make It:
- Arrange simple wooden shelves in a non-traditional pattern on the wall
- Install with proper wall anchors using a level for accuracy
- Style with small decorative objects
44. Floating Bookshelf Wall Art
Books appear to float when mounted specially. This creates an illusion that surprises visitors. The hidden brackets make books seem to defy gravity.
How to Make It:
- Install L-shaped floating shelf brackets into wall studs
- Slide the book onto the bracket from the bottom to hide it
- Stack multiple books at different heights in an interesting pattern
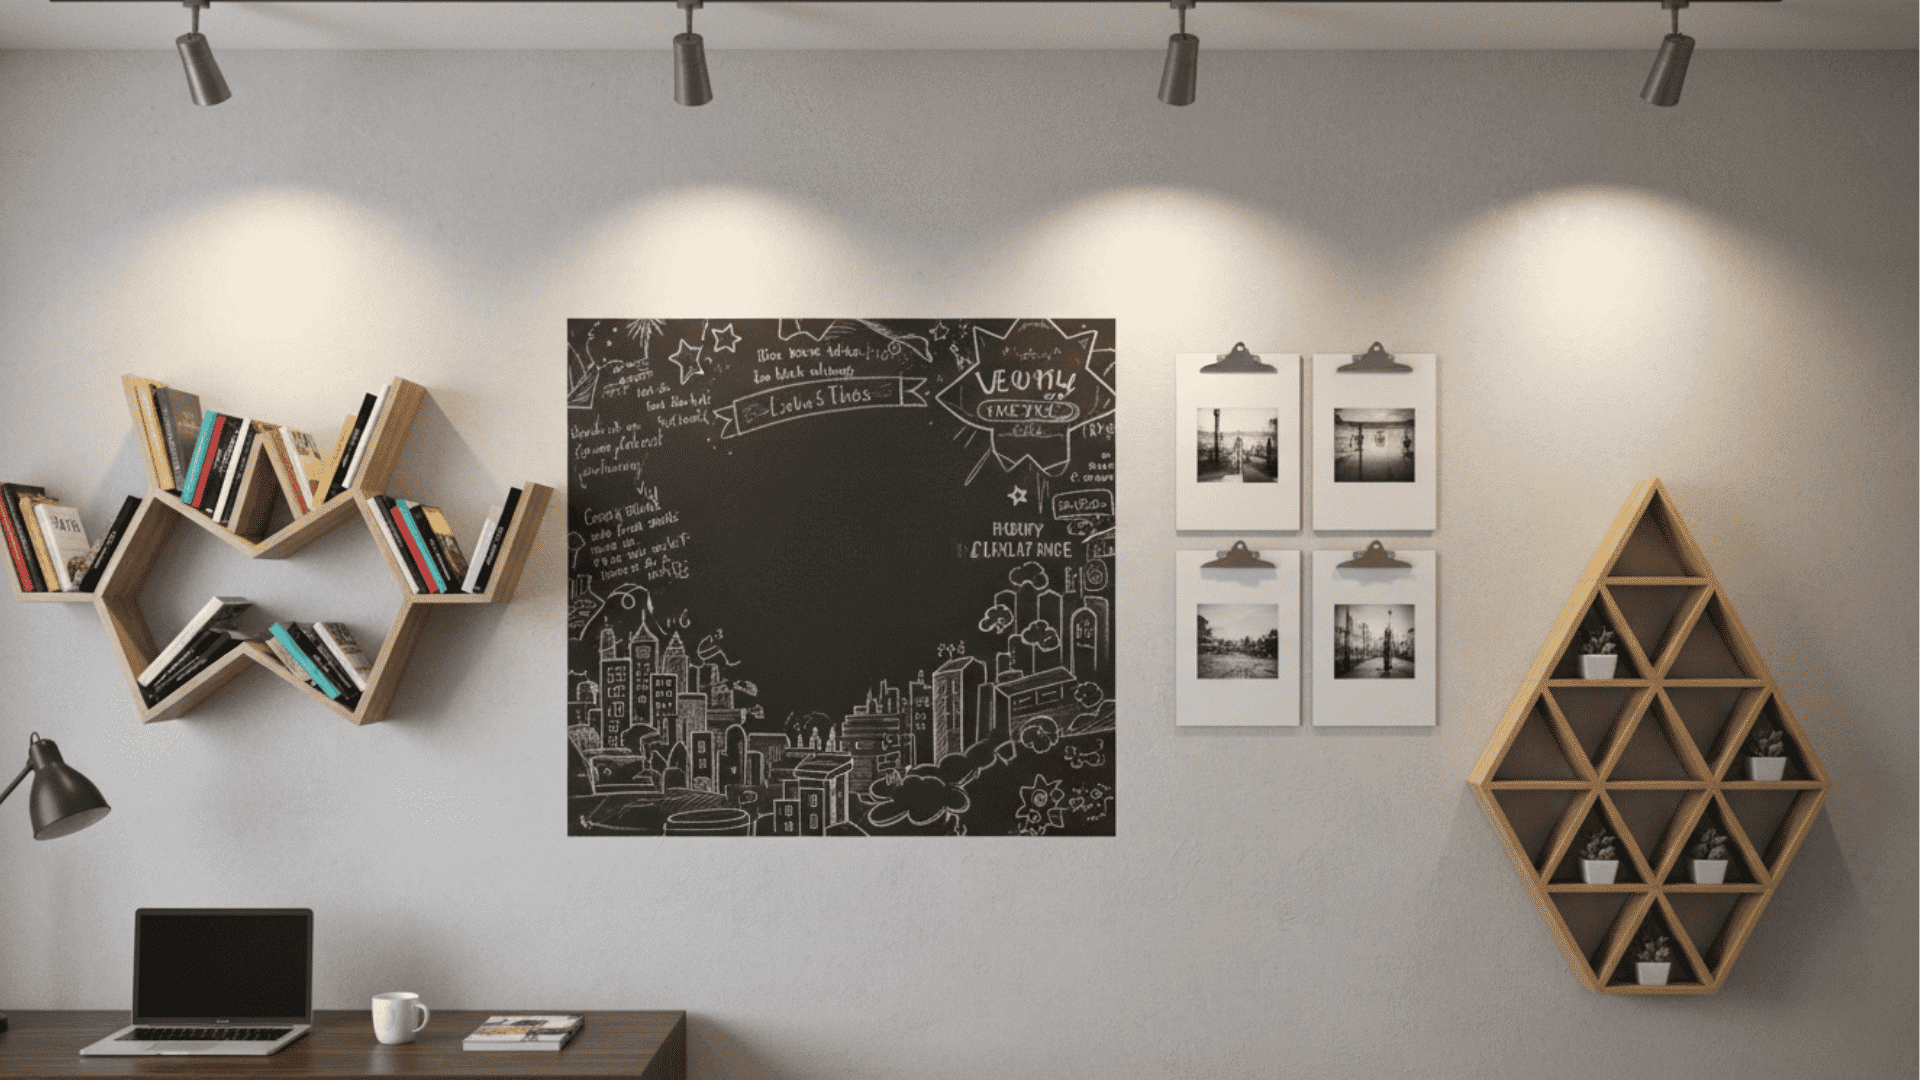
45. Interactive Chalkboard Wall Art
Chalkboard sections let you change art anytime. Write messages, draw, or let kids create. This practical art updates as often as you like.
How to Make It:
- Tape off a section of the wall and apply 2 to 3 coats of chalkboard paint
- Let it cure for 3 days before using
- Season the surface by rubbing chalk over it
46. Felt Wall Art with Removable Pieces
Felt sticks to felt without glue or pins. Create changeable scenes and designs. Kids can rearrange the pieces to make new pictures.
How to Make It:
- Cover board with felt backing
- Cut felt shapes in various colors
- Arrange shapes on the backing and change the design whenever you want
47. Wall-Mounted Photo Clipboards
Clipboards become instant photo displays. Switch photos easily without frames. This gives you the flexibility to update displays seasonally.
How to Make It:
- Paint or decorate the clipboard backs and attach hanging hardware
- Clip your favorite photos to each board
- Hang multiple boards in a group and change photos regularly
48. 3D Fabric Wall Sculptures
Stuffed fabric shapes add dimension to walls. These soft sculptures have tactile appeal. The puffy, raised elements cast interesting shadows.
How to Make It:
- Sew fabric pieces together, leaving an opening, then turn right side out
- Stuff with fiberfill and sew the opening closed
- Attach to the wall with hidden stitching or pins
49. Vintage Frame Shadow Boxes
Deep frames hold collected objects and treasures. This displays meaningful items safely. Group small mementos to tell a visual story.
How to Make It:
- Clean the vintage deep frame and create a backing from cardboard
- Arrange objects on the backing and secure with glue or wire
- Close frame with backing installed
Mixed Media Wall Art Ideas
Combining different materials creates unique, textured art. Layering adds depth and visual interest.
50. Layered Wall Art with Mixed Materials
Stack different materials for dimensional pieces. Combine wood, fabric, paper, and found objects. The variety of textures makes these pieces interesting to look at.
How to Make It:
- Choose base layer material and plan layering order from back to front
- Attach each layer with appropriate adhesive, building up gradually
- Add the smallest details last and seal if needed
51. Holographic or Mirrored Wall Art
Reflective materials catch and bounce light beautifully. These pieces change based on viewing angle. The shimmer adds magic to any room.
How to Make It:
- Cut holographic paper or mirror sheets into desired shapes
- Arrange on contrasting backing and glue down carefully
- Position where light will hit and clean with a soft cloth only
52. Interactive Corkboard or Pushpin Art
Cork surfaces let you pin up changing displays. Create patterns with colorful pushpins. This bulletin board doubles as wall art.
How to Make It:
- Paint or cover the edges of cork corkboard if desired
- Create a design with colorful pushpins or leave blank for photos
- Hang with appropriate hardware and update regularly
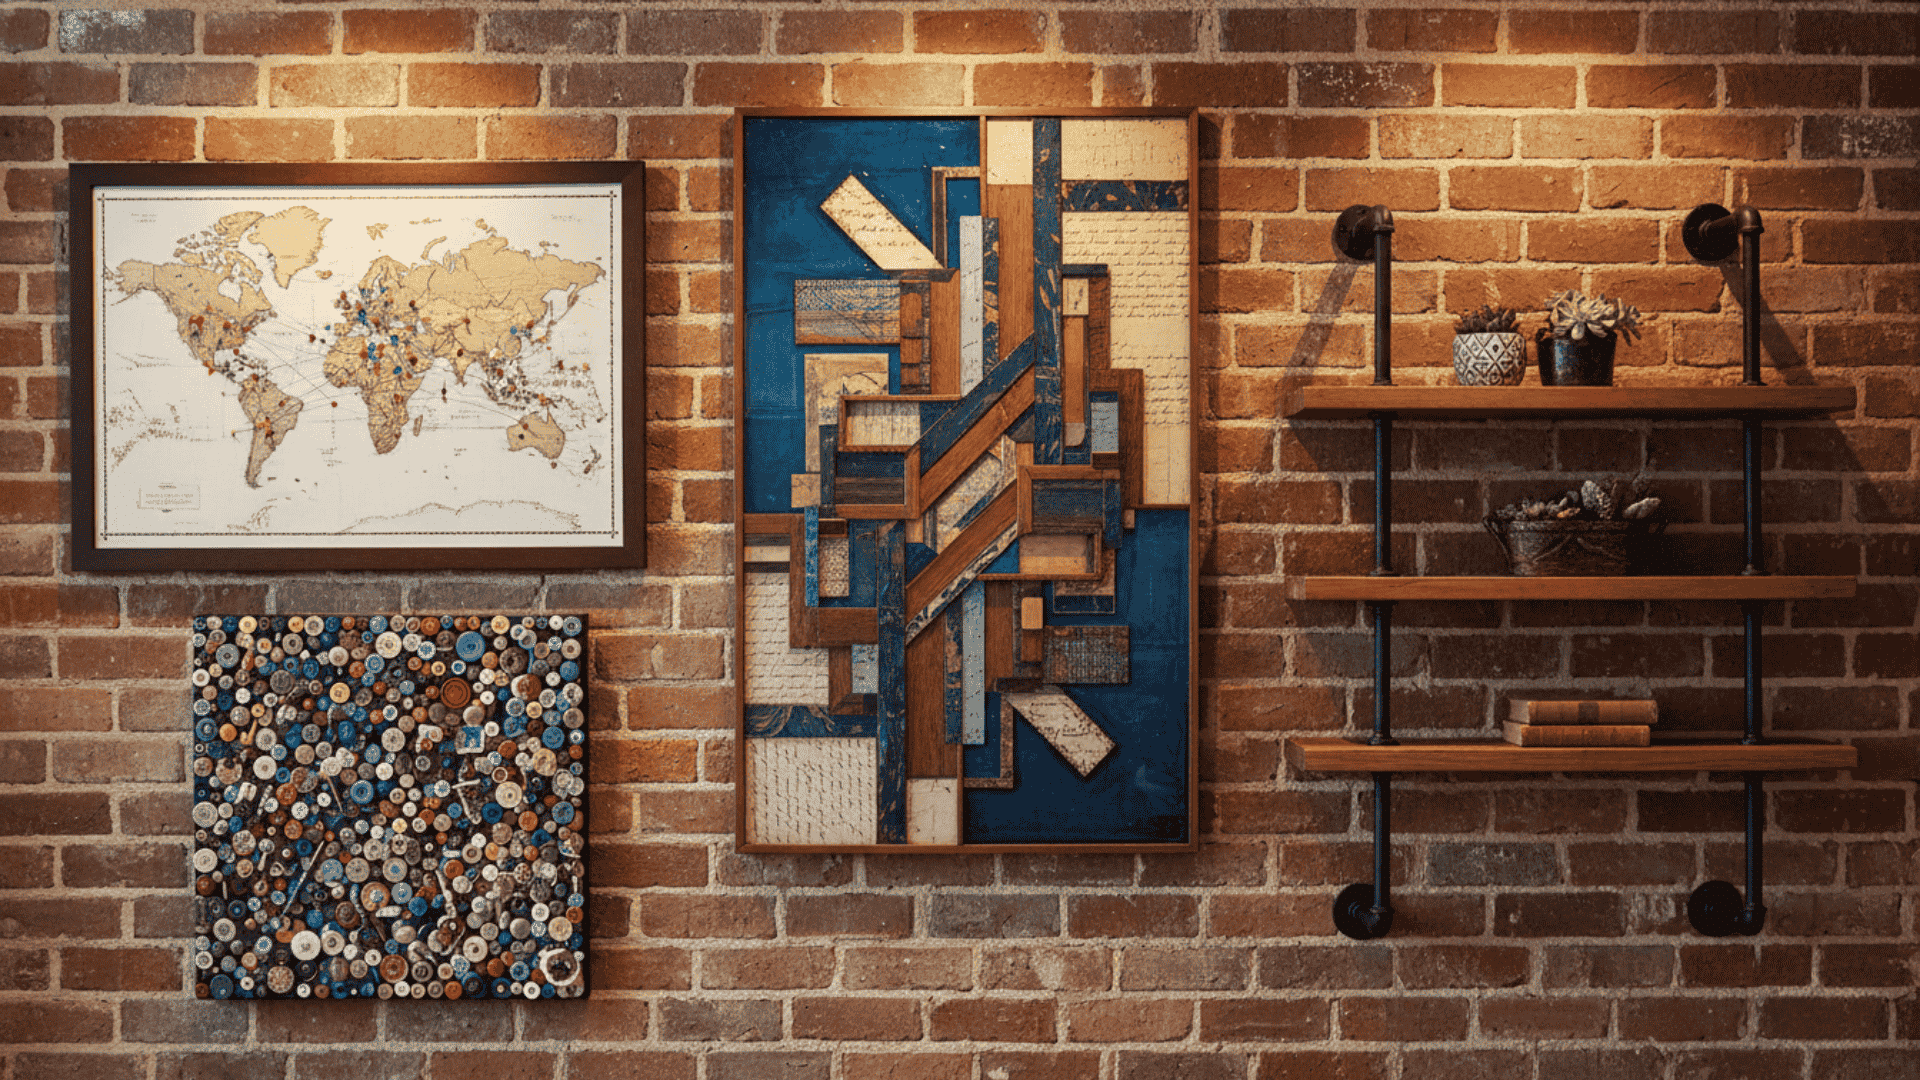
53. Framed Vintage Maps or Travel Pins
Maps mark places you’ve been or want to visit. Pins add an interactive element to the display. This becomes a visual travel journal over time.
How to Make It:
- Frame a vintage or current map in a large frame
- Add pins where you’ve traveled or circle places with a marker
- Update as you visit new places and write dates
54. DIY Canvas with Embedded 3D Objects (Buttons, Beads)
Attaching objects to the canvas creates texture and dimension. Small items add surprise details. This mixed media approach adds physical depth to paintings.
How to Make It:
- Paint the canvas background first and plan where the objects will go
- Attach buttons, beads, or small items with strong glue
- Layer objects for added depth and seal if needed
55. Industrial-Style Wall Hangings with Pipes
Metal pipes arranged on walls look modern and urban. This works well in loft-style spaces. The raw industrial look adds edge to your decor.
How to Make It:
- Plan pipe configuration on paper and assemble pipes with fittings
- Leave natural or spray paint black
- Mount to the wall with pipe flanges as a sculpture or add shelves
56. Collage Wall Art with Personal Photos
Arranged photos tell your life story visually. This makes deeply personal, meaningful art. Every glance at this piece brings back memories.
How to Make It:
- Print favorite photos in various sizes and arrange them on a canvas
- Try overlapping edges for interest and glue with photo adhesive
- Add journaling or dates if wanted, and seal with Mod Podge
Tips for Creating Great DIY Wall Decor
Making your own wall art is fun, but a few smart tips can help your projects look even better. Follow these simple guidelines to get professional results.
- Plan Your Space: Measure the wall area before you start to make sure your finished piece will fit perfectly.
- Use Layers: Adding different textures and layers creates depth that makes flat art look more interesting.
- Choose a Consistent Theme: Stick to one style or color scheme, so all your pieces work well together.
- Test Layouts Before Hanging: Arrange your art on the floor first to find the best layout without putting holes in the walls.
- Keep It Simple: Clean, minimal designs often make a stronger statement than overly complicated ones.
- Frames Add Polish: A simple frame can make even basic DIY art look finished and professional.
The Bottom Line
Your walls are waiting for a personal touch. DIY wall decor saves money, lets you express yourself, and gives you that satisfying feeling of making something with your own hands.
You don’t need to be an artist or spend hundreds of dollars. Start with the materials you have at home.
Pick one simple project from this list and try it this weekend. The beauty of homemade art is that it reflects who you are, not what a store tells you to buy.
Ready to get started? Grab some supplies and choose your first project. Share your creations in the comments below. We’d love to see what you make and hear which ideas worked best for your space.