Looking for a fun, budget-friendly way to add sparkle to your holiday decor? You’ve come to the right place!
Those plain plastic cups sitting in your kitchen cabinet are hidden gems waiting to be changed into gorgeous ornaments. You likely already have most of the necessary supplies at home.
This isn’t about complicated crafting techniques or expensive materials. We’re talking simple, satisfying DIY magic that anyone can master.
Ready to turn trash into treasure? Let’s take the plunge and make something beautiful together.
Why Plastic Cup Ornaments are the Ideal DIY Hack?
Plastic cup ornaments are pure genius. Seriously. They’re inexpensive, easy to find, and can be changed into something extraordinary with minimal effort.
That’s way cheaper than buying fancy decorations at the store. Plus, they’re practically indestructible. Drop a glass ornament? It’s gone. Drop a plastic cup ornament? It bounces. Perfect for homes with kids or pets. The versatility is incredible, too.
Paint them, wrap them in ribbon, fill them with lights, or cover them in glitter. Each technique creates an entirely different look.
And here’s the kicker: they’re so lightweight that even your flimsiest branches can hold them: no more sagging tree limbs or broken ornament hooks.
Materials You’ll Need to Get Started
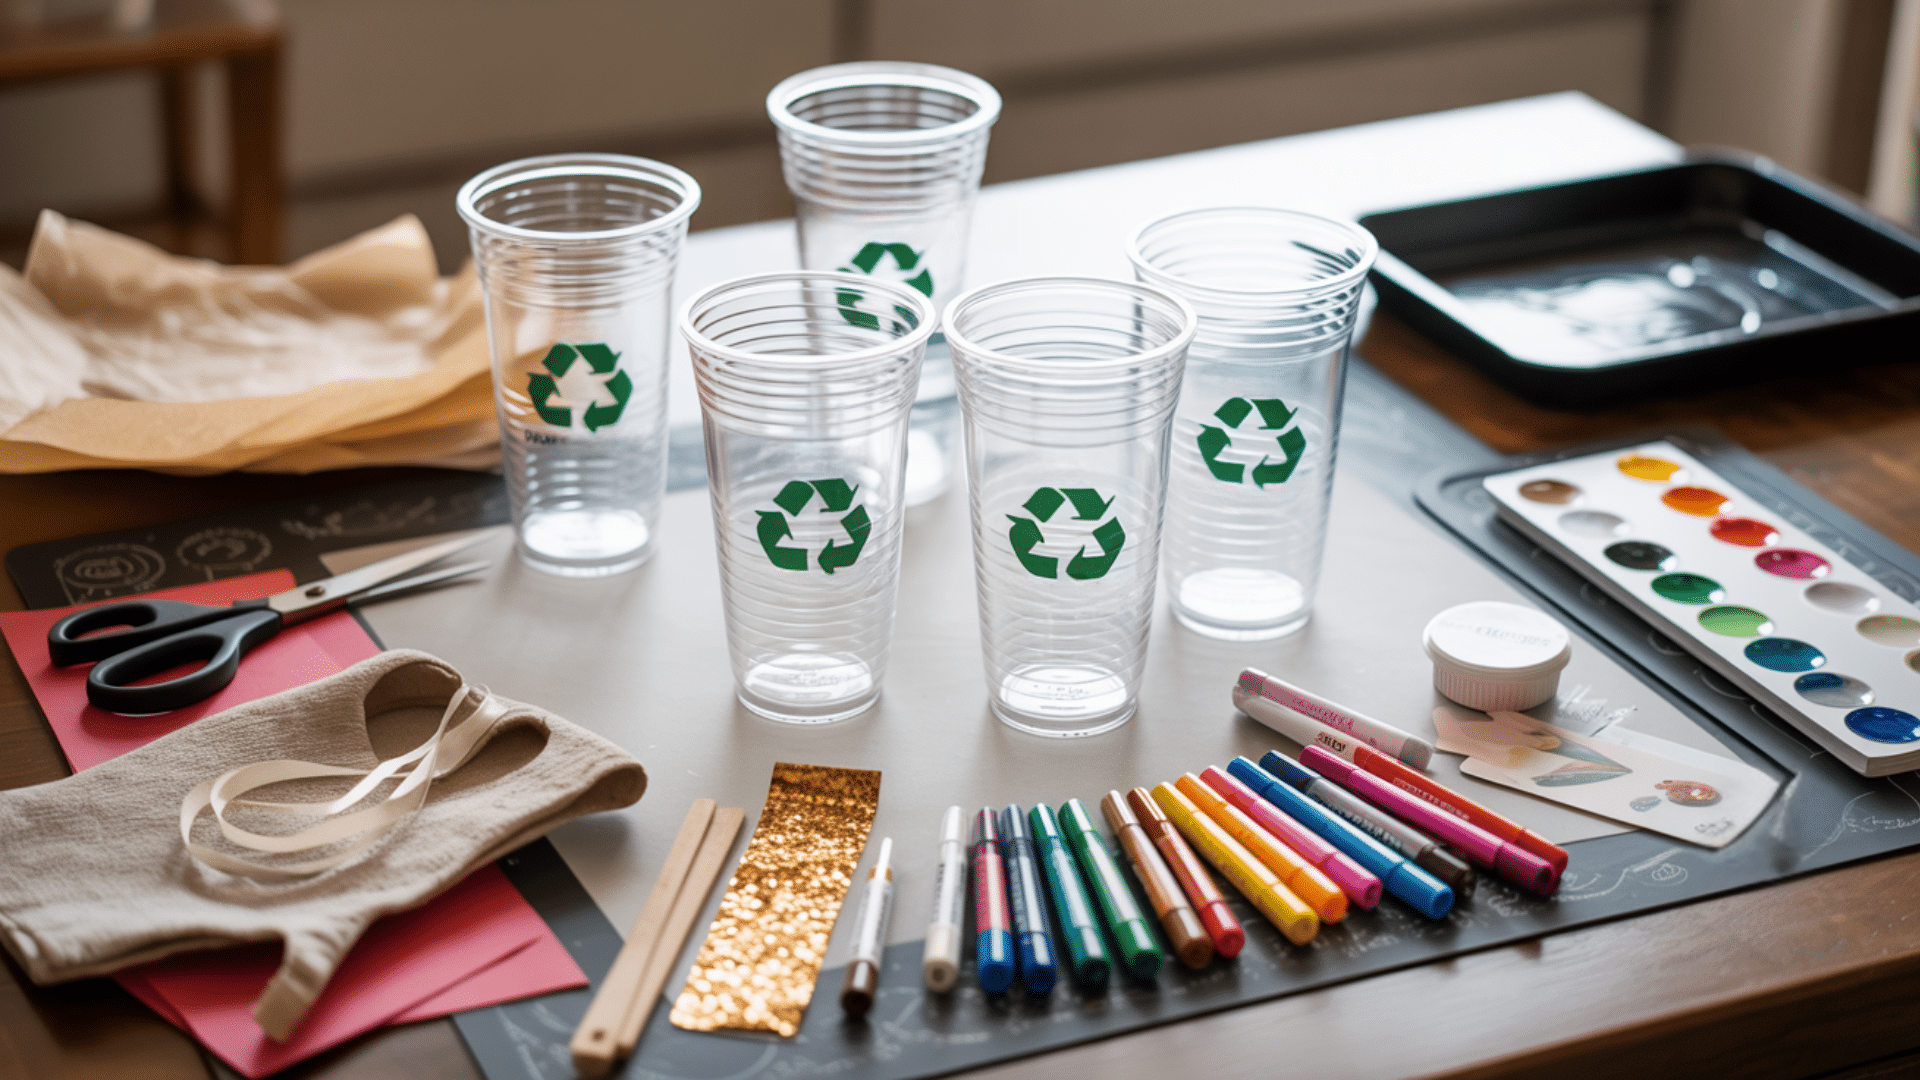
Getting started is incredibly simple; you likely already have most of these supplies on hand. The beauty of this craft lies in how basic the materials are, yet the results appear anything but basic.
Basic Supplies
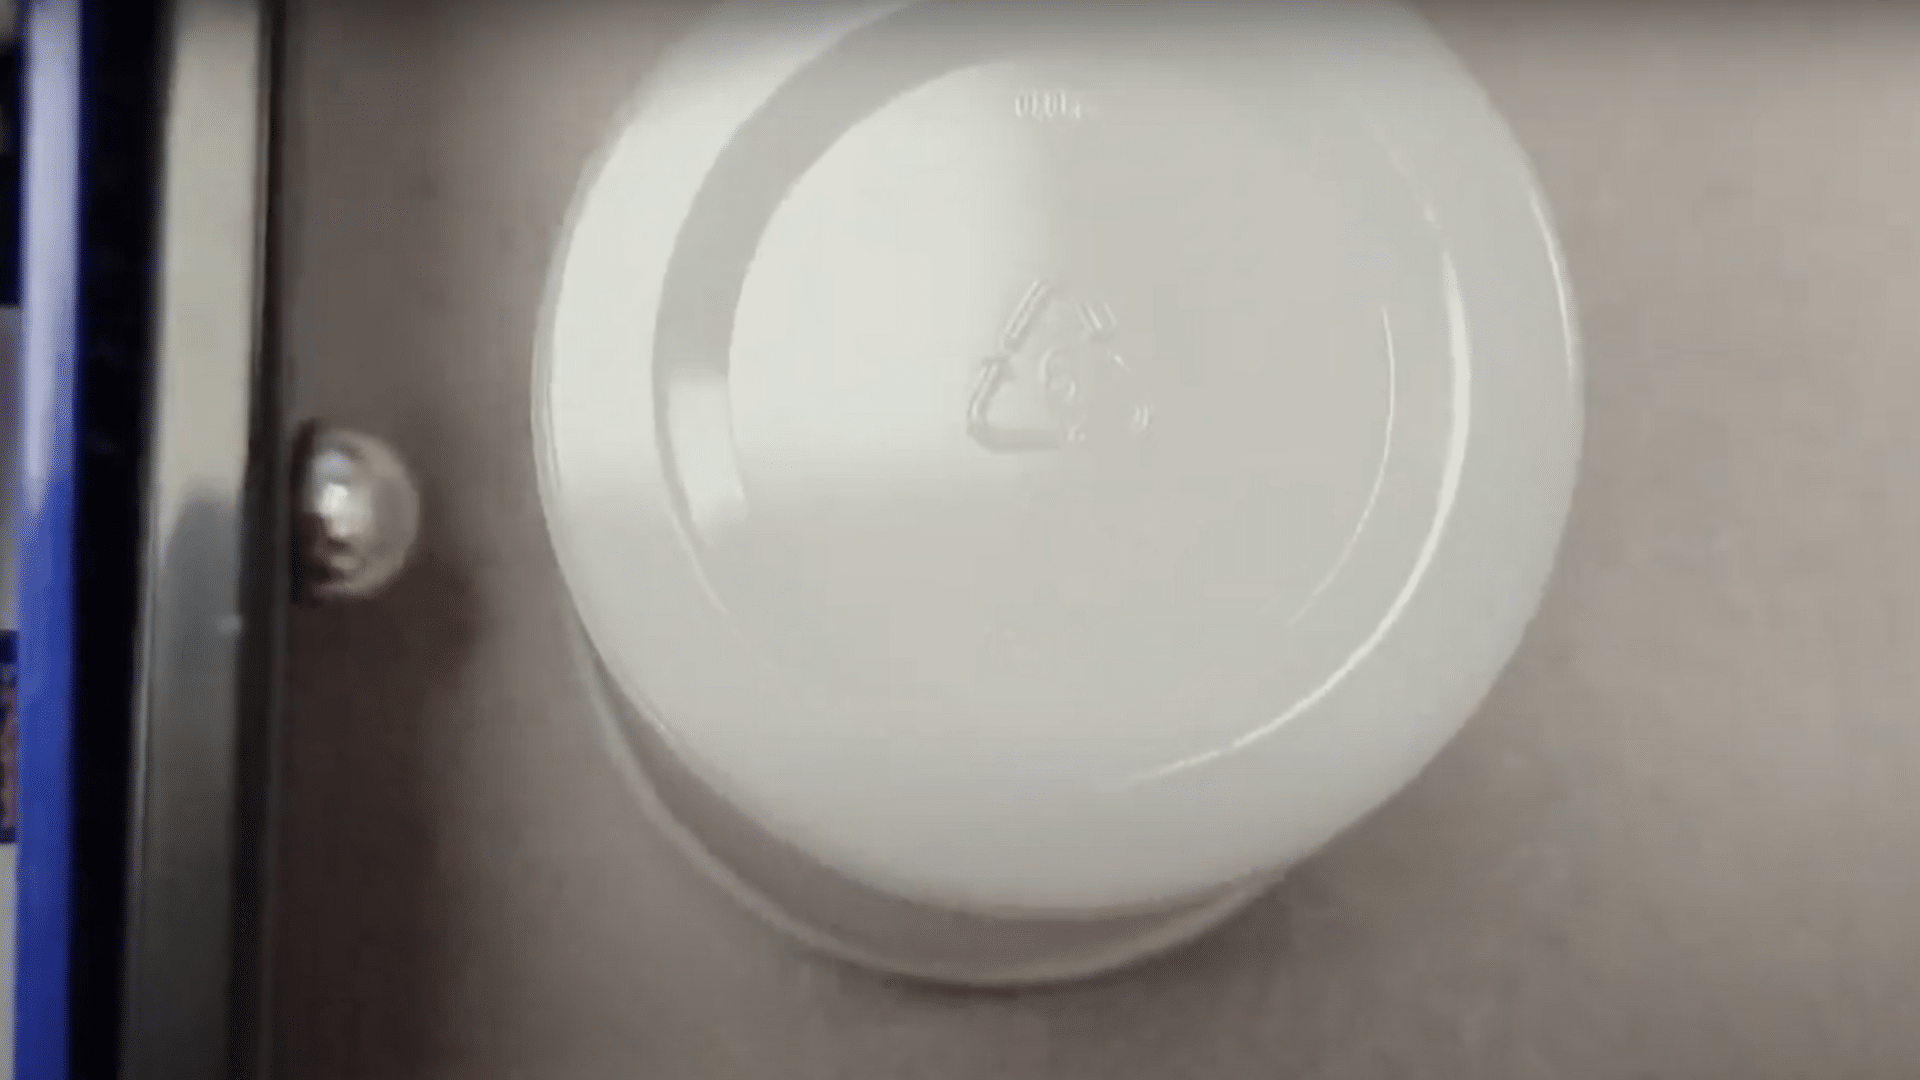
- Plastic cups (#6 plastic only)
- Permanent markers or acrylic paint
- Hole punch
- Baking tray
- Oven
- Tongs or heat-safe gloves
- Parchment paper or silicone mat
Optional Decorative Add-ons
- Glitter or rhinestones
- Ribbons, yarn, or hooks
- Stickers, puffy paint, or googly eyes
How to Make Plastic Cup Ornaments
Creating your plastic cup ornaments is easy, fun, and full of creative possibilities. Follow these simple steps to change plain cups into colorful, one-of-a-kind decorations you’ll be proud to hang or gift.
Step 1: Gather Your Materials
Start by collecting six plastic cups and colorful Sharpie markers. Let kids freely draw their favorite designs on the cups, but remind them that the artwork will shrink and flatten when heated.
This freedom sparks creativity and adds a personalized touch to each ornament, making the decorating process just as fun as the final reveal.
Step 2: Decorate the Cups
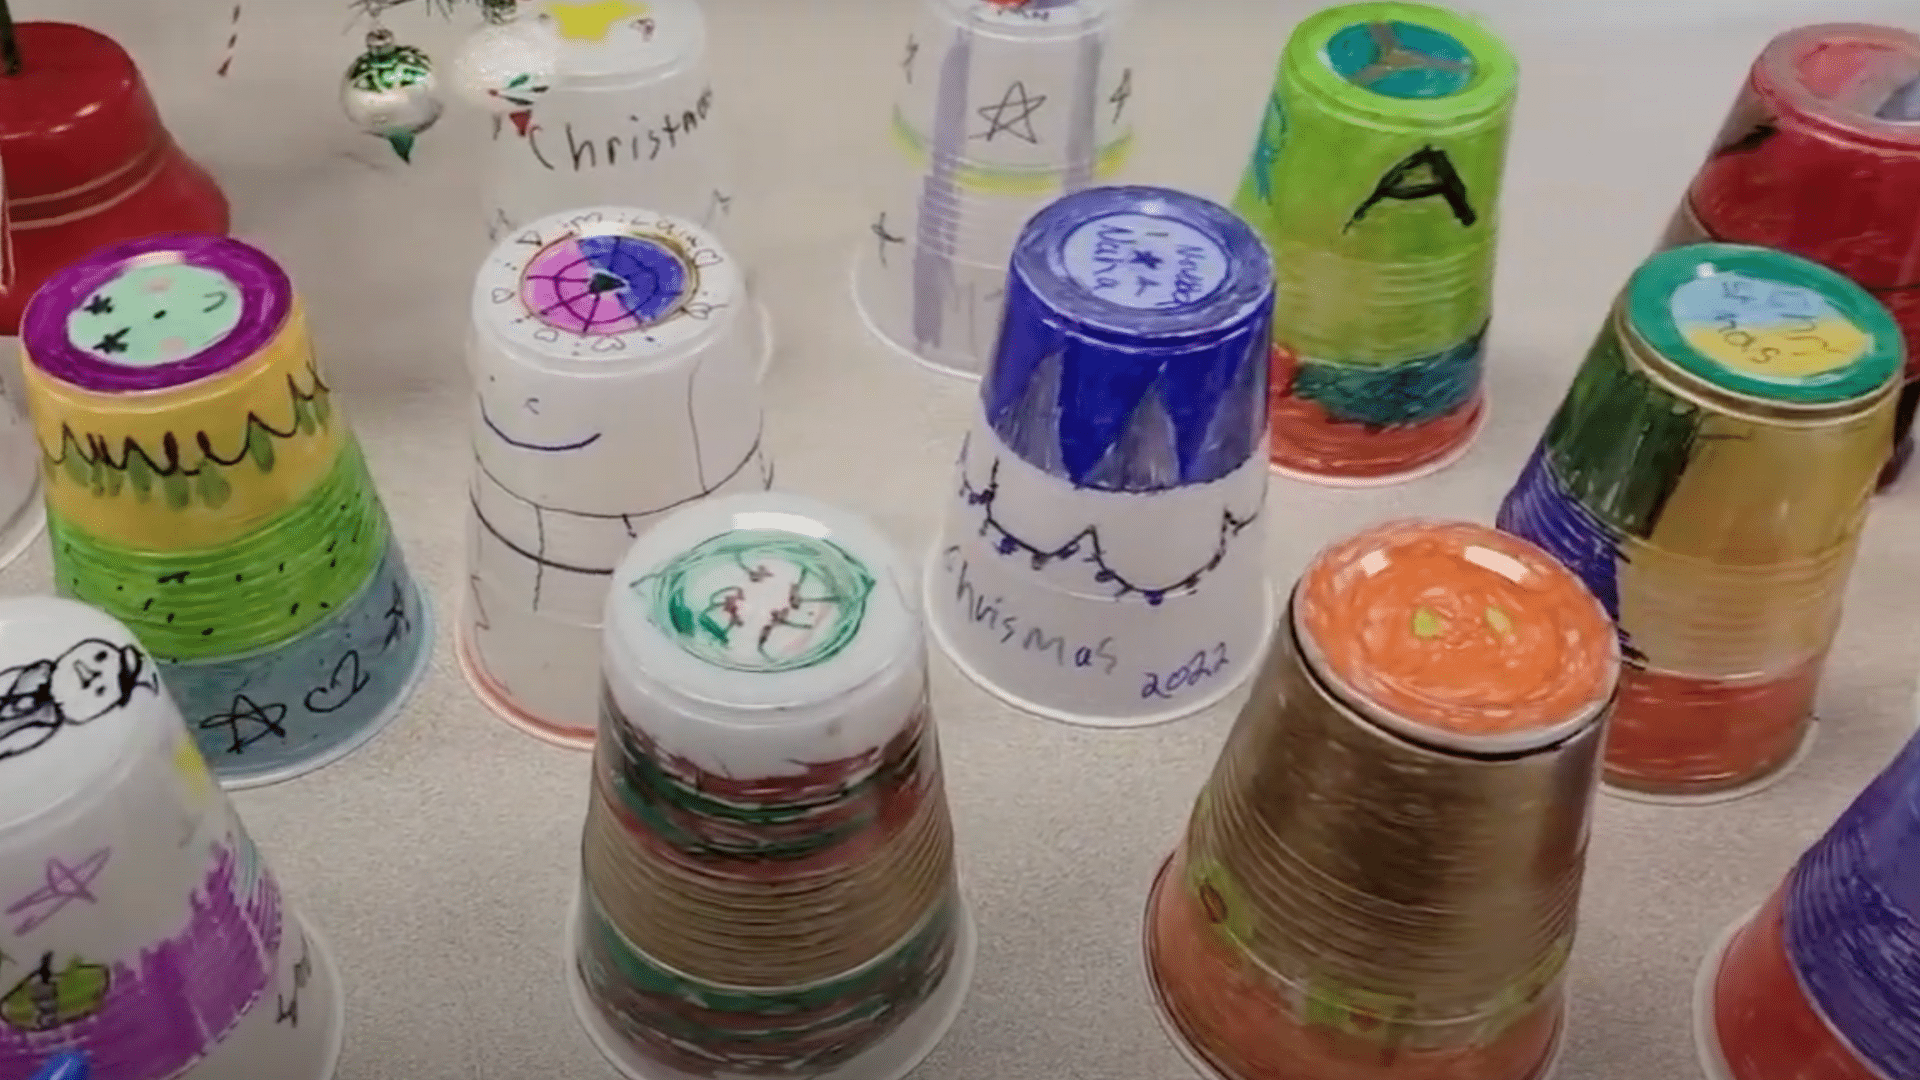
Let children unleash their imagination using Sharpies to cover the cups in patterns, doodles, or festive themes. Since the shrinking process condenses the artwork, bold colors, and clear shapes show up best.
This is the perfect time for storytelling and letting their personalities shine through their designs, ensuring no two ornaments are ever alike.
Step 3: Melt in the Oven
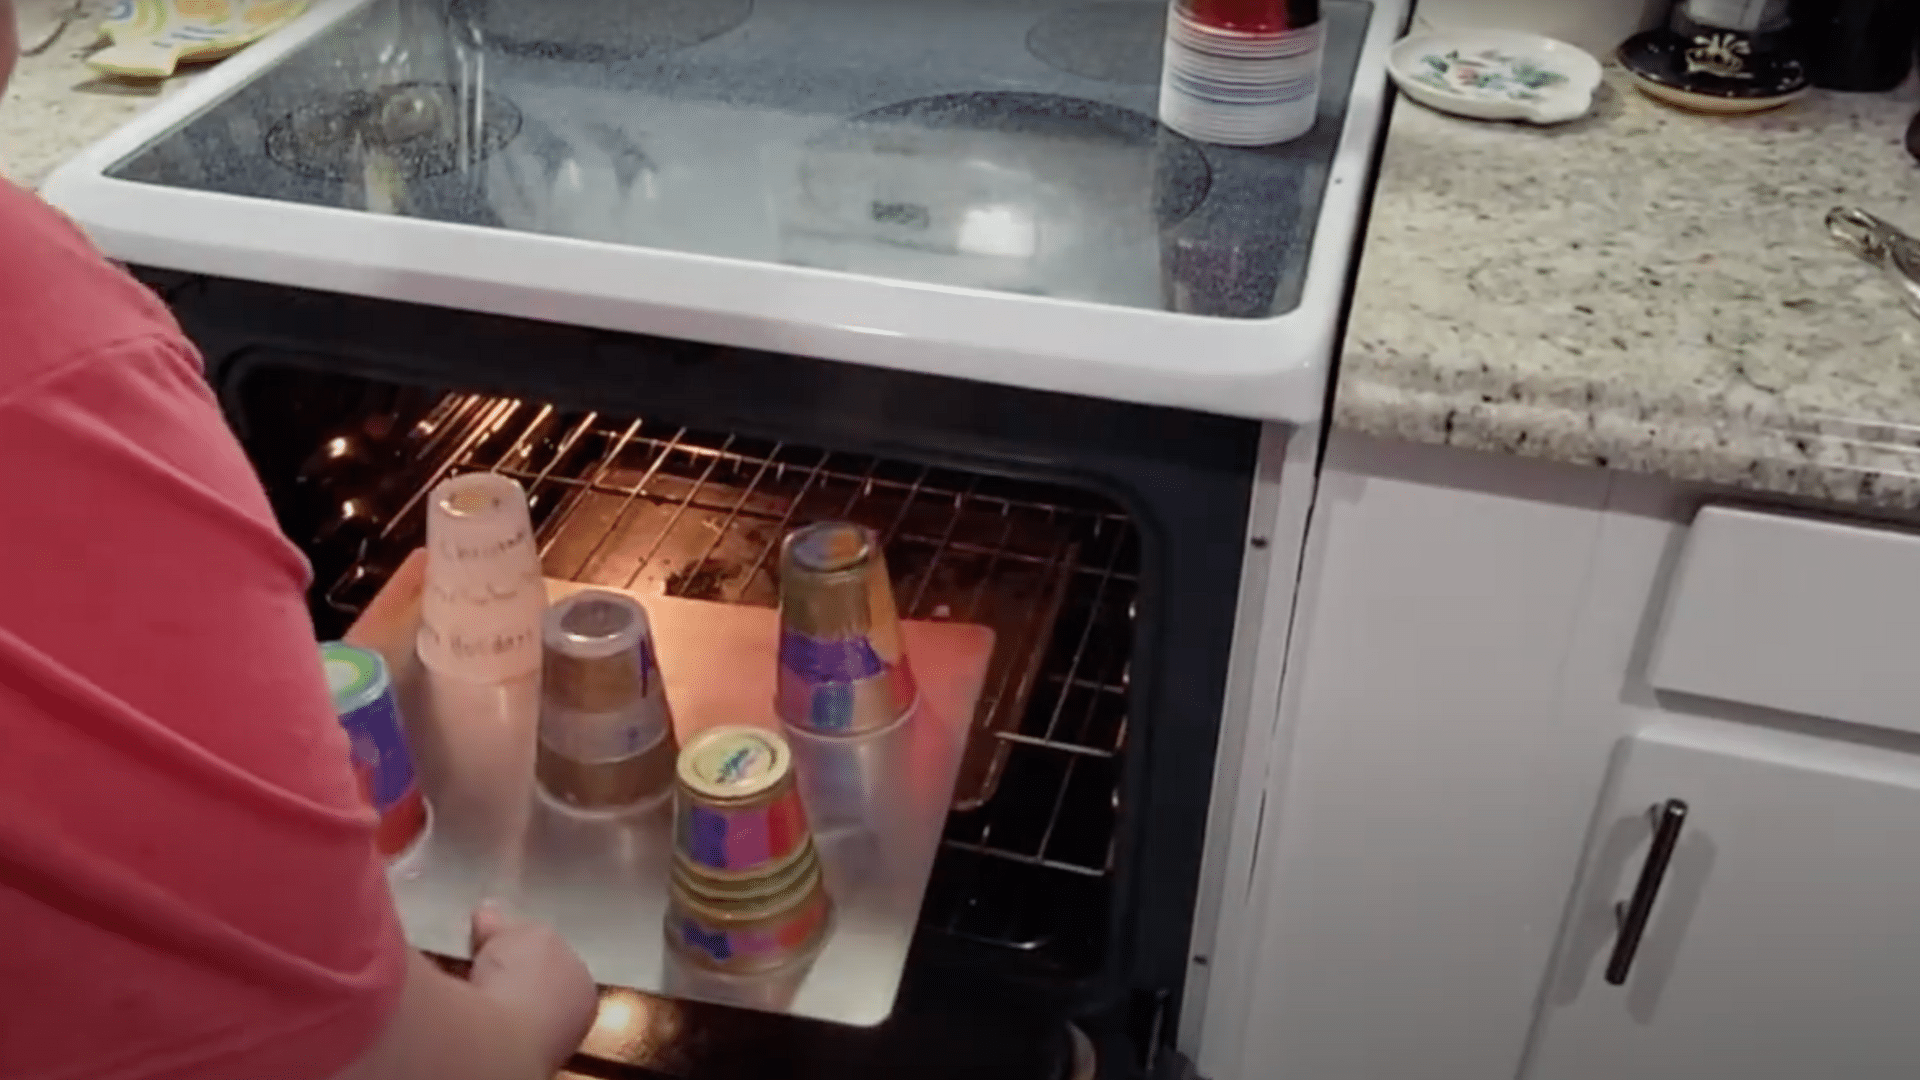
Preheat your oven’s broiler and place the cups upright on a cookie tray. Use proper ventilation, as melting plastic may release toxic fumes. Carefully watch as they shrink within 10–20 seconds.
If a cup tips, reposition it with tongs. They flatten quickly into rings and layers, creating a stunning transformation that your kids will be thrilled to see.
Step 4: Cool and Punch a Hole
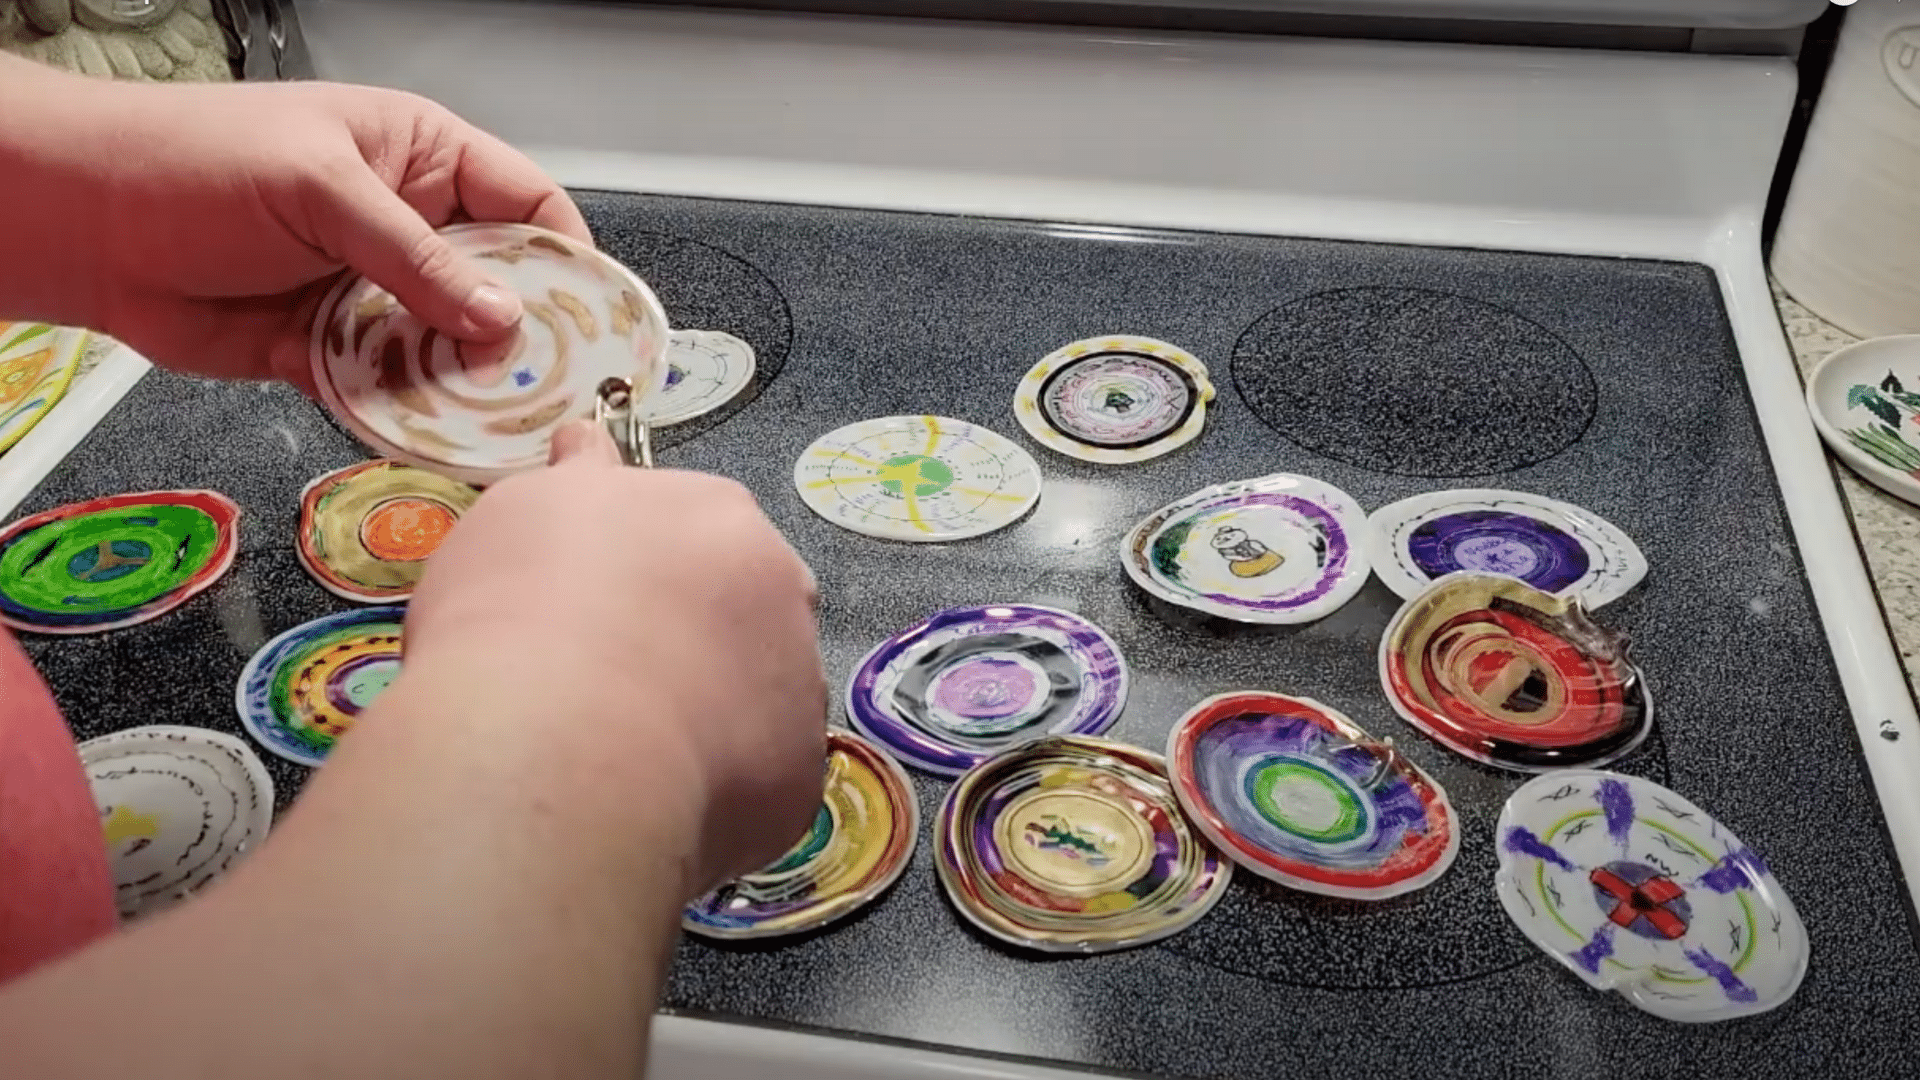
Once melted and flattened, immediately remove the ornaments from the tray to cool. Use a hole punch to make a small hole near the top.
Since the plastic is now firm, it may require some twisting and effort. This hole will be used to thread ribbon or twine, turning it into a hangable ornament.
Step 5: Add Ribbon and Display
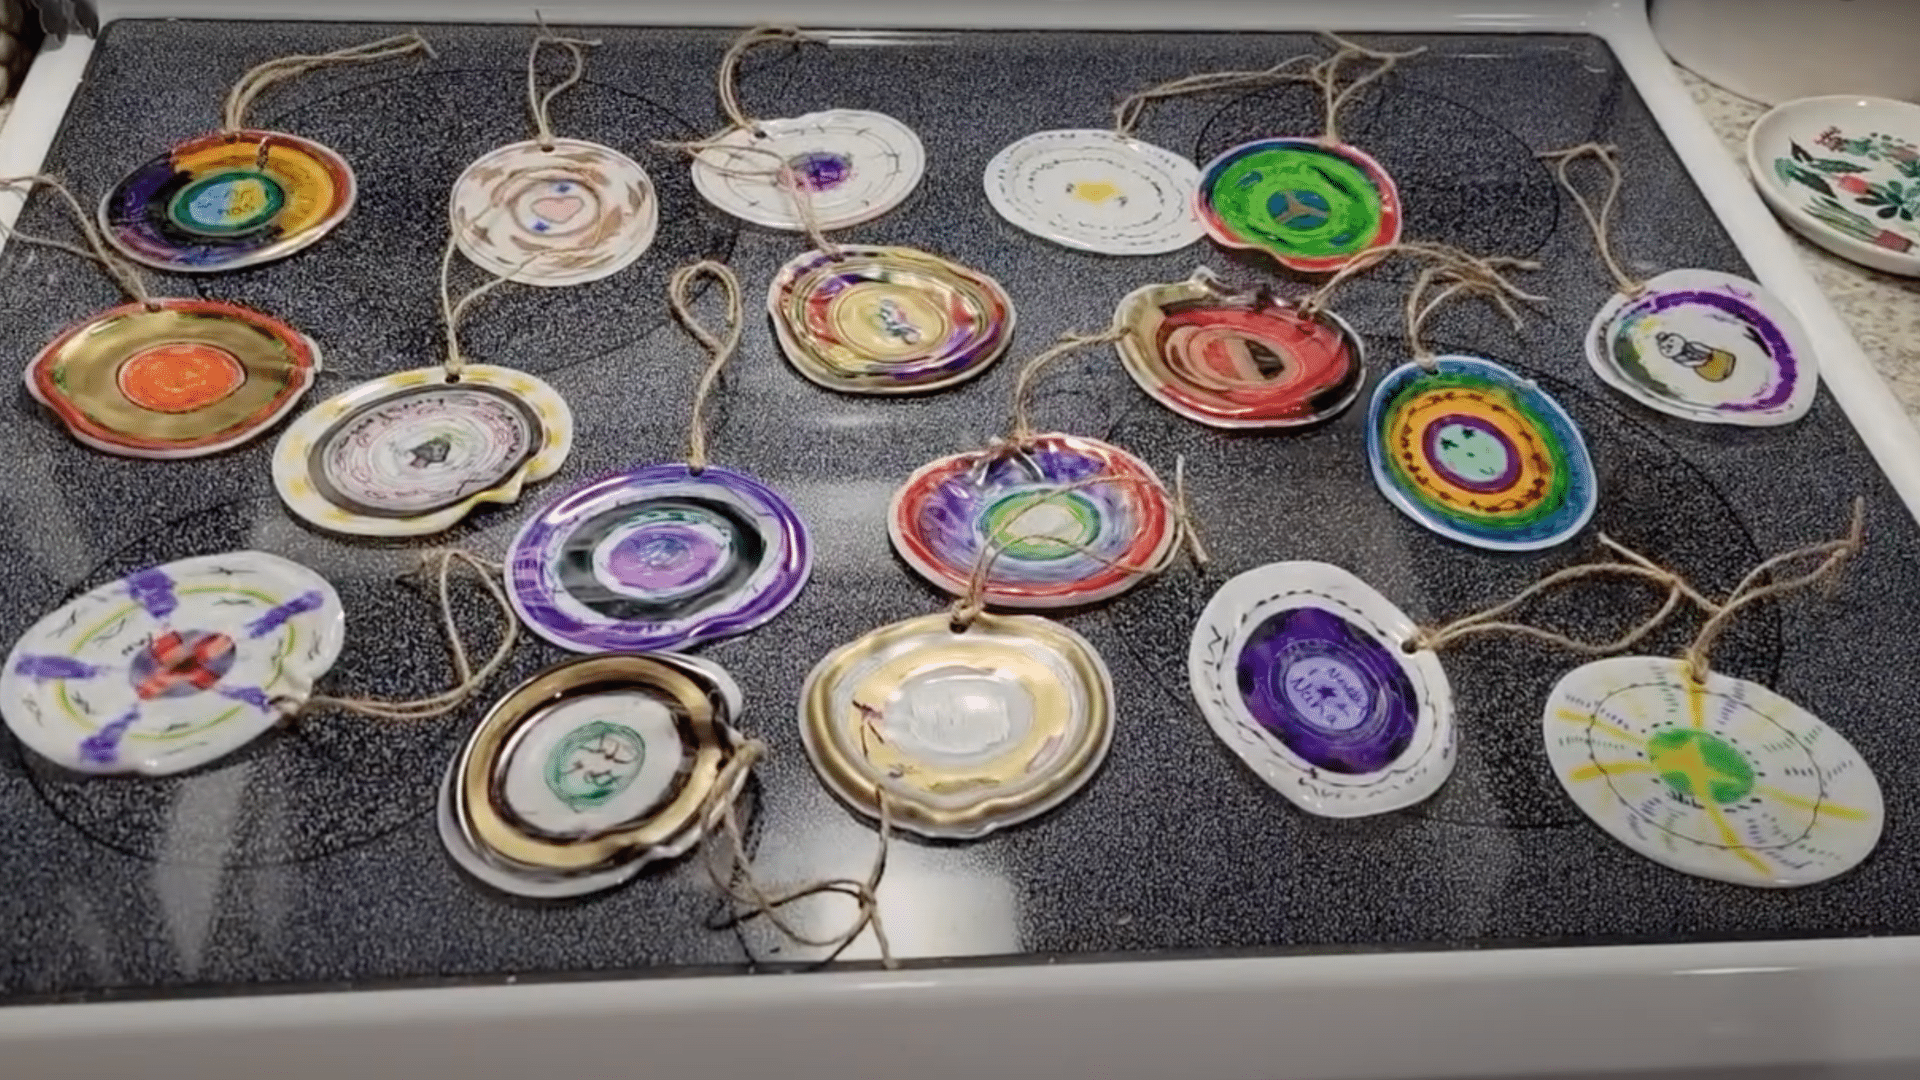
Thread a piece of yarn, ribbon, or twine through the punched hole. Tie a loop with a secure double knot, or use a slip knot for more effortless hanging.
These charming creations can be used to decorate Christmas trees, wreaths, or door handles. Kids will feel proud displaying their handmade ornaments or gifting them to loved ones.
For more details on DIYing plastic cups ornaments, check out the video given below:
Creative Twist Ideas to Make Your Ornaments Stand Out
Ready to take your plastic cup ornaments to the next level? These techniques will have people asking where you bought them.
1. Faux Stained Glass Look
Create bold geometric patterns using black outlines and translucent colors. When shrunk, the contrast pops beautifully. Perfect for window displays or gifting as suncatchers.
- Best Materials: Translucent markers, black permanent markers, plastic cups
- Creative Twist: Use glow-in-the-dark gel pens for a nighttime sparkle
2. Melted Petal Flowers
Cut and curl your cups into petal shapes before melting. The heat transforms them into natural-looking, light-catching blooms. Great for garlands or floral wall art.
- Best Materials: Number 6 cups, scissors, tweezers
- Creative Twist: Layer multiple flowers together for a 3D effect
3. Personalized Name Ornaments
Kids write their names in big, colorful letters across cups. Once shrunk, they make awesome tags or keepsakes; perfect for classrooms, stockings, or holiday tables.
- Best Materials: Sharpies in various colors, plastic cups
- Creative Twist: Add birth year or initials in metallic ink
4. Festive Characters and Icons
Design classic holiday characters, such as Santa, reindeer, or snowmen, on cups. Bold lines and simple shapes work best, shrinking into mini masterpieces full of cheer.
- Best Materials: Red, green, black, and white markers
- Creative Twist: Add googly eyes or mini pom-poms after baking
5. Jewelry Projects
Shrink designs into lightweight charms for earrings, pendants, or pins. Add jump rings or pin backs to complete them. These make great custom gifts or wearable art pieces for any age.
- Best Materials: Jewelry findings, pliers, strong glue
- Creative Twist: Use metallic Sharpies or glitter accents for extra sparkle
6. Keychains and Backpack Tags
Turn designs into keychains by attaching metal rings. Personalize with initials, pets, or fun icons. These durable tags add flair to backpacks, lunch boxes, or pencil pouches.
- Best Materials: Keyrings, hole punch, sturdy string or chain
- Creative Twist: Use glow markers for a tag that stands out in the dark
7. Mixed Media Art or Shadowboxes
Incorporate shrunken ornaments into layered art. Combine with fabric, paper, or small keepsakes for a unique collage or shadowbox with light-catching colors and rich texture.
- Best Materials: Shadowbox frame, mixed media glue, background paper
- Creative Twist: Theme your box (e.g., seasons, memories, nature) for a storytelling effect
Safety Tips while Making Plastic Cup Ornaments
Working with melted plastic is straightforward, but a few precautions go a long way. Keep these basics in mind, and you’ll craft safely every time.
- Always use polystyrene (#6) cups only: Other plastics can release toxic fumes or melt unpredictably.
- Keep temperatures low: Never exceed 250°F in your oven, as this can lead to dangerous fumes.
- Ensure good ventilation: Open windows and use fans to keep air moving.
- Use tongs or oven mittens: Hot plastic can cause severe burns.
- Keep kids at a safe distance: They can watch and help with decorating, but adults handle all heating.
- Work on parchment paper: Prevents sticking and makes cleanup easier.
- Let the pieces cool completely: Hot plastic remains moldable and can cause burns.
Wrapping Up
There you have it, plastic cup ornaments that’ll make your friends wonder where you learned to be so crafty. From simple shrink ornaments to stunning stained glass effects, you’ve got a whole toolkit of techniques now.
You can make these anytime inspiration strikes.
So grab those cups, fire up the oven, and start creating. Your holiday decorations just got a significant upgrade, and your wallet will thank you. Sometimes, the most amazing crafts come from the most ordinary materials.
Happy crafting!